Friday, December 30, 2022

Fitting Florets Suite - Framed Florets Bundle - Beautiful Flowers with Quick & Easy Cardmaking Tips

Hello my crafting friends,

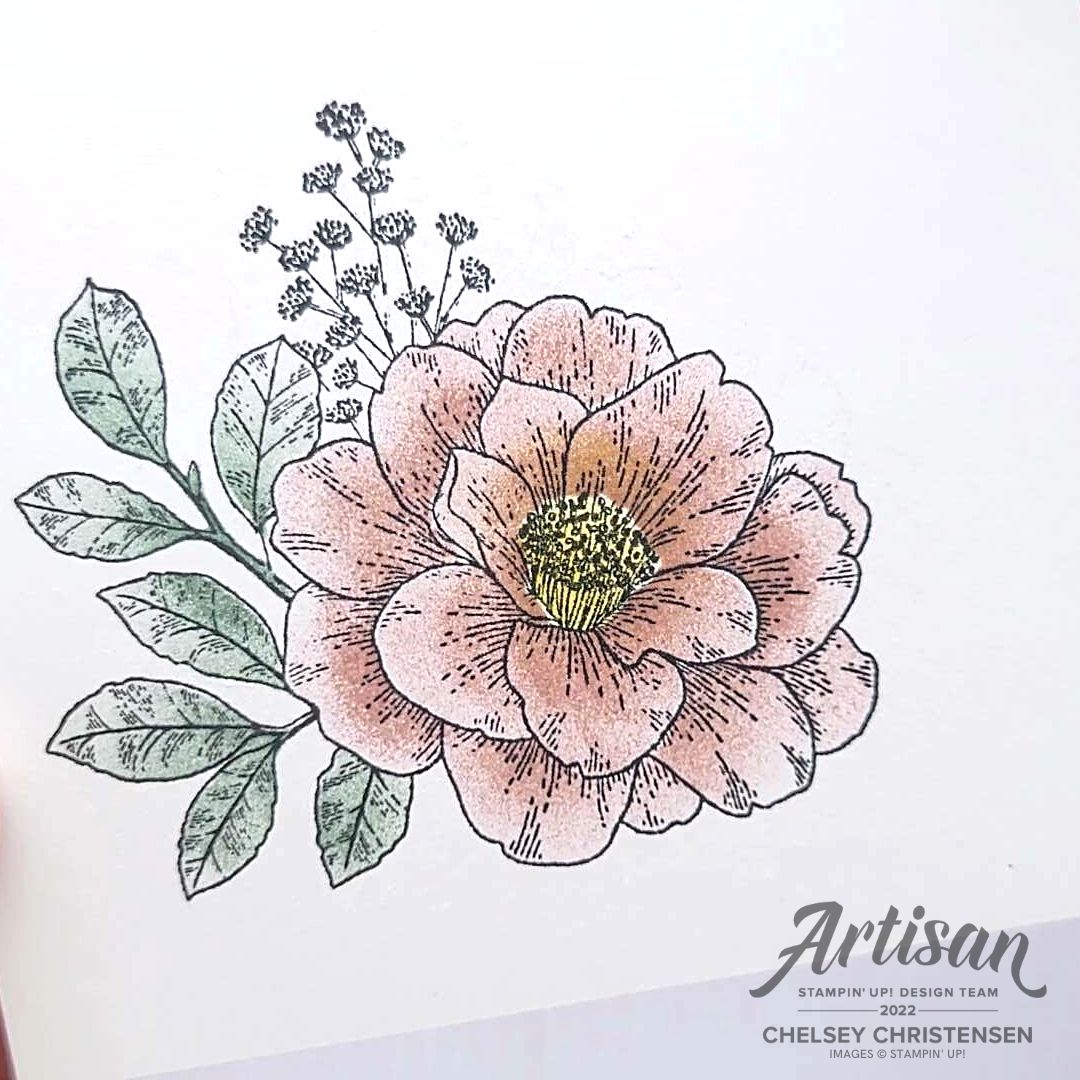
Today I am excited to share with you another card I created for Stampin’ Up as part of their Artisan Design Team. The products are from the Fitting Florets Collection. I shared my first card that I made for this assignment earlier on my blog - if you missed it you can jump over there with this link - http://creativechelsey.blogspot.com/2022/12/christmas-fitting-florets-designer.html


There are some beautiful products in this collection and I share all of them in that first video. Today I am focusing on the Framed Florets Bundle (Stamp Set & Die). To purchase any of these products you see me use today, please visit my online store. The link is below in the description.


Today’s card uses colored cardstock to make bold flowers that pop against the white cardbase. I have lot of tips to share for these flowers, so make sure to see all of them by watching to the end of the video.


See my Customer Appreciation Products for this month: http://creativechelsey.blogspot.com/p/shop-stampin-up-products.html

Follow me on Instagram https://www.instagram.com/creativechelsey

Or join my Facebook group https://www.facebook.com/groups/2221750878097906


Be sure to check out the rest of the team’s wonderful creations on the Stampin’ Up! Corporate Facebook Page at -  http://www.facebook.com/stampinup

For more inspiration, tips & tricks from the 2022 Artisan Design Team also check out Stampin’ Up! on Instagram – https://www.instagram.com/stampinupofficial


To purchase any of the products you need to create this project visit

https://www.stampinup.com?demoid=2042902

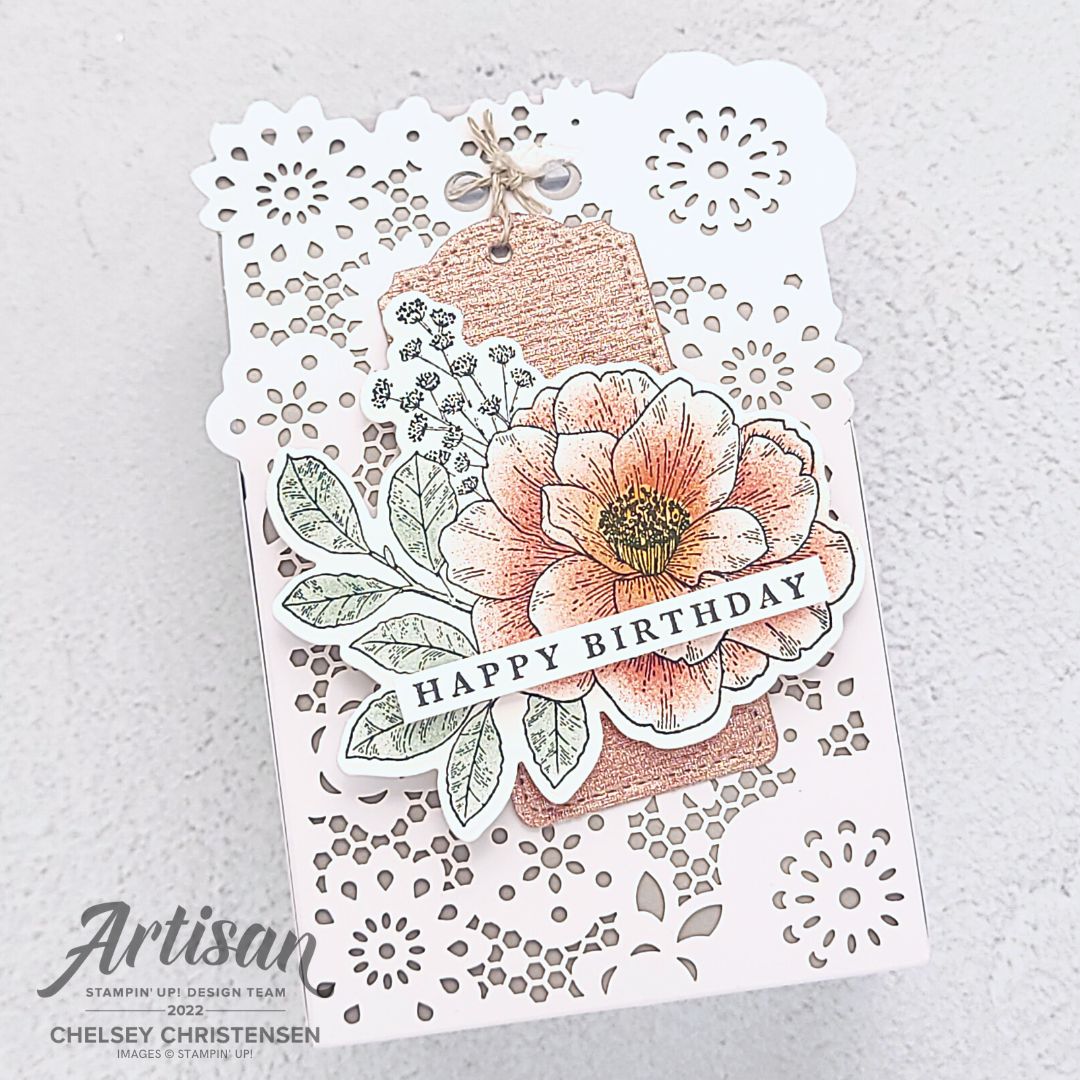
Here are the dimensions and pieces you will need to create this card:

Thick Basic White Cardbase – 5 ½” x 8 ½” scored at 4 ¼”

Basic White Cardstock – 4” x 4” | 4” x 5 ¼”

Flirty Flamingo Cardstock – scraps for stamping

Granny Apple Green Cardstock – scraps for stamping

Pool Party Cardstock – scraps for stamping

So Saffron Cardstock – scraps for stamping 

Product List


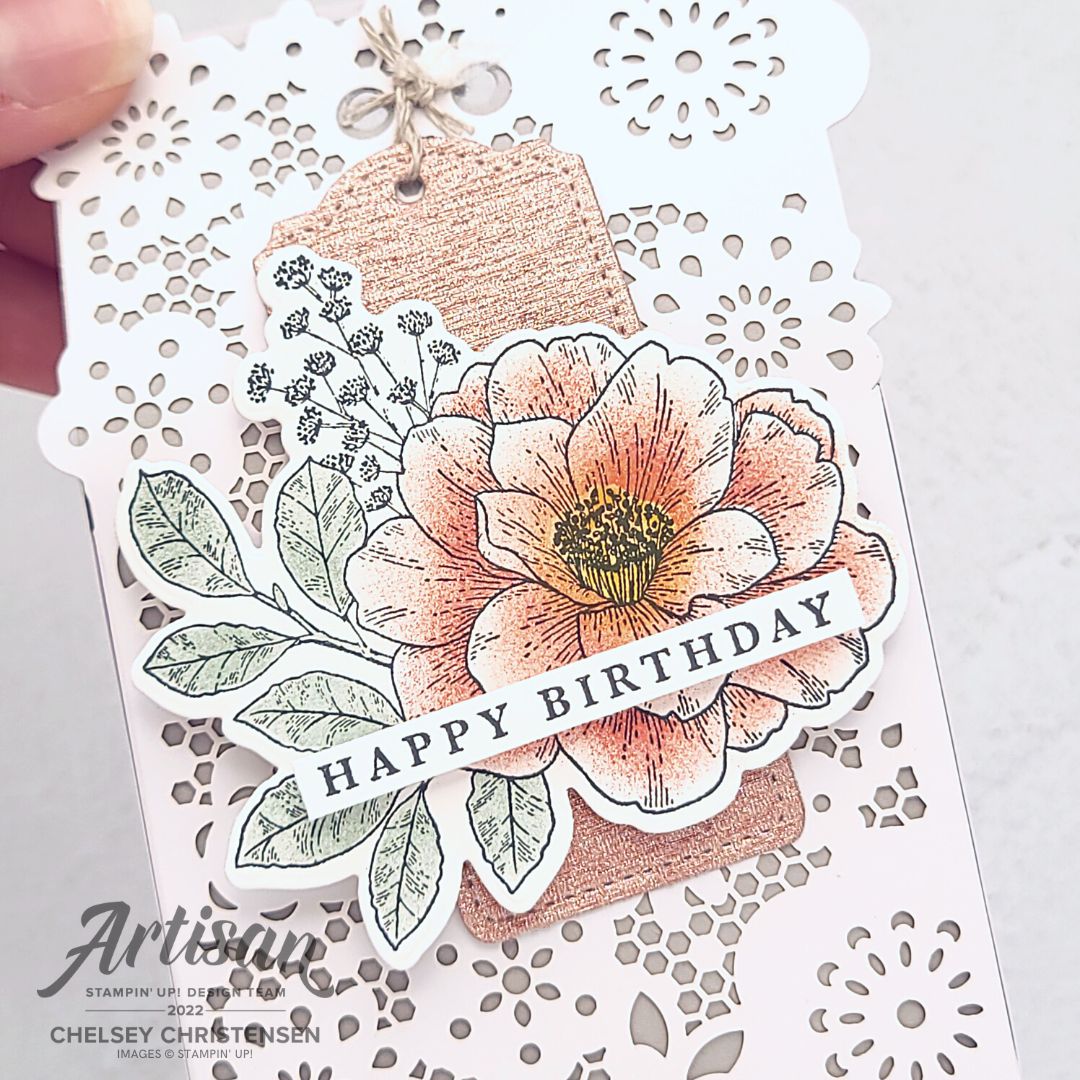
1- Begin by stamping the flowers on colored cardstock. I stamped three of the four floral images in Memento Black ink on three colors of cardstock, Flirty Flamingo, Pool Party, and So Saffron. Cut out with coordinating dies.

Tip: To make your images nice and dark use your Stamparatus and stamp multiple times.


2- Stamp leaves on Granny Apple Green in Memento Black Ink. I used 3 large and 3 small leaves. Cut out with coordinating dies.

Tip: To make cutting out fast & easy if your stamps are in the same position on each piece of cardstock, you can create a template. See video below for details.


3- Use coordinating Stampin’ Blend Markers and add a little color to each flower & leaves. Leave and leaves & branches that are not on the Granny Apple Green cardstock untouched.


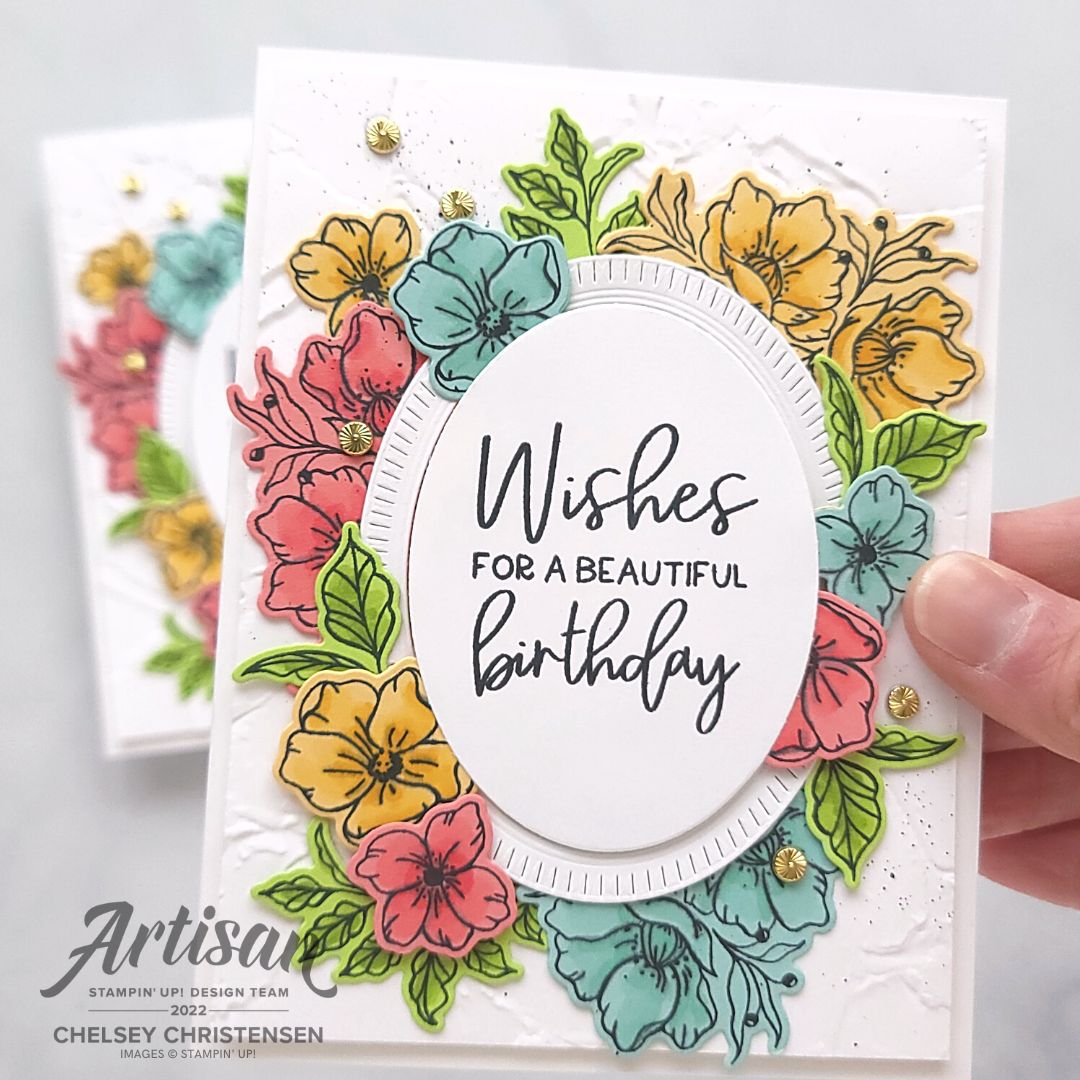
4- Stamp your greeting in the center of the Basic White piece of cardstock in Memento Black ink. Cut it out with the oval from the Framed Florets Dies. Save both pieces.


5- Emboss the 4” x 5 ¼” piece of white cardstock with the Painted Texture Embossing Folder. Add this to the front of the cardbase.

6- Add the three large flowers on the cardbase in a triangular shape. Add two or three of the larger leaves near the flowers. Add a little splatter with the Black Stampin’ Write Marker.


7- Layer the frame of the oval in the center of the cardbase over the flowers. Add the greeting to the center with dimensionals.


8- Add the other flowers and leaves tuck in and around the oval. Use dimensionals as you want. Add 3-5 gold embellishments. I used the Gold Swirls, which are no longer available to purchase. Hopefully you were able to get a pack before they sold out.

All Done!


If you would like to watch me create this cards with step by step tips and directions please watch this video:

If you need any product to make these cards, please visit my online store: http://www.stampinup.com?demoid=2042902


Have a creative day,

Chelsey

chelsey@creativechelsey.com


Wednesday, December 28, 2022

Abigail Rose Product Suite - Add Depth To Your Images With Sponge Daubers & Masking - June 2022 Artisan Showcase

Hello my crafting friends,

Today I am excited to share with you my June 2022 Artisan Design Team Project. I was asked to use the Abigail Rose Product Suite from Stampin’ Up!, Cottage Rose Bundle (Cottage Rose Stamp Set & Cottage Flowers Dies), The Abigail Rose Designer Series Paper, and the Natural Finish ribbon. These products are in 2022-2023 Annual Catalog & Online. To purchase any of these products, please visit my online store. The link is below in the description.


Today I have a technique that gives a fun twist on using Sponge Daubers. I like using Sponge Daubers when I want to add soft color to my stamped images. This technique which gives a precise edge to your images giving them a cleaner look, but still the softness from the Sponge Daubers. I can’t wait to share it with you.


See my Customer Appreciation Products for this month: http://creativechelsey.blogspot.com/p/shop-stampin-up-products.html

Follow me on Instagram https://www.instagram.com/creativechelsey

Or join my Facebook group https://www.facebook.com/groups/2221750878097906


Be sure to check out the rest of the team’s wonderful creations on the Stampin’ Up! Corporate Facebook Page at -  http://www.facebook.com/stampinup

For more inspiration, tips & tricks from the 2022 Artisan Design Team also check out Stampin’ Up! on Instagram – https://www.instagram.com/stampinupofficial


To purchase any of the products you need to create this project visit

https://www.stampinup.com?demoid=2042902

Here are the dimensions and pieces you will need to create these cards:

Thick Basic White Cardbases – (2) 5 ½” x 8 ½” scored at 4 ¼”

Abigail Rose Designer Series Paper – (2) 4 ¼” x 5 ½”

Smoky Slate Cardstock – 4 ¼” x 5 ½”

Gold & Rose Gold Specialty Paper – (4) ¾” x 4 ¼”

Basic White Cardstock – scraps for stamping

Product List


How To Color your Flowers:

1- Create your masks. Stamp your flower image two times on Masking Paper. Cut out the petal layers as well as the outside edge.


For the large flower I created a mask for the center, the first layer of petals, the whole flower, the leaves, and the outside edge.


2- Stamp your image in Memento Black in on Basic White Cardstock. Cover the outside edge of the flower and the flower. The leaves should be open. Use either green color, I used Soft Succulent and add color to the leaves. Start with the darkest area and blend to a lighter color around the outside edges.


3- Remove the full flower mask and add the leaf mask. Add the mask for the top layer of petals so only the back petals are open. Add your petal color ink, I used Blushing Bride for the large flower. Start with the darker areas near the center area of each petal and lighten it as it moves to the outside edge of each flower.

4- Remove the top layer of petals and add the mask for the bottom layer of petals are covered. Add the center mask as well. Color in the top layer of petals using the same technique as the bottom layer with Blushing Bride.


5- Add the top layer of petals back over. The center of the flower should be open. Add Crushed Curry in the center. If you need to blend a little with the masks off you can do that too.


6- Carefully remove all masks to reveal your beautiful flower!

TIP: You can save your masks to use with future projects. Just add them to your stamp case.


Repeat these steps for all the flowers you want to use.

Large Flower & Leaf – Blushing Bride, Crushed Curry, Soft Succulent

Medium Flower – Calypso Coral, Crushed Curry | Blushing Bride, Crushed Curry

Small Flowers – So Saffron, Crushed Curry

Leaves – Soft Succulent, Old Olive


Card #1:

1- Add a soft pattern from the Abigail Rose DSP to the front of your cardbase.

2- Cut the Large Group of Flowers & Leaves from Smoky Slate Cardstock.

Cut a detailed edge around the die cut with the Largest Deckled Rectangle Die.

Emboss with the Timeworn Type Embossing Folder.

Add this to your cardbase at a slight angle.


3- Layer one of the Rose Gold strips about 1 ¾” from the bottom of the cardbase.

Take about 5” of ribbon and add tear and tape to the top edge. Remove the paper backing and fold the ribbon down so the top edge sits just above the bottom edge making a skinner ribbon. Add this below the Rose Gold strip. Trim the sides to match the card.


4- Add the largest flower to the left above the Rose Gold strip with dimensionals.


5- Add the other elements around the larger flower with dimensionals.. I place the Calypso Coral Medium flower on the right with one Old Olive Leaf between the two flowers. Add one small So Saffron flower to the left.


6- Stamp your greeting in Memento Black ink and trim it down to fit. Then add it under the flowers with dimensionals.

All Done!


Card #2:

1- Add the DSP to the front of the cardbase.

2- Lay the three ¾” Rose Gold Strips to the center. Start with the center strip in the center of the card. Then add the second strip on top with a small gap and then the third strip on the bottom with the same size gap.


3- Stamp your greeting Memento Black on Basic White Cardstock and cut out with one of the Deckled Rectangle Dies. Choose one that fits your greeting. Add this to the center of the card with dimensionals.

4- Tuck four leaves around the greeting with dimensionals. I used two Soft Succulent and two Old Olive.


5- Add your choice of flowers on top of the leaves. I used the Medium Blushing Bride in the bottom right corner and two So Saffron Small Flowers in the top left corner.


All Done!


Here is also a fun treat bag you can make with the same coloring technique. I used Rose Gold Specialty Paper and cut a tag from the Tailor-Made Tags.

Add the large flower and a greeting.

I did add Smoky Slate Cardstock to the back of the front of the box so you don’t see through it.


If you would like to watch me create these cards with step by step tips and directions please watch this video:


If you need any product to make these cards, please visit my online store: http://www.stampinup.com?demoid=2042902


Have a creative day,

Chelsey

chelsey@creativechelsey.com