
Welcome to Paper Pumpkin Week here at Creative Chelsey. I love getting my Paper Pumpkin Kit every month and creating fun alternative projects using the supplies in the kit. Today I am sharing my fourth and last alternative idea using the March 2023 Paper Pumpkin Kit called Ten Years Of Growth.

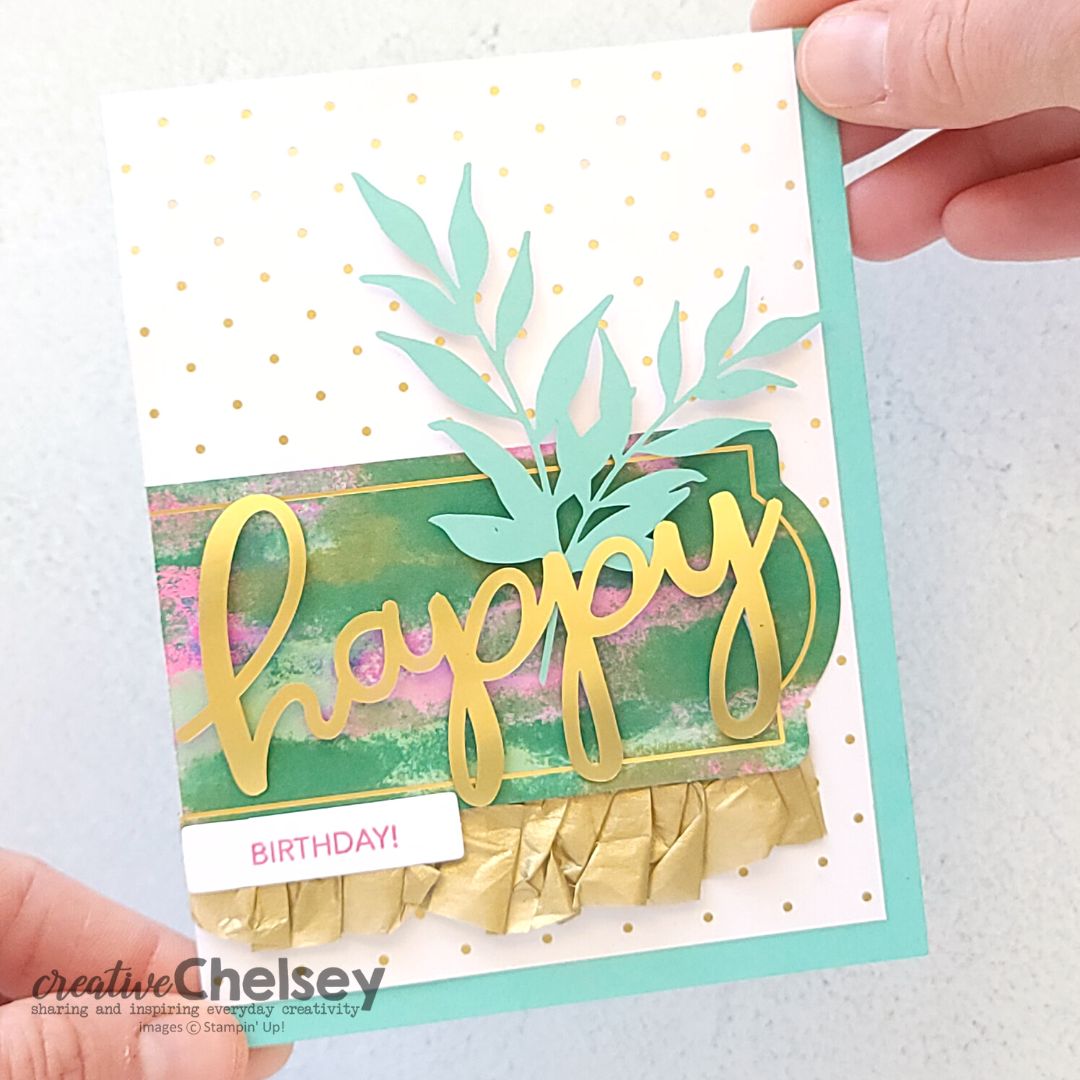
This beautiful kit creates 9 handmade cards. There are enough supplies to make three of each card. What I like to do is use the supplies in the kit along with some other products and create different or alternative projects. Today I am sharing with you another card that uses the Gold Tissue Paper from the kit and some of the pieces you may have left over after making your cards.

If this project inspires you to create something, I would love for you to tag me in any social media post using @creativechelsey | #creativechelsey or email me at chelsey@creativechelsey.com.
It is Paper Pumpkin Week here on Creative Chelsey. This is the last alternative this week. If you would like to see all my alternatives check out the playlist here: https://youtube.com/playlist?list=PL40dV1oxpkNmRa3CHQJOjEI3s_XvrzBRi
Want to see everything in this month’s kit? Watch me UNBOX this month’s Paper Pumpkin Kit here: https://youtube.com/live/SSg3aHOxXHQ?feature=share

Don't miss out on next month’s Paper Pumpkin Kit -
subscribe today!SUBSCRIBE to Paper Pumpkin - click here –

See my Customer Appreciation Products for this month: http://creativechelsey.blogspot.com/p/shop-stampin-up-products.html
Follow me on Instagram https://www.instagram.com/creativechelsey
Or join my Facebook group https://www.facebook.com/groups/2221750878097906

To purchase any of the products you need to create this project visit https://www.stampinup.com?demoid=2042902
———————— What You Need ————————
Thick Basic White Cardbase – 5 ½” x 8 ½” scored at 4 ¼”
Basic White Cardstock – 3 ¾” x 5”
• Basic White 8 1/2" X 11" Thick Cardstock [159229] $8.75 —— https://bit.ly/3Pc9AwW
• Basic White 8 1/2" X 11" Cardstock [159276] $10.25 —— https://bit.ly/3OUrF2w
• Gold Faceted Adhesive Backed Sequins [160536] $8.00 —— https://bit.ly/3ZaiRKr
• Simply Elegant Trim [155766] $7.50 —— https://bit.ly/3pNUvXI
———————— My Favorite Supplies ————————
• Stampin' Seal+ [149699] $12.00 —— https://bit.ly/3Ibz8YK
• Multipurpose Liquid Glue [110755] $4.00 —— https://bit.ly/3IaGF9S
• Tear & Tape Adhesive [138995] $7.00 —— https://bit.ly/3ajQSo5
• Stampin' Dimensionals [104430] $4.25 —— https://bit.ly/3IbzezA
• Mini Glue Dots [103683] $5.25 —— https://bit.ly/3anAcw3
• Stampin' Pierce Mat [126199] $5.00 —— https://bit.ly/3IjEq4d
• Simply Shammy [147042] $8.50 —— https://bit.ly/3bQH7hE
• Paper Snips [103579] $11.00 —— https://bit.ly/3ulT6tV
• Take Your Pick [144107] $10.00 —— https://bit.ly/3IeYxR9
• Bone Folder [102300] $7.00 —— https://bit.ly/3uhErzZ
• Clear Block D [118485] $9.00 —— https://bit.ly/3uuabSs
• Paper Trimmer [152392] $25.00 —— https://bit.ly/3abvykH
• Stampin' Cut & Emboss Machine [149653] $125.00 —— https://bit.ly/3ujz8zU

1- To create the background, cut a large section from the Gold Tissue Paper (5 ½” x 7”).
2- Add Tear & Tape along the edge on the front of the
cardbase. Remove the paper backing from one side.
3- Crinkle the Tissue Paper and lay it across the exposed
adhesive.
4- Remove a little move adhesive from the adjacent sides
and add liquid glue to the center of the card front. Continue to crinkle and
adhere the Tissue Paper so it covers the card front. Repeat.

5- Use a sharp pair of Paper Snips to remove any Tissue Paper that is hanging over the edge of the card front.

6- From the leftover “overprint” die cut paper, Trim around the opening to create a negative space shape.

7- Adhere two of these to the 3 ¾” x 5” Basic White piece.

8- Add three Die Cut Branches with dimensionals on top.

9- Stamp a greeting on a scrap piece of Basic White Cardstock in Polished Pink ink. Trim to fit.
10- Create a faux bow with 10" of Gold Trim on the back of the greeting in the
bottom left corner. Add to the bottom right area of the card with dimensionals.

11- Add some Gold Sequins.

12- On the inside, stamp the smaller branch image in Polished Pink in the bottom right corner. Layer the last Purple Die Cut Branch on top.
All Done!
I have also created a video walking you through each step:
To purchase any Stampin’ Up! products please visit
https://www.stampinup.com?demoid=2042902
Have a creative day!
Chelsey
chelsey@creativechelsey.com


")


")

