Thursday, May 28, 2020

For The Love Of Felt & Seriously The Best Stamp Sets | How I use 1 Layout 2 Different Ways

For today’s tutorial I would like to share two more of my favorite stamps sets that will be retiring from Stampin’ Up on June 2, 2020. They are the For the Love of Felt and Seriously The Best Stamp Sets. They both have coordinating Card Kits available right now, but not for long as they will also be retiring. Make sure to get them before they are gone. I love how easily these two sets can be used together. I also love the idea of using one layout and one background piece to create two cards. I hope you enjoy this tutorial.

I would love to see your finished creations that are inspired by this tutorial! You can tag me in any social media post using @creativechelsey | #creativechelsey or email me at chelsey@creativechelsey.com

To see the list of retiring products visit my online store: https://www.stampinup.com/ecweb/products/1000600/last-chance-products?dbwsdemoid=2042902
 

To purchase any of the products you need to create this project visit https://www.stampinup.com/ECWeb/default.aspx?dbwsdemoid=2042902

Here are the dimensions and pieces you will need to create this cards:
Petal Pink Cardstock card base 8 ½” x 5 ½” scored at 4 ¼”
Whisper White Cardstock (2)  4 ¼” x 5 ½” | (2) 1” x 3 ½” 
Gold Foil Sheet 2” x 5”
Linen Thread or Twine (2) 16”


Here is a list of the supplies I used to make the card: 
*For the Love of Felt Stamp Set 149507 $20.00
*Coordinating Kit: For the Love of Felt Project Kit 149650 $30.00
*Seriously The Best Stamp Set 151712 $19.00
*Coordinating Kit: Seriously The Best Project Kit 151307 $30.00 ON SALE $18.00
Petal Pink Cardstock 146985 $8.75
Whisper White Cardstock 100730 $9.75
Gold Foil Sheets 132622 $5.00
Stitched Rectangle Dies 148551 $35.00
Petal Pink Ink Pad 147108 $7.50
Crushed Curry Ink Pad 147087 $7.50
Rococo Rose Ink Pad 150080 $7.50
Mossy Meadow Ink Pad 147111 $7.50
Sprig Punch 148012 $18.00
*Crushed Curry Bakers Twine
Paper Trimmer 152392 $25.00 
Simply Shammy 147042 $8.00 
Snail Adhesive 104332 $7.00 
Multipurpose Liquid Glue 110755 $4.00 
Dimensionals 104430 $4.00 
Clear Block D 118485 $8.50
Paper Snips 103579 $10.00 
Bone Folder 102300 $7.00 
Stampin' Pierce Mat 126199 $5.00 
Take Your Pick Tool 144107 $10.00 

* These items are retiring and will not be available after June 2, 2020. Click here to see all retiring products: https://www.stampinup.com/ecweb/products/1000600/last-chance-products?dbwsdemoid=2042902
Card #1
1- On one of the Whisper White pieces stamp the leaf image in Petal Pink ink repeating across the cardstock making sure to rotate the stamp 180. 
2- Use the largest Stitched Rectangle Die 4” x 5 ¼” and the 3 ¾” x 1 ¾”. Cut the outside edge and a “window” left of center and glue the frame to one of the Petal Pink card bases.
3- Stamp the greeting in Mossy Meadow on the 1” strip.
4- Stamp the other images on the other piece of Whisper White cardstock. Fussy cut them out.
2 Leaf images – Mossy Meadow
3 Large flowers – Crushed Curry
2 Small flowers – Rococo Rose  
5- Punch out 2 Sprigs from the Gold Foil Sheet. Adhere them to the back of each grouping of leaves.
6- Add the greeting to the card with dimensionals. Place it about ½” from the base of the “window”. Add the leaves above the greeting. The left should be along the left edge of the window. The right should be along the right side of the window and lower than the first.
7- Add the large flowers above the greeting, some can go in front or behind the leaves. Add the small flowers to the leaves.
8- Fold the twine in half and tie a bow. Add the bow below the greeting on the right.

All Done!


Card #2
1- Place the rectangle on left of center in the same place the window from card 1. Add the greeting ½” from the base of the rectangle. 
2- Follow direction 3 - 9 as card 1. Switching the colors of the flowers:
2 Leaf images – Mossy Meadow
3 Large flowers – Rococo Rose
2 Small flowers – Crushed Curry  

All Done!


Here is the same project as a video tutorial.


To purchase any of the products you see in this video visit https://www.stampinup.com/ECWeb/default.aspx?dbwsdemoid=2042902

Have a creative day,
Chelsey
chelsey@creativechelsey.com

Saturday, May 23, 2020

Double Wonder Card Class

Today I shared a Double Wonder Card Class in my Creative Chelsey Facebook Group as a live video. This is the replay.
 ***Wrong cutting happening from 50:00 - 55:00. Keeping watching we figure things out 🤦‍♀‍***

This fun Double Wonder Card Template is such a quick and easy way to create 11 cute cards. All you need is some Designer Series Paper (or other double-sided pattern paper), some cardstock, a greeting of your choice, a punch to punch out the greeting, some ribbon, and an ink pad. I have included the Cutting Template and Card Designs as PDF’s below. Hope you enjoy making these cards. I would love to see your finished cards. You can upload them to my Facebook Group on this post: https://www.facebook.com/groups/2221750878097906/permalink/2681942102078779/


Here are pictures of the cards you can make with this template:


Here is the cutting template:
You can download the Cutting Template PDF here:

You can download the Double Wonder Card Designs PDF here:

Here is the live video:


Have a creative day,
Chelsey
chelsey@creativechelsey.com

Friday, May 22, 2020

Cute and Happy Handmade Greeting Cards using the May 2020 Paper Pumpkin Kit from Stampin Up!


This tutorial shows you the design for the exclusive card kit I will be sending to my Paper Pumpkin customers who received the May 2020 Kit “A Kit in Color”. I also show a bonus card that use the stamp set and left-over pieces you may have giving you even more things you can do with this kit. I  have loved creating alternative cards with Paper Pumpkin Kits. If you have missed any check out the YouTube playlist below.


It is Paper Pumpkin Week here on CreativeChelsey. This is the last tutorial this week. If you missed some check out the playlist here: https://www.youtube.com/playlist?list=PL40dV1oxpkNlFWa6rPmuKg1cUtoS1ixMs

Watch me UNBOX this month’s Paper Pumpkin Kit here: https://youtu.be/c9VyEH0Qnq0

Don't miss out on next months Paper Pumpkin Kit - subscribe today!
SUBSCRIBE to Paper Pumpkin - click here –


Here are the dimensions and pieces you will need to create these cards:
From the Kit:
1 Cloud stencil
Any left-over strips
Left-over piece Purple Posy cardbase from one of the Shaker Cards 
2 x 8” Twine

Extra Cardstock:
Thick Whisper White cardstock card base 4.25” x 11” scored at 5.5”
Balmy Blue cardstock card base 4.25” x 11” scored at 5.5” | 4” x 5 ¼”
So Saffron cardstock 2” x 2”
Whisper White cardstock 4 ¼” x 5 ½”
Purple Posy cardstock 2” x 2 ¾” | ½” x 5”
Yellow Twine or Ribbon 16”


Here is a list of the supplies I used to make the cards:
Thick Whisper White cardstock 140272 $8.25
Whisper White cardstock 100730 $9.75
So Saffron cardstock 105118 $8.75
Purple Posy cardstock 150881 $8.75
Daffodil Delight ink pad 147094 $7.50
Melon Mambo ink pad 147051 $7.50
Pumpkin Pie ink pad 147086 $7.50
VersaMark ink pad 102283 $9.50
Sponge Daubers 133773 $5.00
Any size Circle Punch ( 1 ½” 138299 $16.00 ) 
Any shape punch ( Balloon Bouquet 140609 $18.00 ) 
Paper Trimmer 152392 $25.00
Simply Shammy 147042 $8.00
Snail Adhesive 104332 $7.00
Multipurpose Liquid Glue 110755 $4.00
Dimensionals 104430 $4.00
Clear Block D 118485 $8.50
Paper Snips 103579 $10.00
Bone Folder 102300 $7.00
Stampin' Pierce Mat 126199 $5.00
Take Your Pick Tool 144107 $10.00


Card #1
1- Trace the 3 cloud sizes on to Whisper White cardstock and cut out.
2- Stamp the asterisks image in Misty Moonlight in the top right corner and along the bottom of the 4” x 5 ¼” Balmy Blue cardstock. 
3- Punch out a circle from So Saffron and stamp the 3 line image (happy lines) along the edge in Daffodil Delight.
4- Stamp all the rainbow arches in Melon Mambo in the top half of the Purple Posy 2” x 2 ¾” rectangle. Stamp the greeting “oh,happy day” 2 times on the ½” strip.
5- Use a sponge dauber and add some Misty Moonlight color along the edges of each cloud and the Balmy Blue card front.
6- Adhere the sun in the top left corner of the card front. Add the largest cloud in the center. Wrap 16” of yellow twine or ribbon and tie a bow on the right side.
7- Add the rainbow with dimensionals on the right side of the large cloud. Add the small cloud under the right side of the rainbow. Add the medium cloud in the bottom left corner. 
8- Cut the greeting into these sections “oh, happy” “happy day” add these to the medium cloud. Add the card front to the card base.
All Done!

Card #2
1- Cut all strips to 4” in length. The width doesn’t matter, but I didn’t want anything larger than 1/2” or so.
2- Adhere each strip to the Whisper White cardbase. Keep them close to each other and leave a border along the edges of the cardbase.
3- Punch out some shapes from leftover Purple Posy cardstock, add them to the rectangle from one of the shaker cards or use any large piece of cardstock you have leftover. Add this to your card in the center.
4- Ink the greeting “hey” and “You’re amazing” in Pumpkin Pie then use a sponge dauber to pick up Melon Mambo ink on the sponge dauber and add color to the stamp to create the ombre look. Stamp on any leftover white paper or white envelope paper. Fussy cut.
5- Add your greetings to your card. You can use dimensionals if you want. Tie a bow with 8” of twine and add any leftover embellishments.
All Done!


I have also created a video walking you through each step:


To purchase any of the products you see in this video visit

Have a creative day!
Chelsey
chelsey@creativechelsey.com

Thursday, May 21, 2020

Two More Alternative Handmade Card Ideas using the Stampin Up May 2020 Paper Pumpkin Kit

Today I have for you some simpler handmade cards using the supplies in the May 2020 Paper Pumpkin Subscription Kit “A Kit in Color”. I love the easy layout combined with the bright colors and the addition of the cute small blooms punched flowers make these cards so happy. I love creating alternative cards with Paper Pumpkin Kits so make sure to come back for more videos as I continue to create with this month’s kit.

It is Paper Pumpkin Week here on CreativeChelsey. This is the third tutorial this week. Make sure to keep coming back for more.

Watch me UNBOX this month’s Paper Pumpkin Kit here: https://youtu.be/c9VyEH0Qnq0

Don't miss out on next months Paper Pumpkin Kit - subscribe today!
SUBSCRIBE to Paper Pumpkin - click here –

Here are the dimensions and pieces you will need to create these cards:
From the Kit:
1 Rainbow cardbase
1 White label
1 Bumble Bee flag label
1 Large Vellum Sheet
1 Flag Vellum Sheet
1 Magenta Madness envelope
1 Pumpkin Pie envelope
Square from “window” of card 1 from the projects on Wednesday 5/20/20
18”  & 16” of Bakers Twine

Extra Cardstock:
2 Thick Whisper White cardstock card base 4.25” x 11” scored at 5.5”


Here is a list of the supplies I used to make the cards:
Thick Whisper White cardstock 140272 $8.25
Melon Mambo ink pad 147051 $7.50
Pumpkin Pie ink pad 147086 $7.50
VersaMark ink pad 102283 $9.50
Sponge Daubers 133773 $5.00
Small Blooms Punch 
Any “Thanks” Stamp – I used Well Said Stamp Set 148796 $45.00
Paper Trimmer 152392 $25.00
Simply Shammy 147042 $8.00
Snail Adhesive 104332 $7.00
Multipurpose Liquid Glue 110755 $4.00
Dimensionals 104430 $4.00
Clear Block D 118485 $8.50
Paper Snips 103579 $10.00
Bone Folder 102300 $7.00
Stampin' Pierce Mat 126199 $5.00
Take Your Pick Tool 144107 $10.00

Card #1
1- Begin by trimming the Rainbow cardbase. Remove the front pattern from the back and trim to 4” x 5 ¼”. Cut the white side to these sizes for card #2: ½” x 1 ½” | ¼” x 4” | 2” x 2” | 2” x 2 ½” | Keep the rest for punching. 
2- Trim each envelope on the right and left sides. Open and remove the white back from the color front. Trim each pattern to 4” x 3” for card #2. 
3- Stamp the greeting “oh, happy day” in Misty Moonlight on the white side of the Bumble Bee flag label. Use the Misty Moonlight Ink Spot and rub color on the White Label, use a sponge dauber to blend the color to make it smooth. Let dry.
4- Add the Rainbow piece to the front of the cardbase. Add the large vellum cardstock in the center. Place the square Purple Posy pattern piece a little above center over the vellum. Tie the 18” of under the Vellum on the left side with the bow about 1/3 of the way up the Purple Posy square. 
5- Add the now Misty Moonlight Label above the bow with dimensionals. You want to have it start off the velum on the left. Curl up the flag points on the greeting and add on top a little below middle and off to the right slightly on the Misty Moonlight label.
6- Punch 3 Small Bloom Flowers, curl the petals and adhere to your card. Add a coordinating embellishment in the center of each one.

All Done!

Card #2
1- Add the Pumpkin Pie pattern piece to the bottom half of the other Thick Whisper White cardbase. Add the Magenta Madness to the top half. They will overlap in the middle. Place the ¼” x 4” strip to cover where they meet.
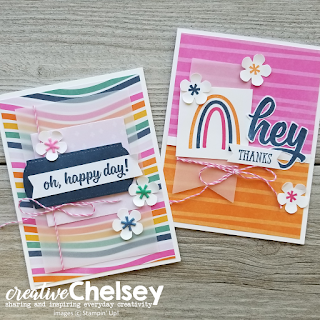
2- Stamp the Rainbow arches with Pumpkin Pie (large), Misty Moonlight (middle), and Melon Mambo (small) on the 2” x 2” square. Stamp the “hey” in Misty Moonlight on the 2” x 2 ½” piece. And “Thanks” on the ½” x 1 ½” strip – flag the sides. 
3- Punch out 3 flowers with the Small Blooms punch and stamp one asterisk image in the center of each flower. Use the same three colors as the rainbow. Curl the petals.
4- Add the Vellum flap piece to the left of the card. Place the rainbow stamped image in the center at an angle over the vellum. Tie the 16” of twine along the bottom of the vellum with a bow on the right side. 
5- Fussy cut out “hey” and adhere it to the right of the rainbow at an angle. Add “thanks” with some dimensionals. Place the 3 flowers around the card.

All Done!


I have also created a video walking you through each step:


To purchase any of the products you see in this video visit

Have a creative day!
Chelsey
chelsey@creativechelsey.com