
Welcome to Paper Pumpkin Week here on Creative Chelsey. Over the last week I have shared some great card ideas you can make with from the April 2025 Paper Pumpkin Kit called Inked Occasions. Today I am sharing with you my sixth and last alternative card idea.
This
card uses heat embossing to add extra details to the die cut flowers. I love
how it turned out.

If you would like to watch me unbox the kit and make the original cards visit this playlist - https://youtube.com/playlist?list=PL40dV1oxpkNkvVXVfvEQQQmCEuKtJwWAp&si=qzHZennAfzR8j8y9

Each month I take the contents from the paper pumpkin kits and make alternative projects. My cards are easy to follow and can be made by both experienced or new paper crafter. You may need just a couple other products to complete them. You can follow along with me using supplies you already have or purchase any products you see me use from my online store. A full supply list is below or on my blog – www.creativechelsey.com

I also want to mention the amazing perks you can receive when you subscribe to Paper Pumpkin with me as your demonstrator. With every Paper Pumpkin Stamp Set & Ink Spot sent, I design a card and mail out my very own card kit to my subscribers so they can make two of my exclusive card design. These cards so fun and show new ways to use stamps & ink. We also meet once each month to make the card together, chat & have fun.

*PLUS I have joined with other Stampin’ Up! Demonstrators to design 7-10 more alternative ideas in a PDF Tutorial (includes photos & instructions). My subscribers receive this PDF Tutorial along with an Exclusively Designed Card Kit, all for FREE! If you would also like to receive this extra perk, sign up for paper pumpkin using the link below and make sure to select me as your demonstrator.
If you are
interested in getting your own paper pumpkin subscription, please use this link
to subscribe - https://www.stampinup.com/products/paper-pumpkin-subscription/?demoid=2042902
If this project inspires you to create something, I would
love for you to tag me in any social media post using @creativechelsey |
#creativechelsey or email me at chelsey@creativechelsey.com.

It is Paper Pumpkin Week here on Creative Chelsey. This is my last alternative card idea. If you would like to see all my alternatives this month check out the playlist here: https://www.youtube.com/playlist?list=PL40dV1oxpkNm1Myq6BdMg8plSrhWR7G27
Don't miss out on next month’s Paper Pumpkin Kit - subscribe
today!SUBSCRIBE to Paper Pumpkin - click here –
![Paper Pumpkin Subscription [ 166815 ]](https://assets1.tamsnetwork.com/images/EC042017NF/166815s.jpg "Paper Pumpkin Subscription [ 166815 ]")
![Hugs Abloom Dies [ 166238 ]](https://assets1.tamsnetwork.com/images/EC042017NF/166238s.jpg "Hugs Abloom Dies [ 166238 ]")
![Basic White 8 1/2" X 11" Thick Cardstock [ 159229 ]](https://assets1.tamsnetwork.com/images/EC042017NF/159229s.jpg "Basic White 8 1/2\" X 11\" Thick Cardstock [ 159229 ]")
![Basic White 8 1/2" X 11" Cardstock [ 166780 ]](https://assets1.tamsnetwork.com/images/EC042017NF/166780s.jpg "Basic White 8 1/2\" X 11\" Cardstock [ 166780 ]")
![Gold Foil Sheets [ 132622 ]](https://assets1.tamsnetwork.com/images/EC042017NF/132622s.jpg "Gold Foil Sheets [ 132622 ]")
![Berry Burst 8-1/2" X 11" Cardstock [ 144243 ]](https://assets1.tamsnetwork.com/images/EC042017NF/144243s.jpg "Berry Burst 8-1/2\" X 11\" Cardstock [ 144243 ]")
![Peach Pie 8 1/2" X 11" Cardstock [ 163799 ]](https://assets1.tamsnetwork.com/images/EC042017NF/163799s.jpg "Peach Pie 8 1/2\" X 11\" Cardstock [ 163799 ]")
![Flirty Flamingo 8-1/2" X 11" Cardstock [ 141416 ]](https://assets1.tamsnetwork.com/images/EC042017NF/141416s.jpg "Flirty Flamingo 8-1/2\" X 11\" Cardstock [ 141416 ]")
![Fresh Freesia 8 1/2" X 11" Cardstock [ 155613 ]](https://assets1.tamsnetwork.com/images/EC042017NF/155613s.jpg "Fresh Freesia 8 1/2\" X 11\" Cardstock [ 155613 ]")
![Gorgeous Grape 8-1/2" X 11" Cardstock [ 146987 ]](https://assets1.tamsnetwork.com/images/EC042017NF/146987s.jpg "Gorgeous Grape 8-1/2\" X 11\" Cardstock [ 146987 ]")
![Pool Party 8-1/2" X 11" Cardstock [ 122924 ]](https://assets1.tamsnetwork.com/images/EC042017NF/122924s.jpg "Pool Party 8-1/2\" X 11\" Cardstock [ 122924 ]")
![Gorgeous Grape Classic Stampin' Pad [ 147099 ]](https://assets1.tamsnetwork.com/images/EC042017NF/147099s.jpg "Gorgeous Grape Classic Stampin' Pad [ 147099 ]")
![Versamark Refill [ 102193 ]](https://assets1.tamsnetwork.com/images/EC042017NF/102193s.jpg "Versamark Refill [ 102193 ]")
![Metallics Wow! Embossing Powder [ 165678 ]](https://assets1.tamsnetwork.com/images/EC042017NF/165678s.jpg "Metallics Wow! Embossing Powder [ 165678 ]")
![Heat Tool (Us And Canada) [ 129053 ]](https://assets1.tamsnetwork.com/images/EC042017NF/129053s.jpg "Heat Tool (Us And Canada) [ 129053 ]")
![Embossing Additions Tool Kit [ 159971 ]](https://assets1.tamsnetwork.com/images/EC042017NF/159971s.jpg "Embossing Additions Tool Kit [ 159971 ]")
See my Customer Appreciation Products for this month: http://creativechelsey.blogspot.com/p/shop-stampin-up-products.html
Follow me on Instagram https://www.instagram.com/creativechelsey
Or join my Facebook group https://www.facebook.com/groups/2221750878097906

To purchase any of the products you need to create this
project visit https://www.stampinup.com?demoid=2042902
———————— My Favorite Supplies ————————
• Stampin' Seal+ [149699] —— https://bit.ly/3Ibz8YK
• Multipurpose Liquid Glue [110755] —— https://bit.ly/3IaGF9S
• Tear & Tape Adhesive [138995] —— https://bit.ly/3ajQSo5
• Stampin' Dimensionals [104430] —— https://bit.ly/3IbzezA
• Mini Glue Dots [103683] $7.25 —— https://bit.ly/3anAcw3
• Stampin' Pierce Mat [126199] —— https://bit.ly/3IjEq4d
• Simply Shammy [147042] —— https://bit.ly/3bQH7hE
• Paper Snips [103579] —— https://bit.ly/3ulT6tV
• Take Your Pick [144107] —— https://bit.ly/3IeYxR9
• Bone Folder [102300] —— https://bit.ly/3uhErzZ
• Clear Block D [118485] —— https://bit.ly/3uuabSs
• Paper Trimmer [152392] —— https://bit.ly/3abvykH
• Stampin' Cut & Emboss Machine [149653] —— https://bit.ly/3ujz8zU
Thick Basic White Cardbase – 5 ½” x 8 ½” scored at 4 ¼”
Basic White Cardstock – scraps
Cardstock Scraps in these coordinating colors – Berry Burst,
Peach Pie, Flirty Flamingo, Fresh Freesia, Gorgeous Grape, Pool Party
Gold Foil Sheet – scraps
Alcohol Ink in Center Cardbase – Kit

1- Cut the Alcohol Ink in Center Cardbase down to 4 1/8” x 5 3/8” and add it to the center of the cardbase.
2- Cut out one flower from each of these coordinating colors:
Berry Burst, Peach Pie, Flirty Flamingo, Fresh Freesia, Gorgeous Grape, Pool
Party

3- Add a drop of VersaMark Ink Refill to a scrap piece of paper. With a paintbrush you don’t care about add a little ink to the center of each flower.

4- Using Tweezers to hold the flowers add Gold Embossing Powder over the centers, tap off the excess.

Heat with Heat Tool until shiny.
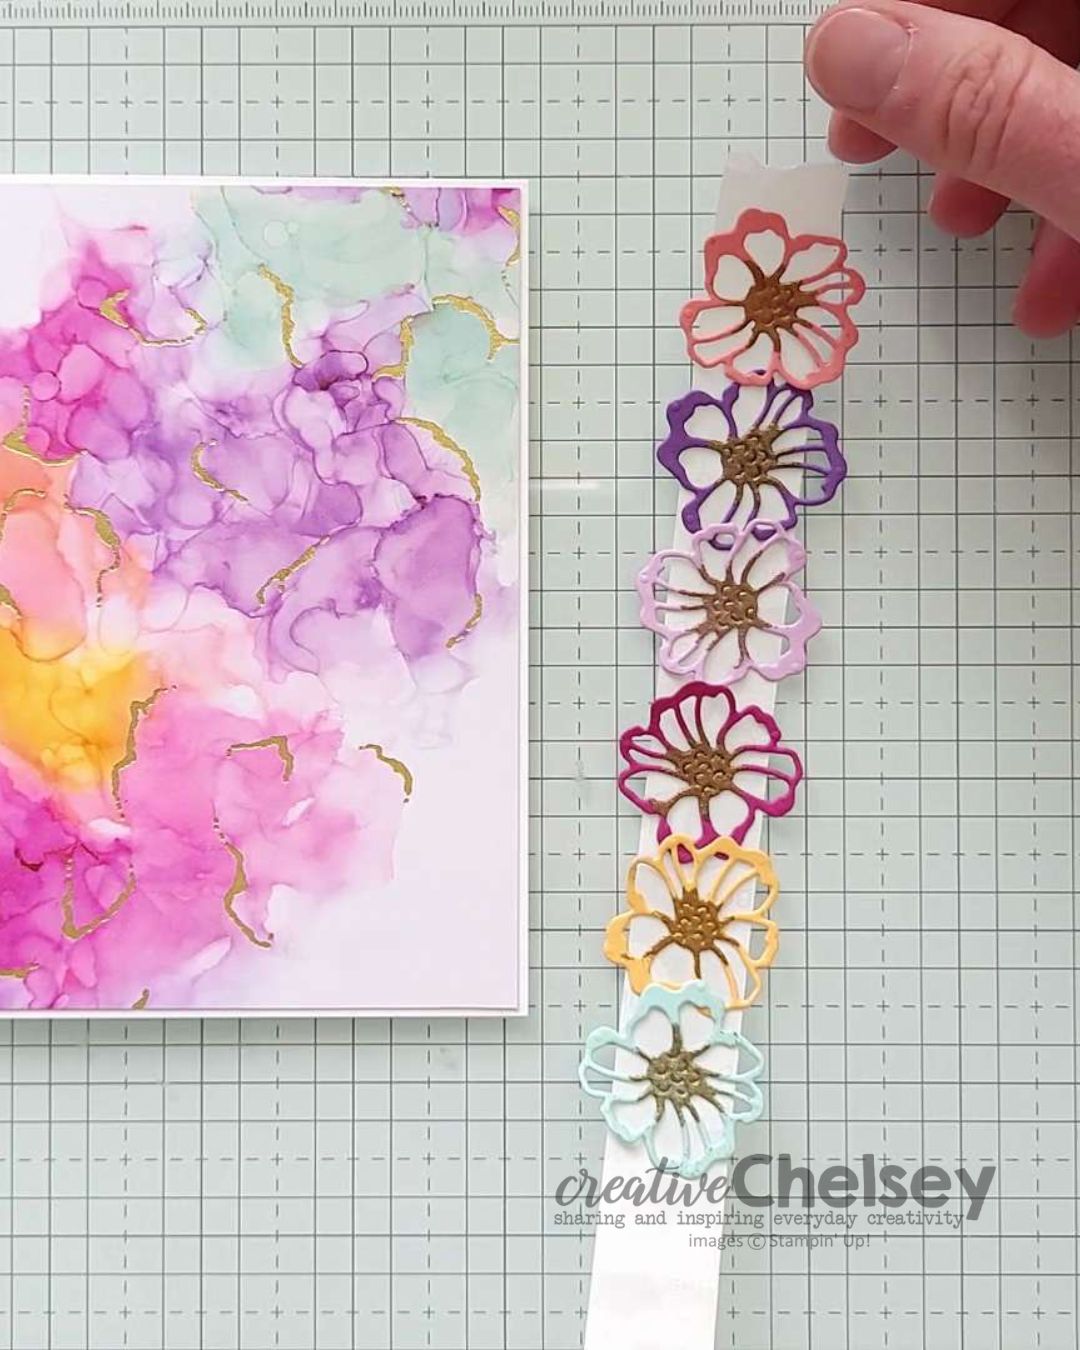
Repeat for each flower.

5- Add the flowers with a glue dot to the back to areas on the cardbase that match the color of flower. I started in the bottom left corner with Berry Burst, then added Peach Pie, Flirty Flamingo, Fresh Freesia, Gorgeous Grape and finished in the top right corner with Pool Party.

6- Cut out a Label from Basic White Cardstock. Stamp Hugs in Berry Burst ink in the center. Add to the right of the flower with dimensionals.
7- Cut a 5/16” strip from Basic White Cardstock and stamp another
greeting in Gorgeous Grape ink. Trim to fit and add at the bottom of Hugs on
the Label with dimensionals.

8- Cut out one Leaf Die from Gold Foil Sheet. Cut it in half and tuck each piece under the greeting. One on top of the label under the strip and one under the large label.
All Done!
I have also created a video walking you through each step.
To purchase any Stampin’ Up! products please visit
https://www.stampinup.com?demoid=2042902
Have a creative day!
Chelsey
chelsey@creativechelsey.com


![Brushed Brass Butterflies [ 158136 ]](https://assets1.tamsnetwork.com/images/EC042017NF/158136s.jpg "Brushed Brass Butterflies [ 158136 ]")
![Adhesive Sheets [ 152334 ]](https://assets1.tamsnetwork.com/images/EC042017NF/152334s.jpg "Adhesive Sheets [ 152334 ]")


