Tuesday, May 17, 2022

QUICK TIP & TECHNIQUE - Watercolor Pencils On Stamps - Artfully Layered Bundle from Stampin' Up!

Hello my crafting friends,

Today I would like to share with you a fun and easy technique that can give your stamped images a cool and unique look using Watercolor Pencils. This tutorial also shows you how to get a splatter look using the Gilded Leafing from Stampin’ Up!


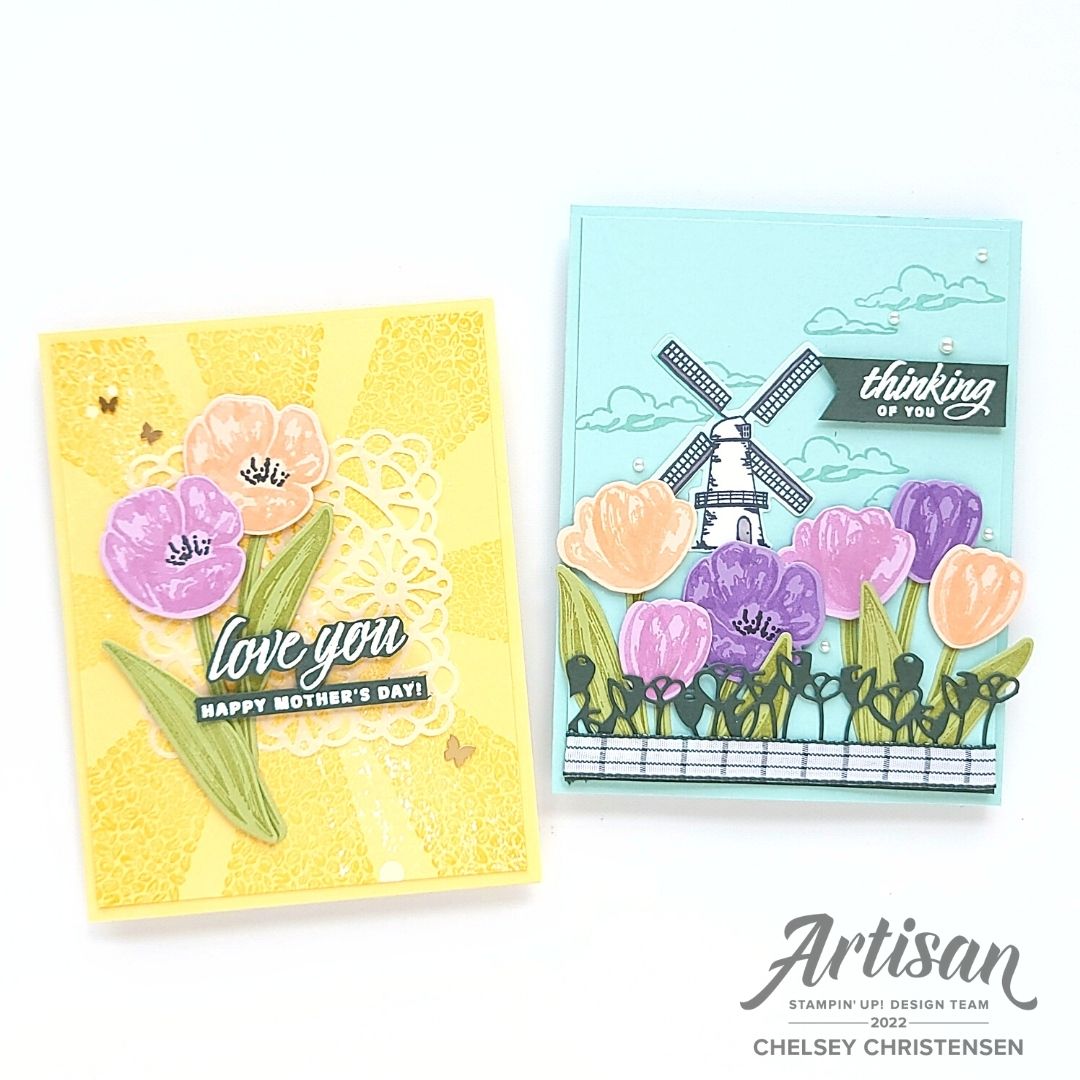
Create beautiful watercolor images using Watercolor Pencils directly on stamps. To achieve this effect lightly spritz water over the stamp. Color on the stamp with Watercolor Pencils mixing multiple colors if you want. Lightly spritz again and stamp.  


See my Customer Appreciation Products for this month: http://creativechelsey.blogspot.com/p/shop-stampin-up-products.html

Follow me on Instagram https://www.instagram.com/creativechelsey

Or join my Facebook group https://www.facebook.com/groups/2221750878097906


Be sure to check out the rest of the team’s wonderful creative on the Stampin’ Up! Corporate Facebook Page at -  http://www.facebook.com/stampinup

For more inspiration, tips & tricks from the 2022 Artisan Design Team also check out Stampin’ Up! on Instagram – https://www.instagram.com/stampinupofficial


To purchase any of the products you need to create this project visit

https://www.stampinup.com?demoid=2042902

Here are the dimensions and pieces you will need to create these cards:

Crumb Cake Cardbase 5 ½” x 8 ½” scored at 4 ¼”

Basic White Cardstock 3” x 5 ½” and scraps for stamping

Gold Foil Sheets (2) 1” x 3 ½”


The products I used are:

Artfully Layered Bundle 157761 $53.00

Crumb Cake Ink Pad 147116 $8.00

Crumb Cake Cardstock 120953 $9.25

Basic White Cardstock 159276 $10.25

Gold Foil Sheets 132622 $5.00

Stampin’ Spritzer 126185 $3.25

Watercolor Pencils Assortment 1 141709 $16.00

Watercolor Pencils Assortment 2 149014 $12.50

Memento Black Ink Pad 132708 $6.00

Basic Borders Dies 155558 $29.00

Silicone Craft Sheet 127853 $6.50

Gilded Leafing 154560 $9.00

Linen Thread 104199 $5.00

Clear Block D 118485 $9.00

Simply Shammy 147042 $8.50

Stampin’ Seal Adhesive 152813 $8.00

Dimensionals 104430 $4.25

Multipurpose Liquid Glue 110755 $4.00

Paper Snips 103579 $11.00

Bone Folder 102300 $7.00

Take Your Pick Tool 144107 $10.00

Stampin’ Cut & Emboss Machine 149653 $125.00

Stamparatus 146276 $49.00


1- This technique is best done on a stamp positioning tool like the Stamparatus. Add the stamp to one of the clear plates. Place your scrap Basic White cardstock under the stamp and hold with the magnets.

2- Lightly spritz water onto the stamp. Then color with a light watercolor pencil directly on the stamp. I used Granny Apple Green.


3- Add any dark color you want I used Garden Green. Then spritz with water again lightly. Then stamp with light pressure. When you remove the stamp don’t move your paper, you can see if you need more water, you can add a little more water and stamp again. Cut out with coordinating dies.

Clean the stamp with running water.


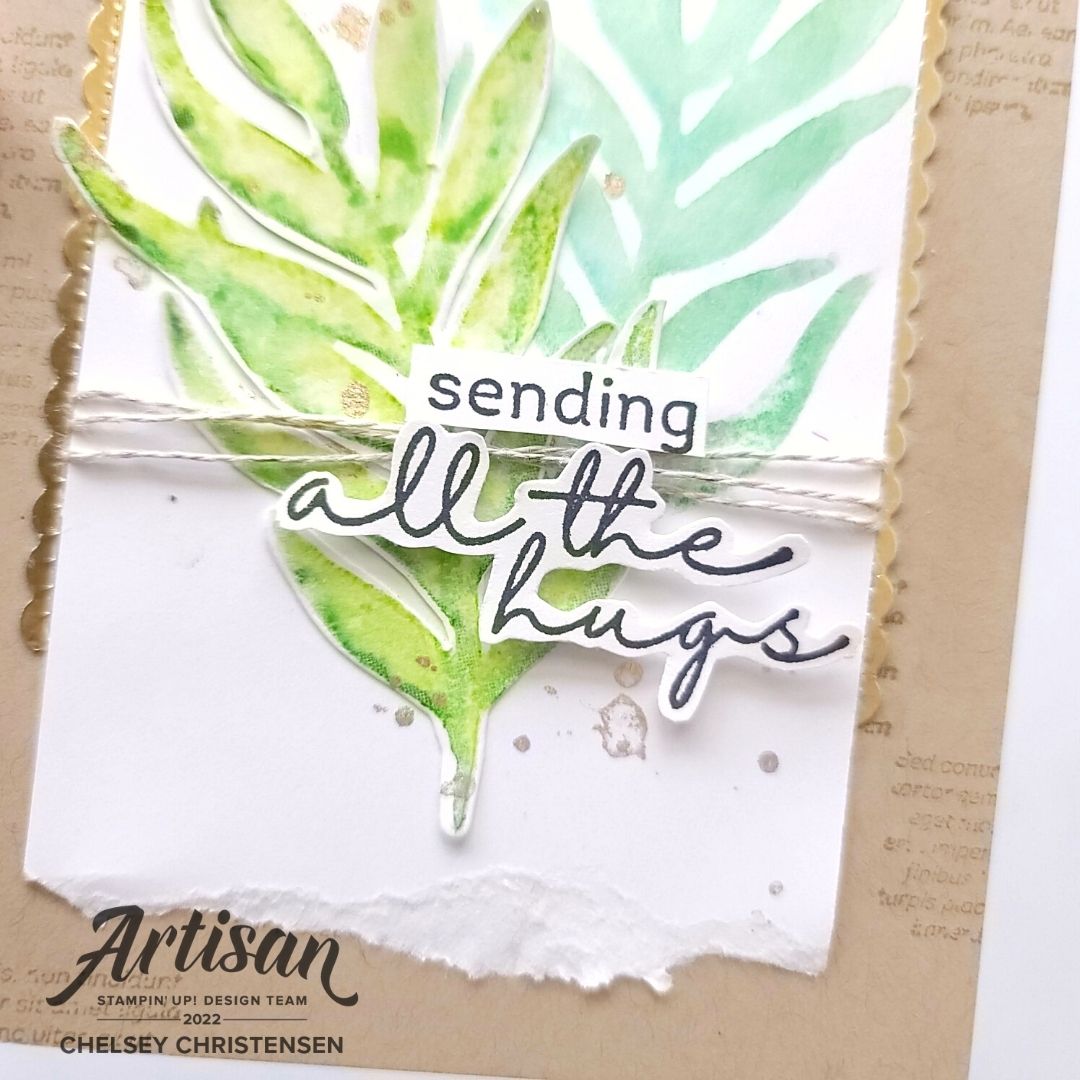
4- Stamp a second image using the same technique with different colors on the 3” Basic White Cardstock close to the top. I used Garden Green as my first color and Coastal Cabana as my darker color.


5- Stamp the distressed text image in Crumb Cake ink randomly on the front of the Crumb Cake Cardbase.


6- Cut out two tiny gold scallop borders in Gold Foil. Cut only the center area and trim the edges to remove the angled areas.


7- To create the Gilded Foil Splatter use an old paint brush, bowl of water. Mix Multipurpose Liquid Glue with a little water on your Silicone Craft Sheet. Tap across the 3” Basic White Cardstock piece (if you want gold splatter on the front leaf adhere it first to the cardstock before adding splatter). Let the glue dry.


8- Once the glue is dry you can add the Gilded Leafing to the sticky areas. Rub it gently to remove any excess.


9- Add the Top Leaf so it slightly overlaps the bottom leaf. Tear the bottom from the 3” Basic White piece. Then wrap 16” of Linen Thread near the bottom of the leaves.

10- Add the two gold scallops to the center of each side and adhere to the center of the cardbase.


11- Stamp the greeting in Memento Black Ink and fussy cut out. Add over the Linen Thread.

All Done!


If you would like to watch me create these cards with step by step tips and directions please watch this video:

If you need any product to make these cards, please visit my online store: http://www.stampinup.com?demoid=2042902

Have a creative day,

Chelsey

chelsey@creativechelsey.com

Tuesday, May 10, 2022

June 2022 Exclusive Online Card Class - Cute Critters & Fun Folds

How To Sign Up -

Registration for this class has closed.


Join me for exclusive Online Card Making Tutorials from 
June 6 – June 11, 2022!
Class Fee - $35

Today I would like to share with you my upcoming Online Class for June 2022. In this class we will be creating 6 Fun Fold Cards with your choice of either Hello Ladybug (157699), Sweet Songbirds (158727), or Best Butterflies (159120) Bundles. You get to choose which stamp set(s) you want to use. You can purchase these items from my Stampin’ Up Online Store, https://www.stampinup.com?demoid=2042902.


I am excited to share these cards with you today. I hope you decided to join me, it will be fun. We will be learning six different fun folds as wells as stamping the cute critters in some fun ways.

To sign up for this class, please use the PayPal button below. Please see the list below of the product you will need to have to create these cards.  


CUTE CRITTERS CLASS & FUN FOLD CARDS
 - $35 (US Only)

You will receive a class kit from me that will include the below supplies:

• Pre-cut cardstock

• Envelopes

• New pack of Fun Flowers Resin Shapes

• New Roll of Fresh Freesia Open Weave Ribbon

• 12 sheets of 6” x 6” Butterfly Kisses Designer Series Paper

*Please note that I reserve the right to switch products based on availability. Substituted products will be of similar value and keep the integrity of the design.


If you are interested in purchasing two or more kits so you can make more sets of cards, please note that I will be offering a Cardstock Only Kit for $15. You can purchase as many of either kits as you would like. Please note that the Cardstock Only Kit can ONLY be purchased along with one FULL kit. Please make sure to add this option to your PayPal cart before checking out.


This class will take place in a Private Facebook Group. Not on FACEBOOK? You can still participate - I will email you each video and PDF tutorial after the live class. After you register/pay please email me - chelsey@creativechelsey.com - letting me know you are not on Facebook!

In this Facebook Group I will post:

• Written instructions for each card (PDF) with measurements so you can create more cards.

• Facebook Live Videos for each card where I will walk you through each step to create the cards. Watch live or when you have the time.


What is not included (you will need to have these supplies to complete the cards):

• One of these stamp sets or another of your choice:

          Hello Ladybug (157699) $32.25 includes Stamp Set & Punch

          Sweet Songbirds (158727) $34.00 includes Stamp Set & Punch

          Best Butterflies (159120) $47.50 includes Stamp Set & Dies

• Calypso Coral Ink Pad – 147101 $8.00

• Fresh Freesia Ink Pad – 147103 $8.00

• Crushed Curry Ink Pad – 147087 $8.00

• Parakeet Party Ink Pad – 159208 $8.00

• Starry Sky Ink Pad – 159212 $8.00

• Crumb Cake Ink Pad – 147116 $8.00

• Memento Ink Pad – 132708 $6.00


Here are the tools you will need:

• Paper Trimmer – 152392

• Stampin’ Cut & Emboss Machine – 149653 or MINI Stampin’ Cut & Emboss Machine – 150673  for the Best Butterflies Bundle

• Tools: Ribbon/fabric scissors, paper snips, bone folder, adhesive, clear blocks A, B, C, D, H and stamp cleaner


If you need any Stampin Up product to take this class you can visit my online store at https://www.stampinup.com?demoid=2042902

Please use host code when ordering: 7P9G2KQG

Please contact me if you have any questions chelsey@creativechelsey.com


FINE PRINT:

• Registration for this class closes on Saturday May 21st.

• This class is available to both customers and Stampin’ Up demonstrators in the USA. If you live outside of the USA I do offer a TUTORIALS ONLY option for you (not available to those in USA). Please select the correct option when paying.

• I will ship the class kit to the address listed in PayPal. Please make any changes before you pay.

• I will contact you and send you class information using the email address you enter in PayPal. Please make sure it is your current email address.

• I reserve the right to switch products based on availability. Substituted products will be of similar value and keep the integrity of the design.

Please notify me ASAP if there is a problem or the information in PayPal is incorrect – chelsey@creativechelsey.com

Registration for this class has closed.


These images are close-ups of the cards we will be making in this Exclusive Online Class! Don't miss it!


Have a creative day,

Chelsey

chelsey@creativechelsey.com

Thursday, May 5, 2022

Stampin' Up! Flowering Tulips & Tulip Fields Bundles - Mother's Day & Thinking Of You Handmade Cards

Hello my crafting friends,


Today I would like to share with you these two beautiful tulip cards I created for Stampin’ Up!’s Artisan Design Team Showcase in February 2022. I was asked to use the Flowering Tulips & Tulip Fields Bundles in the January – June 2022 Mini Catalog. If you are interested in any of these products make sure to purchase them before June as some do not carryover to the New 2022-2023 Annual Catalog.


I love the seamless look you can achieve for the flowers and leaves by stamping color on color. For example some the Tulips have been stamped in Petal Pink Ink on Petal Pink Cardstock. I have also done this technique with Fresh Freesia & Highland Heather and Pear Pizzazz for the leaves/stems. I also share another seamless technique when you stamp on Basic White Cardstock, but don’t want the white border around your images. Make sure to check it out.


If you would like to see written instructions or close up images of this card you can visit my blog -

See my Customer Appreciation Products for this month: http://creativechelsey.blogspot.com/p/shop-stampin-up-products.html

Follow me on Instagram https://www.instagram.com/creativechelsey

Or join my Facebook group https://www.facebook.com/groups/2221750878097906


Be sure to check out the rest of the team’s wonderful creative on the Stampin’ Up! Corporate Facebook Page at -  http://www.facebook.com/stampinup

For more inspiration, tips & tricks from the 2022 Artisan Design Team also check out Stampin’ Up! on Instagram – https://www.instagram.com/stampinupofficial


To purchase any of the products you need to create this project visit

https://www.stampinup.com?demoid=2042902

Here are the dimensions and pieces you will need to create these cards:

Card #1

So Saffron Cardbase – 5 ½” x 8 ½” scored at 4 ¼”

So Saffron Cardstock – 4” x 5 ¼”

Petal Pink Cardstock – scraps for stamping

Fresh Freesia Cardstock – scraps for stamping

Highland Heather Cardstock – scraps for stamping

Pear Pizzazz Cardstock – scraps for stamping

Evening Evergreen Cardstock – scraps for stamping

Vellum Square Doily - retired


Card #2

Pool Party Cardbase – 5 ½” x 8 ½” scored at 4 ¼”

Pool Party Cardstock – 4” x 5 ¼”

Basic White Cardstock – scraps for stamping

Petal Pink Cardstock – scraps for stamping

Fresh Freesia Cardstock – scraps for stamping

Highland Heather Cardstock – scraps for stamping

Pear Pizzazz Cardstock – scraps for stamping

Evening Evergreen Cardstock – scraps for stamping


The products I used are:

Flowering Tulips Bundle 157678 $52.00

Tulip Fields Bundle 157684 $45.75

Basic White Cardstock 159276 $10.25

Pool Party Cardstock $122924 $9.25

So Saffron Cardstock 105118 $9.25

Petal Pink Cardstock 146985 $9.25

Fresh Freesia Cardstock 155613 $9.25

Highland Heather Cardstock 146986 $9.25

Pear Pizzazz Cardstock 131201 $9.25

Evening Evergreen Cardstock 155574 $9.25

Pool Party Ink Pad 147107 $8.00

So Saffron Ink Pad 147109 $8.00

Petal Pink Ink Pad 147108 $8.00

Fresh Freesia Ink Pad 155611 $8.00

Highland Heather Ink Pad 147103 $8.00

Pear Pizzazz Ink Pad 147104 $8.00

Memento Black Ink Pad 132708 $6.00

VersaMark Ink Pad 102283 $9.50

White Embossing Powder 155554 $18.00

Heat Tool 129053 $30.00

Vellum Square Doilies – retired

Chalk Marker – retired

Pool Party Stampin’ Blend Markers 154894 $9.00

Smoky Slate Stampin’ Blend Markers 154904 $9.00

Evening Evergreen Windowpane Check Ribbon 158135 $7.50

Brushed Brass Butterflies158136 $10.00

Silicone Craft Sheet 127853 $6.50

Clear Block D 118485 $9.00

Simply Shammy 147042 $8.50

Stampin’ Seal Adhesive 152813 $8.00

Dimensionals 104430 $4.25

Multipurpose Liquid Glue 110755 $4.00

Paper Snips 103579 $11.00

Bone Folder 102300 $7.00

Take Your Pick Tool 144107 $10.00

Stampin’ Cut & Emboss Machine 149653 $125.00


Stamping the Tulips & Leaves

1- Each flower has two stamps to give it a full look. Place each stamp for the flower on one clear block, one on each side. It is easier to keep track of them this way.

2- On colored cardstock stamp the larger flower first in the same color ink. Then line up the second stamp and ink and stamp. The area where the two color overlap will be slightly darker.


3- Repeat for all colors. I used Petal Pink, Fresh Freesia, Highland Heather. I cut one of each flower size in each color. Total 9 flowers. Cut out with coordinating dies.

4- For the leaves and stems, stamp in Pear Pizzazz ink on Pear Pizzazz cardstock. Cut out with coordinating dies. I cut 8 stems, 4 large leaves, 4 small leaves.


Card #1 – So Saffron

1- Stamp the triangle flower fields stamp in So Saffron ink on the 4” x 5 ¼” So Saffron Cardstock in a sunburst pattern.

2- Create a white splatter effect by opening an old Chalk Marker and squeezing a little ink onto a clear block or paper plate. Use some water and a paint brush to splatter across the cardstock. Let dry. Add to the front of a So Saffron Cardbase.


3- Add a little detailed background like the Vellum Square Doilies in the center.

4- Add two flowers to the left with dimensionals. Tuck in a stem at the bottom of each flower. Add two leaves with dimensionals.


5- Stamp your greeting in VersaMark on Evening Evergreen Cardstock. Add White Embossing Powder and heat to set. Then fussy cut out. Add to the center of the card with dimensionals.

6- Add a couple Brass Butterflies around the flowers.

All Done!


Card #2

1- Stamp a couple clouds in Pool Party ink on the top half 4” x 5 ¼” Pool Party Cardstock.


2- Add 6 flowers to the bottom half of the cardstock with dimensionals. Tuck in a stem to each flower and add leaves to fill in the gaps. Trim off any pieces hanging off the bottom.


3- Cut out the Tulip Border from Evening Evergreen Cardstock. Add to the bottom of the Pool Party piece. Trim off any overhanging areas.


4- Wrap 5” of Ribbon along the bottom edge. Tuck the ends to the back. Add to the front of the Pool Party Cardbase.


5- Stamp the small Windmill in Memento Black Ink. Use the Smoky Slate Blends to color in details. Solid area on the blades/fan, the window, the door. Then use the Pool Party Blend to color around the Windmill, make sure to add color into the open areas on the blades/fan and the railing/deck. Cut out with coordinating dies. Add above the Tulips.


6- Stamp your greeting in VersaMark on Evening Evergreen Cardstock. Add White Embossing Powder and heat to set. Trim to a rectangle shape and add a banner shape to the left edge. Add to the right side in the top half of the card with dimensionals.

7- Add some Pearl Basic Jewels around the flowers and greeting.

All Done!


If you would like to watch me create these cards with step by step tips and directions please watch this video:


If you need any product to make these cards, please visit my online store: http://www.stampinup.com?demoid=2042902

Have a creative day,

Chelsey

chelsey@creativechelsey.com

Monday, May 2, 2022

May 2022 SheetLoad of Cards #SLCTMay2022 - Happiness Abounds Stamp Set & Quick Watercolor Technique

Today I would like to share with you my cards I made with this month’s SheetLoad of Cards by Call Me Crafty Al. Each month Alicia from Call Me Crafty Al designs a fun template to create multiple handmade cards. Her designs are always fun and easy to use. They include a list of the types of products you need along with measurements to help you cut each piece.


The products I used to make these cards are new in the 2022-2023 Stampin’ Up! Annual Catalog. They will be available TOMORROW - MAY 3. I love the fun Glimmer Paper that comes in all 5 new In Colors. Also, the beautiful hand drawn flowers and beautiful sentiments from the Happiness Abounds Stamp Set. I know I will be using this stamp set a lot.


This is another template that uses 6” x 6” pattern paper. I like how the design has a modern feeling to it and this is what gave me the idea to use blocks of color instead of pattern paper for my cards. I also love the black and white elements which really make the design pop. So many fun possibilities with this design.


See what the Collaboration Team created:

   YOUTUBE: #SLCTMay2022 - https://www.youtube.com/hashtag/slctmay2022

   INSTAGRAM : https://www.instagram.com/explore/tags/slctmay2022/


If YOU CREATE cards using this month’s SheetLoad, PLEASE USE the following hashtags: #SUYSMay2022 #ShowUsYourSheetLoad

Get more details on how to “Show Us Your SheetLoad”, here: https://youtu.be/8r6JbbGfWmo

Find out how to download the May 2022 SheetLoad of Cards, here: https://youtu.be/ldQ9lcxpJCM


To purchase any of the products you need to create this project visit https://www.stampinup.com?demoid=2042902

Here are my Current Customer Appreciation Products: http://creativechelsey.blogspot.com/p/shop-stampin-up-products.html

The products I used are:

Happiness Abounds Bundle 158824 $49.50

2022-2024 In Color Glimmer Paper 159246 $12.00

Thick Basic White Cardstock 159229 $8.75

Basic White Cardstock 159276 $10.25

Basic Black Cardstock 121045 $9.25

Daffodil Delight Ink Pad 147094 $8.00

Parakeet Party Ink Pad 159208 $8.00

Melon Mambo Ink Pad 147051 $8.00

VersaMark Ink Pad 102283 $9.50

White Embossing Powder – Basics 155554 $18.00

Pattern Party Designer Series Paper 155426 Host Reward (May 2 last day to order)

Silver & Clear Epoxy Essentials 155567 (May 2 last day to order)

Stampin’ Spritzers 126185 $3.25


Paper Trimmer 152392 $25.00

Clear Block D 118485 $9.00

Simply Shammy 147042 $8.50

Stampin’ Seal Adhesive 152813 $8.00

Dimensionals 104430 $4.25

Multipurpose Liquid Glue 110755 $4.00

Adhesive Sheets 152334 $11.00

Paper Snips 103579 $11.00

Bone Folder 102300 $7.00

Take Your Pick Tool 144107 $10.00

Grid Paper 130148 $12.50

Stampin’ Cut & Emboss Machine 149653 $125.00

Stamparatus 146276 $49.00


A Quick & Easy Watercolor Technique

1- Use the acetate sheet from the Stamp Set. Add ink in the center. Spritz with water.


2- You can also spritz water on the Basic White Cardstock. Then tap the ink on the paper randomly on the cardstock.


3- To get a lighter color, spritz on the acetate sheet again without adding water. Add to the cardstock.


4- Let dry. Then stamp images on top and cut out with coordinating dies.


I have shared and talked about these cards on my YouTube Channel, so check them out.

To purchase any of the products you see in this video visit https://www.stampinup.com?demoid=2042902


Have a creative day!

Chelsey

chelsey@creativechelsey.com