Tuesday, January 18, 2022

Quick & Easy Coloring with Sponge Daubers and the Friendly Hello Stamp Set & Designer Series Paper

Hello my crafting friends,

Today I am excited to share that I was recently invited to the Stampin’ Fancy Friday Design Team. This group of amazing designers create fun challenges each month. We each then design a project around the challenge. Everyone is invited to participate in the challenge each month. Share your project on IG or FB then tag #stampinfancyfriday when you post it. They will share in their stories to inspire others as well!


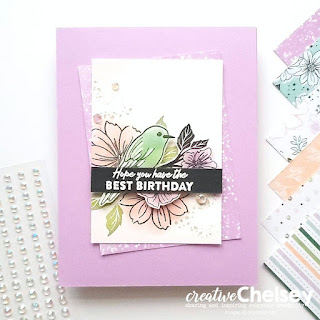
The first challenge of 2022! It's all about BIRTHDAYS! 🎂 Make sure to check out all 24 projects from the team all during January to inspire you because everyone deserves a card on their birthday! 

SALE-A-BRATION

This is the card I made. I used the new Sale-a-bration Friendly Hello Stamp Set & Friendly Hello Designer Series Paper. I love that they come bundled together and you can get them for FREE with a $100 order from now until Feb 28, 2022. 


This stamp set is great, it has both lined and solid stamps making it easy to use with or without coloring. Here I used sponge daubers to add color quickly to the images. Then with a little layering this card came together so quickly.

I hope you are inspired by this card and create your own Birthday project for the challenge this month.


See my Customer Appreciation Products for this month: http://creativechelsey.blogspot.com/p/shop-stampin-up-products.html

Follow me on Instagram https://www.instagram.com/creativechelsey

Or join my Facebook group https://www.facebook.com/groups/2221750878097906

Be sure to check out the rest of the Stampin’ Fancy Friday team’s wonderful creations on Facebook -  https://www.facebook.com/stampinfancyfriday/ or Instagram - https://www.instagram.com/stampinfancyfriday/


To purchase any of the products you need to create this project visit https://www.stampinup.com?demoid=2042902

Here are the dimensions and pieces you will need to create this card:

Fresh Freesia Cardbase 5 ½” x 8 ½” scored at 4 ¼”

Friendly Hello Designer Series Paper 3” x 4”

Shimmery White Cardstock 2 ¾” x 3 ¾” | 2” x 3” scrap

Basic Black Cardstock ½” x 2 ¾”


The products I used are:

Friendly Hello Stamp Set & Friendly Hello Designer Series Paper 159990 *FREE with $100 order

Fresh Freesia Cardstock 155613 $8.75

Shimmery White Cardstock 101910 $10.00

Basic Black Cardstock 121045 $8.75

Fresh Freesia Ink Pad 155611 $7.50

Petal Pink Ink Pad 147108 $7.50

Pool Party Ink Pad 147107 $7.50

Granny Apple Green Ink Pad 147095 $7.50

Sahara Sand Ink Pad 147117 $7.50

Sponge Daubers 133773 $5.00

Memento Black Ink Pad 132078 $6.00

Chalk Marker 132133 $3.50

Basic Black Stampin’ Write Marker 100082 $3.00

VersaMark Ink Pad 102283 $9.50

Basics Embossing Powders (white) 155554 $18.00

Heat Tool 129053 $30.00

Iridescent Rhinestones 158130 $7.50

Paper Trimmer 152392 $25.00

Clear Block D 118485 $8.50

Simply Shammy 147042 $8.00

Stampin’ Seal Adhesive 152813 $8.00

Dimensionals 104430 $4.00

Adhesive Sheets 152334 $10.00

Paper Snips 103579 $10.00

Bone Folder 102300 $7.00

Take Your Pick Tool 144107 $10.00


1- Begin by stamping the double flower image in Memento Black Ink in the bottom left area of the 2 ¾” x 3 ¾” Shimmery White piece. Then add four solid leaves in Granny Apple Green around the flowers. Add the splatter image in Sahara Sand ink in the top left area and bottom right.


2- With a Sponge Dauber and Petal Pink ink pad add color inside the flowers.


3- Stamp the bird & flower image on the other piece of Shimmery White Cardstock in Memento Black ink. Add color with Sponge Daubers, Fresh Freesia to the flowers, Pool Party & Granny Apple Green to the bird. Fussy Cut out.


4- Color in some of the branch with a Black Stampin’ Write Marker.

Add highlights to the birds’ tail with a Chalk Marker.


5- Add the Shimmery White Petal Pink flower piece to the DSP at an angle. Add this to the center of the cardbase. You will want the Shimmery White piece to be straight on the card.


6- Add the bird with dimensionals over the Petal Pink flowers. Trim off the tail of the bird at the branch.


7- On the Black ½” strip stamp your greeting in VersaMark ink, add white embossing powder and heat. Then add to the card over the bird with dimensionals. Cover up the branch. Tuck the tail under the greeting with a dimensional. Make sure to place it so the tail of the bird is inline with the body.

8- Add three Iridescent Rhinestones.

All Done!


If you would like to watch me create this card with step by step tips and directions please watch this video:

If you need any product to make these cards, please visit my online store: http://www.stampinup.com?demoid=2042902

Here are a couple more cards I made with the Friendly Hello Stamp Set & Designer Series Paper


Have a creative day,

Chelsey

chelsey@creativechelsey.com 

Wednesday, January 12, 2022

February 2022 Exclusive Online Card Class - Rainbow of Happiness Stamp Set - Shaker Cards

Registration is closed


Join me for exclusive Online Card Making Tutorials from February 21-26, 2022!
Class Fee - $30

Today I would like to share with you my upcoming Online Class for February 2022. In this class we will be creating 6 Fun Shaker Cards with the Rainbow of Happiness Bundle, which includes the Rainbow of Happiness Stamp Set & coordinating Brilliant Rainbow Dies. Both these items can be found in the new January-June Mini Catalog or online.

I am excited to share these cards with you today. I hope you decided to join me, it will be fun!


There are two different shaker card techniques we will explore during this class. One creates a thicker card and uses Foam Adhesive Strips and window sheets, while the other uses plastic to create a pocket for the shaker elements.

Each of these cards uses the techniques to create unique and visually interesting cards. Giving you new ideas on how to create shaker cards.

The soft yet still bright cards are perfect for this time of year and will give you that extra incentive to spread some happiness.

To sign up for this class, please use the PayPal button below.


RAINBOW SHAKER CLASS - $30 (US Only)

When you sign up you will receive a class kit. This kit is only available to participants in the United States. If you live outside of the US you can choose the tutorial only option below.

This kit will include:

• Pre-cut cardstock with die cuts

• Window Sheets & Clear Envelopes

• Basic White Envelopes

• New Assortment of Sparkle & Shine Sequins

• New Roll of Pool Party Sheer Ribbon

• 12- 6” x 6” Sheets of Sunshine & Rainbows Designer Series Paper – Sale-a-bration item

*Please note that I reserve the right to switch products based on availability. Substituted products will be of similar value and keep the integrity of the design.


This class will run from Monday February 21 thru Saturday February 26. We will meet each day during the week to create one of the six cards.

This class is open to everyone, customers and demonstrators. Participants can join me live at 10am Mountain Time for the sessions during the week or can watch the replay videos at their leisure.


This class will take place in a Private Facebook Group. In this group we will have 6 Facebook Live session scheduled at 10am Mountain Time each day during the week of February 21st. In each session I will walk you through how to make the card and show you the techniques needed.

If you are able to join me live, you can also ask questions and get personal help. These video sessions will be recorded and will stay in the group so you can watch the replay at any time. I will also be posting written PDF instructions for each card in the group.

Not on FACEBOOK? You can still participate through email. After each session I will send you a link to watch the replay along with a written PDF with step by step instructions. After you register/pay please email me - chelsey@creativechelsey.com - letting me know you are not on Facebook!


In this Facebook Group I will post:

• Written instructions for each card (PDF) with measurements so you can create more cards.

• Facebook Live Videos for each card where I will walk you through each step to create the cards. Watch live or when you have the time.


To participate in this class and complete these cards you will need to have these supplies. They will not be provided to you in your class kit. If you need to purchase any of these items please purchase them through my online store https://www.stampinup.com?demoid=2042902 and use the host code WJW4ADYB.

What is not included (you will need to have these supplies to complete the cards):

• Rainbow Of Happiness Bundle – 157727 $44.00

• Flirty Flamingo Ink Pad – 147052 $7.50

• Pale Papaya Ink Pad – 155670 $7.50

• Soft Sea Foam Ink Pad – 147102 $7.50

• Pool Party Ink Pad – 147107 $7.50

• Memento Black Ink Pad – 132708 $6.00

Here are the tools you will need:

• Paper Trimmer (152392)

• Stampin’ Cut & Emboss Machine (149653)

• Tools: Ribbon/fabric scissors, paper snips, bone folder, take a pick tool, clear blocks A, C, D, E and stamp cleaner

• You will also want a variety of adhesives including Mini Dimensionals, Foam Adhesive Strips, Stampin’ Seal, Tear & Tape, Liquid Adhesive

If you need any Stampin Up product to take this class you can visit my online store at https://www.stampinup.com?demoid=2042902

Please use host code when ordering: WJW4ADYB

Please contact me if you have any questions chelsey@creativechelsey.com


FINE PRINT:

• Registration for this class closes on Saturday February 5th.

• This class is available to both customers and Stampin’ Up demonstrators in the USA. If you live outside of the USA I do offer a TUTORIALS ONLY option for you (not available to those in USA). Please select the correct option when paying.

• I will ship the class kit to the address listed in PayPal. Please make any changes before you pay.

• I will contact you and send you class information using the email address you enter in PayPal. Please make sure it is your current email address.

• I reserve the right to switch products based on availability. Substituted products will be of similar value and keep the integrity of the design.

Please notify me ASAP if there is a problem or the information in PayPal is incorrect – chelsey@creativechelsey.com

Registration is closed


These images are close-ups of the cards we will be making in this Exclusive Online Class! Don't miss it!

Please contact me with any questions

Have a creative day,

Chelsey

chelsey@creativechelsey.com


Monday, January 10, 2022

Use The Stamps from the December 2021 Paper Pumpkin Kit To Create More Handmade Cards - Stampin' Up!

Welcome to Paper Pumpkin Week here at Creative Chelsey. I love getting my Paper Pumpkin Kit every month and creating fun alternative projects using the supplies in the kit. Today I am sharing my last alternative idea using the December 2021 Paper Pumpkin Kit – Lots of Pun. This kit comes with everything you need to make 9 Punny Cards, 3 in three different designs.


Every month my Paper Pumpkin subscribers receive an exclusive card kit designed by me using the stamp set from that month’s Paper Pumpkin Kit. These are the cards they will be creating as an extra thank you for being my Paper Pumpkin Customer. If you would like to also receive this special perk, sign up today and select me as your demonstrator (Chelsey Christensen, CO) click here: https://www.paperpumpkin.com/en-us/sign-up/?demoid=2042902.


These cards are quick and easy and can be used with any stamp set. I love creating alternative projects with Paper Pumpkin Kits so make sure to come back for more as I continue to create with this month’s kit. If this project inspires you to create something, I would love for you to tag me in any social media post using @creativechelsey | #creativechelsey or email me at chelsey@creativechelsey.com


It is Paper Pumpkin Week here on Creative Chelsey. This is the last alternative this week. If you would like to see all my alternatives check out the playlist here: https://youtube.com/playlist?list=PL40dV1oxpkNmsKFbVLmhdr8k5iwqH__IZ

Want to see everything in this month’s kit? Watch me UNBOX this month’s Paper Pumpkin Kit here: https://youtu.be/sN3mYgRHYHE


Don't miss out on next month’s Paper Pumpkin Kit - subscribe today!

SUBSCRIBE to Paper Pumpkin - click here –

https://www.paperpumpkin.com/en-us/sign-up/?demoid=2042902


See my Customer Appreciation Products for this month: http://creativechelsey.blogspot.com/p/shop-stampin-up-products.html

Follow me on Instagram https://www.instagram.com/creativechelsey

Or join my Facebook group https://www.facebook.com/groups/2221750878097906


To purchase any of the products you need to create this project visit https://www.stampinup.com?demoid=2042902

Here are the extra pieces of cardstock I used for the cards:

Thick Basic White Cardstock 5 ½” x 8 ½” scored at 4 ¼”

Basic White Cardstock 4” x 5 ¼” | 2” x 2”

Basic Black Cardstock 2 ¼” x 2 ¼”

Pattern Party Designer Series Paper 2” x 2”


Here is a list of the supplies I used to make the card:

Thick Basic White Cardstock 159229 $8.25

Basic White Cardstock 159276 $9.75

Basic Black Cardstock 121045 $8.75

Pattern Party Designer Series Paper 155426 Host $18.00

Matte Black Dots 154284 $7.00

Early Espresso Ink Pad 147114 $7.50

Watercolor Pencils Assortment 1 141709 $16.00

Paper Trimmer 152392 $25.00

Simply Shammy 147042 $8.00

Stampin’ Seal PLUS Adhesive 149699 $12.00

Multipurpose Liquid Glue 110755 $4.00

Tear & Tape Adhesive 138995 $7.00

Dimensionals 104430 $4.00

Clear Block D 118485 $8.50

Paper Snips 103579 $10.00

Bone Folder 102300 $7.00

Stampin' Pierce Mat 126199 $5.00

Take Your Pick Tool 144107 $10.00


1- Stamp your food image on Basic White Cardstock in your choice or Early Espresso ink. Color with your choice of coloring tools. I used Watercolor Pencils. Repeat if multiple images are desired. Fussy cut out.


2- Layer the pattern paper over the Basic Black Cardstock. Add with dimensionals to the center of the 4” x 5 ¼” Basic White Cardstock. I placed it 1 ½” from the side and ¾” from the top.


3- Add the food images with dimensionals to the center of the pattern paper.


4- Stamp your greeting in Early Espresso ink directly below the Basic Black square. Add everything to the cardbase. Then add a couple Matte Black Dots.

All Done!


I have also created a video walking you through each step and some of the details from the other cards:

To purchase any of the products you see in this video visit

https://www.stampinup.com?demoid=2042902


Have a creative day!

Chelsey

chelsey@creativechelsey.com

Friday, January 7, 2022

CELEBRATE! Lots of Pun - December 2021 Paper Pumpkin Kit Quick & Simple Alternative Card Ideas

Welcome to Paper Pumpkin Week here at Creative Chelsey. I love getting my Paper Pumpkin Kit every month and creating fun alternative projects using the supplies in the kit. Today I am sharing my fourth alternative idea using the December 2021 Paper Pumpkin Kit – Lots of Pun. This kit comes with everything you need to make 9 Punny Cards, 3 in three different designs.


What I like to do is use the supplies in the kit and create different or alternative cards. Today I am sharing a quick and simple idea using the supplies from the kit to create a fun card to celebrate any occasion. I love creating alternative projects with Paper Pumpkin Kits so make sure to come back for more as I continue to create with this month’s kit.


If this project inspires you to create something, I would love for you to tag me in any social media post using @creativechelsey | #creativechelsey or email me at chelsey@creativechelsey.com.


It is Paper Pumpkin Week here on Creative Chelsey. This is the fourth alternative this week. If you would like to see all my alternatives check out the playlist here: https://youtube.com/playlist?list=PL40dV1oxpkNmsKFbVLmhdr8k5iwqH__IZ

Want to see everything in this month’s kit? Watch me UNBOX this month’s Paper Pumpkin Kit here: https://youtu.be/sN3mYgRHYHE


Don't miss out on next month’s Paper Pumpkin Kit - subscribe today!
SUBSCRIBE to Paper Pumpkin - click here –


See my Customer Appreciation Products for this month: http://creativechelsey.blogspot.com/p/shop-stampin-up-products.html

Follow me on Instagram https://www.instagram.com/creativechelsey

Or join my Facebook group https://www.facebook.com/groups/2221750878097906

To purchase any of the products you need to create this project visit https://www.stampinup.com?demoid=2042902

Here are the extra pieces of cardstock I used for the cards:

None

From the Kit:

Yellow cardbase

Colorful stripe strip

Pool Party thin rectangle label

Die cut pieces


Here is a list of the supplies I used to make the card:

Early Espresso Ink Pad 147114 $7.50

Paper Trimmer 152392 $25.00

Simply Shammy 147042 $8.00

Stampin’ Seal PLUS Adhesive 149699 $12.00

Multipurpose Liquid Glue 110755 $4.00

Tear & Tape Adhesive 138995 $7.00

Dimensionals 104430 $4.00

Clear Block D 118485 $8.50

Paper Snips 103579 $10.00

Bone Folder 102300 $7.00

Stampin' Pierce Mat 126199 $5.00

Take Your Pick Tool 144107 $10.00


1- Ink up only the word Celebrate from the “Celebrate Go Bananas” greeting with Early Espresso ink. Then repeat it running vertically down the cardbase 8 times left of center.


2- Adhere the colorful stripe strip over the second to bottom “Celebrate”.


3- Stamp the coordinating image over two of the die cuts from the kit in Early Espresso ink. Add a face with glasses or mustache. Stamp two party hats on scraps from the kit in Early Espresso ink and fussy cut out. Add the hats to the top of the die cuts. Adhere one die cut with a dimensional near the strip & words. Adhere the other above.


4- Stamp Celebrate again on ½” of a Pool Party thin rectangle label and cut to size. Adhere with dimensionals over the Celebrate above the strip.Stamp a second greeting on another Pool Party label. Adhere over the strip below the die cuts.

5- Add enamel dots to finish.

All Done!


I have also created a video walking you through each step and some of the details from the other cards:

To purchase any of the products you see in this video visit

https://www.stampinup.com?demoid=2042902

Have a creative day!

Chelsey

chelsey@creativechelsey.com