Thursday, April 30, 2020

New Plastic Wrap Watercolor Technique with Pigment Sprinkles and Beautiful Day Stamp Set - Stampin Up


The other day I ran across a YouTube video from K Werner Design where she used plastic wrap over watercolor paints to create a kind of tie-dyed look. Today I wanted to try that same technique but with the Pigment Sprinkles and some other of my favorite products that are retiring on June 2, 2020. I love strong graphic images and the butterfly and flower from the Beautiful Day Stamp Set really make a card pop when used with this watercolor technique. I would love to see your finished creations that are inspired by this tutorial! You can tag me in any social media post using @creativechelsey or #creativechelsey.


To see the list of retiring products visit my online store: https://www.stampinup.com/ecweb/products/1000600/last-chance-productsdbwsdemoid=2042902

Follow me on Instagram https://www.instagram.com/creativechelsey/
Or join my Facebook group https://www.facebook.com/groups/2221750878097906

To purchase any of the products you need to create this project visit https://www.stampinup.com/ECWeb/default.aspx?culture=en-us&dbwsdemoid=2042902

Here are the dimensions and pieces you will need to create these cards:
Balmy Blue Cardstock card base 8 ½” x 5 ½” scored at 4 ¼”
Blushing Bride Cardstock card base 8 ½” x 5 ½” scored at 4 ¼”
Thick Whisper White Cardstock card base 8 ½” x 5 ½” scored at 4 ¼”
Whisper White Cardstock 4 ¼” x 6 ¼” (butterfly) 3 ¼” x 6” (flower)
Watercolor Paper 3 ½” x 5” (background) 4 ¼” x 6 ¼” (butterfly) 3 ¼” x 6” (flower)
Basic Black Cardstock 3 ½” x 5” (background) | scraps for greeting
Golden Honey Specialty DSP – retired ½” x 5” | (2) ½” x 3 ¼”


Here is a list of the supplies I used to make the card:
Beautiful Day Stamp Set 151257 $21.00
Stitched All Around Stamp Set 151287 $19.00
Balmy Blue Cardstock 146982 $8.75
Blushing Bride Cardstock 131198 $8.75
Thick Whisper White Cardstock 140272 $8.25
Whisper White Cardstock 100730 $9.75
Fluid 100 Watercolor Paper 149612 $9.00
*Pigment Sprinkles 149663 $23.00 (on sale $16.10)
Stampin Spritzers 126185 $3.00
VersaMark Ink Pad 102283 $9.50
White Embossing Powder 109132 $6.00
Black Embossing Powder 146956 $6.00
*Embossing Buddy 103083 $6.00
Heat Tool 129053 $30.00
Wink of Stella 141897 $8.00
Plastic Wrap
*Silver Metallic Thread 138402 $3.50
*Rose Metallic Thread 146915 $3.50
White Craft Ink 147277 $9.50
*Aqua Painters 103954 $17.00
Plastic Wrap
Stamparatus 146276 $49.00
Paper Trimmer 152392 $25.00
Simply Shammy 147042 $8.00
Snail Adhesive 104332 $7.00
Multipurpose Liquid Glue 110755 $4.00
Dimensionals 104430 $4.00
Clear Block D 118485 $8.50
Paper Snips 103579 $10.00
Bone Folder 102300 $7.00
Stampin' Pierce Mat 126199 $5.00
Take Your Pick Tool 144107 $10.00

* These items are retiring and will not be available after June 2, 2020. Click here to see all retiring products: https://www.stampinup.com/ecweb/products/1000600/last-chance-products?dbwsdemoid=2042902

Plastic Wrap Watercolor Technique
1- Begin with a piece of plastic wrap. Scrunch it up a little to create wrinkles. Sprinkle Pigment Sprinkles over the area about the size of your paper and spray with water.
2- Place paper on top. Fold up the sides of the plastic wrap. Turn over and move the water and color around with your fingers. Keep the wrinkles. Set aside for a minute to let the color soak into the paper.
3- Unwrap and let dry or use a heat tool.
Create the card:
1- Use the Embossing Buddy or a dryer sheet to remove static from the paper you want to stamp the butterfly or flower on. Stamp with the Stamparatus so you can double stamp with VersaMark to make sure you getting a good image.
2- Add your choice of Black or White embossing powder. Tap off excess, and heat with heat tool. Repeat the stamping and embossing so you have 2 images.
3- Fussy cut out the images.
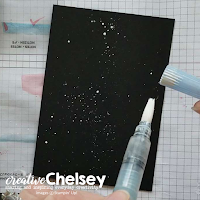
4- If using Black cardstock as your background use the Aqua Painters and White Craft Ink and add some splatters on the top.


5- Place the black white stripe strip on the left or right / top and bottom of the 3 ½” x 5” piece. Add to your card base.

6- Wrap the metallic thread around your hand 5X and adhere to the back of both butterfly (silver) or flowers (rose). Add these to your card with dimensionals. Trim off any part that is off the cardbase.

7- On Black Cardstock stamp your greeting in VersaMark Ink and heat emboss with white embossing powder. Fussy cut. Place in an open area on your card with dimensionals.

8- Use Wink of Stella to add a little glimmer over the butterfly / flower images.

All Done!

Here is the same project as a video tutorial.


To purchase any of the products you see in this video visit https://www.stampinup.com/ECWeb/default.aspx?culture=en-us&dbwsdemoid=2042902

Have a creative day!
Chelsey

Tuesday, April 28, 2020

Three Boy Birthday Handmade Cards using the Bonanza Buddies Stamp Set & Dies from Stampin Up


For Today’s tutorial I wanted to share these cute boy inspired birthday cards using the Bonanza Buddies Stamp Set and coordinating Bonanza Dies. I love this adorable stamp set and know you will too. Don’t wait to long to get it, this stamp set and dies retire on June 2, 2020 and won’t be available to purchase through Stampin’ Up. I am also using the 2018-2020 In Colors; Lovely Lipstick, Grapefruit Grove, Pineapple Punch, Call Me Clover, and Blueberry Bushel. These colors are fun and vibrant and perfect for any gender birthday/celebration. They also retire soon, so don’t miss this last chance to get them. I would love to see your finished creations that are inspired by this tutorial! You can tag me in any social media post using @creativechelsey or #creativechelsey.


To see the list of retiring products visit my online store: https://www.stampinup.com/ecweb/products/1000600/last-chance-products?dbwsdemoid=2042902


Follow me on Instagram https://www.instagram.com/creativechelsey/
Or join my Facebook group https://www.facebook.com/groups/2221750878097906


To purchase any of the products you need to create this project visit https://www.stampinup.com/ECWeb/default.aspx?culture=en-us&dbwsdemoid=2042902

Here are the dimensions and pieces you will need to create these cards:
Card #1:
Smoky Slate Cardstock card base 8 ½” x 5 ½” scored at 4 ¼”
Blueberry Bushel Cardstock 3 ½” x 3”
Lovely Lipstick Cardstock 1 ½” x 5”
Whisper White Cardstock 2” x 4 ¼” | 2” x 2”
Daffodil Delight Ruched Ribbon 10”

Card #2:
Smoky Slate Cardstock card base 8 ½” x 5 ½” scored at 4 ¼”
Blueberry Bushel Cardstock 3 ½” x 4 ½”
Whisper White Cardstock 3” x 3 ½” | 1” x 1 ¾” | 2” x 4”
Lovely Lipstick Cardstock ¾” x 4 ¼”
Call Me Clover Cardstock 2 ½” x 2 ½”
Red Twine 12”

Card #3:
Smoky Slate Cardstock card base 8 ½” x 5 ½” scored at 4 ¼”
Call Me Clover Cardstock 3 ½” x 4 ½”
Whisper White Cardstock 3” x 4 ¼” | 2 ½” x 4” | 2” x 2”
Pineapple Punch Cardstock 1” x 8 ½”
Black Twine 8”


Here is a list of the supplies I used to make the card:
Smoky Slate Cardstock 131202 $8.75
Smoky Slate Ink Pad 147113 $7.50
*Lovely Lipstick Cardstock 146970 $8.75
*Lovely Lipstick Ink Pad 147140 $7.50
*Grapefruit Grove Cardstock 146972 $8.75
*Grapefruit Grove Ink Pad 147142 $7.50
*Pineapple Punch Cardstock 146971 $8.75
*Pineapple Punch Ink Pad 147141 $7.50
*Call Me Clover Cardstock 146969 $8.75
*Call Me Clover Ink Pad 147139 $7.50
*Blueberry Bushel Cardstock 146968 $8.75
*Blueberry Bushel Ink Pad 147138 $7.50
Memento Black Ink Pad 132708 $6.00
*Bonanza Buddies Bundle (Save 10%) 153815 $38.50
     Includes: *Bonanza Buddies Stamp Set 151567 $17.00
     *Bonanza Dies 151566 $26.00
Daffodil Delight Ruched Ribbon 151311 $7.50
*Country Club Twine Combo Pack 151318 $9.00
Banner Tripe Punch 138292 $23.00
Layering Circle Dies 141705 $35.00
Journaling Pens (2) 145480 $6.00
Paper Trimmer 152392 $25.00
Simply Shammy 147042 $8.00
Snail Adhesive 104332 $7.00
Multipurpose Liquid Glue 110755 $4.00
Dimensionals 104430 $4.00
Clear Block D 118485 $8.50
Paper Snips 103579 $10.00
Bone Folder 102300 $7.00
Stampin' Pierce Mat 126199 $5.00
Take Your Pick Tool 144107 $10.00

* These items are retiring and will not be available after June 2, 2020. Click here to see all retiring products: https://www.stampinup.com/ecweb/products/1000600/last-chance-products?dbwsdemoid=2042902

Card #1:
1- Randomly stamp the circle image in Blueberry Bushel Ink on the Blueberry Bushel Cardstock.
2- Randomly stamp the long stripe image in Lovely Lipstick Ink on the Lovely Lipstick Cardstock. Keep the stamp horizontal and the paper should be vertical.
3- Punch one end of the Whisper White Cardstock with the Triple Banner Punch. Stamp the greeting “Let’s celebrate you!” in Memento Black Ink at the top. Stamp the balloon strings in black in the center to the left. Stamp the circle image in Blueberry Bushel, Lovely Lipstick, and Pineapple Punch to look like balloons on top of the strings. Use a black journaling pen to draw on bows where the string and balloon meet.
4- Stamp the Toucan in Memento Black ink on the small Whisper White Cardstock. Use the beak image and stamp Pineapple Punch inside the beak outline. Use the coordinating die and cut. Adhere with dimensionals in the center of the Whisper White strip so the beak is holding the bunch of balloons.
5- Adhere the Blueberry Bushel Cardstock to the front of the cardbase so the 3” edge is touching the right edge of the card and about 1” from the top. Adhere the Lovely Lipstick cardstock so the 1 ½” edge is touching the top of the card about 1 ½” from the right.
6- Add 10” of ribbon to the back of the Whisper White strip so it loops at the top and the ends hang at the bottom. Attach this element to the card with dimensionals so it sits in the center between the Blueberry Bushel and Lovely Lipstick cardstocks.

All Done!
Card #2:
1- Use the following stamp images and colors to create a random background on the large Whisper White Cardstock:
     Circle image: Call Me Clover Ink
     Triangle image: Blueberry Bushel Ink
     Starburst image: Lovely Lipstick Ink
2- Stamp the greeting “Happy Birthday” in Memento Black Ink on the strip of Whisper White. Stamp the Lion’s body in Pineapple Punch and the Mane in Grapefruit Grove and face in black.
3- Use the coordinating dies to cut out. Cut out a 2” circle of the Call Me Clover Cardstock with a punch or the Layering Circle Dies.
4- If you want, create a fringe boarder around the Blueberry Bushel cardstock using your paper snips. Adhere the cardstock to the front of the cardbase in the center. Add the pattern piece in the center so the left, top, and right sides around about the same. There should be more space on the bottom.
5- Add the Lovely Lipstick strip at the bottom of the pattern piece, there should still be a little more space showing at the bottom of the Blueberry Bushel piece.
6- Add the Lion to the right side of the 2” circle. Use a dimensionals to pop up the head.  Add 12” of twine wrapped back and forth to the back of the circle. Add the greeting just under the Lion’s body to the left. Add this element to the bottom of the pattern piece with dimensionals. Leave some of the Blueberry Bushel Cardstock showing.

All Done!
Card #3:
1- Use the following stamp images and colors to create a random background on the large Whisper White Cardstock:
     Large rectangle: Grapefruit Grove Ink
     Long rectangle: Call Me Clover Ink
     Small rectangle: Pineapple Punch Ink
     Bow for small rectangle: Black Ink
2- Cut from the medium piece of Whisper White the tag die from the Bonanza Dies. Cut both banners with in Pineapple Punch Cardstock.
3- Stamp the greeting in the center of the tag near the top in Black Memento Ink. Stamp the Koala in Smoky Slate Ink and the face in Black. Cut with the coordinating die.
4- Adhere the Call Me Clover Cardstock to the cardbase at an angle in the bottom right corner. Add the pattern piece at an opposing angle in the center.
5- Tie the black twine on the tag and add to the right side of the pattern paper with dimensionals. Add both Banners to the bottom of the tag so the cross on the right side. Add the Koala with dimensionals over the cross.

All Done!


Here is the same project as a video tutorial.


To purchase any of the products you see in this video visit https://www.stampinup.com/ECWeb/default.aspx?culture=en-us&dbwsdemoid=2042902

Have a creative day!
Chelsey

Friday, April 24, 2020

New ways to use the elements in April 2020 Paper Pumpkin Kit from Stampin Up | Handmade Card Ideas


It has been so fun playing with all the different elements from April 2020 Paper Pumpkin Kit. For my last tutorial I wanted to use the elements in a unique way to give you more ideas on ways you can use your kit. I have used the white side of the large leaf die cut and fussy cut around the leftover paper to get an outline of the same shape. When used together I think they create a fun central element. I hope you have enjoyed my Paper Pumpkin Alternative Card ideas this week.


It is Paper Pumpkin Week here on CreativeChelsey. This is the fifth and last tutorial this week. Make sure to look at previous posts for more inspiration on how to use your kit.

Don't miss out on next months Paper Pumpkin Kit - subscribe today!
SUBSCRIBE to Paper Pumpkin - click here –
https://www.paperpumpkin.com/en-us/sign-up/?demoid=2042902

To purchase any of the products you see in this video visit
https://www.stampinup.com/ECWeb/default.aspx?culture=en-us&dbwsdemoid=2042902


Here are the dimensions and pieces you will need to create this card:
From the Kit:
Shaded Spruce Leaf Die cut and surrounding paper
Melon Mambo Ribbon 5”
Bird Die Cut

Extra Cardstock:
Mint Macaron Cardstock card base 8 ½” x 5 ½” scored at 4 ¼”
Melon Mambo Cardstock 4” x 5 ¼”
Soft Sea Foam Cardstock 3 ¾” x 5”
Whisper White Cardstock ½” strip
Linen Thread 16”


Here is a list of the supplies I used to make the cards:
Mint Macaron Cardstock 138337 $8.75
Melon Mambo Cardstock 115320 $8.75
Soft Sea Foam Cardstock 146988 $8.75
Whisper White Cardstock 101650 $9.75
Mint Macaron Ink Pad 147106 $7.50
Melon Mambo Ink Pad 147051 $7.50
Linen Thread 104199 $5.00
Aqua Painter 103954 $17.00
Heat Tool 129053 $30.00
Paper Trimmer 152392 $25.00
Simply Shammy 147042 $8.00
Snail Adhesive 104332 $7.00
Multipurpose Liquid Glue 110755 $4.00
Dimensionals 104430 $4.00
Clear Block D 118485 $8.50
Paper Snips 103579 $10.00
Bone Folder 102300 $7.00
Stampin' Pierce Mat 126199 $5.00
Take Your Pick Tool 144107 $10.00
Simply Scored Scoring Tool 122334 $30.00

1- Create a watercolor wash with the Mint Macaron ink pad on the Soft Sea Foam cardstock. Let dry. You can also splatter some ink after it has dried a little.
2- Carefully remove the Shaded Spruce Leaf from the surrounding paper. Then fussy cut around the leftover shape to give you another piece that is just the outline of the leaf.
3- Distress the edges of the Melon Mambo cardstock with your paper snips. When dry add the Soft Sea Foam cardstock at angle on top of the Melon Mambo cardstock.
4- Wrap the linen thread around these two pieces near the bottom. Tie a knot on the left side. Fold the Melon Mambo ribbon in half and add it on top of the knot. Then tie the Linen Thread into a bow. Add this element to the front of the cardbase.
5- Add the outline leaf piece to the center of the card with the stem under the thread. Add the solid leaf with the white side up over the outline in the center of the card under the thread.
6- Stamp your greeting on the ½” strip of Whisper White cardstock in Melon Mambo ink. Add the card so the left side is over the bow and use dimensionals to pop up the middle and right side. Add a bird die cut near the bow with a dimensional.

All Done!


I have also created a video walking you through each step:


To purchase any of the products you see in this video visit
https://www.stampinup.com/ECWeb/default.aspx?culture=en-us&dbwsdemoid=2042902


Have a creative day!
Chelsey