This is the second tutorial in my series Cut It to...Create It. Today I would like to share with you 7 cards that I have made using one sheet of Designer Series Paper along with coordinating cardstock, stamps, ink, markers, accessories, and adhesive. The template is very versatile and can be used with different Designer Series Paper Packs, Stamp Sets, and color combinations.
I chose to create 2 sets of cards using different Designer Series Paper Packs, Stamp Sets, and color combinations to help you see how you can use this template to create your own cards. I would love to see what you create so lets share it online by using the #cutittocreateit .
I am offering the cutting templates and pictures of each card for free on this blog post. However, if you are interested in knowing how I put together each individual card and all the supplies I used you can purchase the pdf tutorials for $5.00 USD. Please send me your contact information by filling out this form and I will email you the details. https://www.surveymonkey.com/r/VYNP9CD
Here is what you will need to create 7 cards with 1 sheet of Designer Series Paper:
1 - 12" x 12" Sheet of Designer Series Paper
4 - 8.5" x 11" Sheets of White or Vanilla Cardstock
Cut 7 cards bases 8.5" x 5.5" and use the last 1/2 sheet for cutting and stamping
1 - 8.5" x 7.5" Sheet of Cardstock in a coordinating color (Color A)
1 - 8.5" x 7.5" Sheet of Cardstock in a second coordinating color (Color B)
Coordinating Stamps / Ink / Markers / Accessories / Adhesive
In today's tutorial I share with you a new stamping technique called no-line coloring. You can do this technique with all different types of mediums, watercolors, colored pencils, etc. Today I will show you how to do it with Stampin Up's Alcohol Markers - Stampin' Blends. I hope you enjoy this tutorial and give this technique a try.
Here are the measurements for the cardstock needed to make this card:
Very Vanilla Thick Cardstock card bases 5.5" x 8.5" scored at 4.25"
Very Vanilla Cardstock 3 7/8" x 5 1/8"
Crumb Cake Cardstock 4" x 5.25" / 0.5" x 3"
Here is a list of the supplies I used to make the card:
Beautiful Day Stamp Set 151257 $21.00
Very Vanilla Thick Cardstock 144237 $8.25
Very Vanilla Cardstock 101650 $9.75
Crumb Cake Cardstock 120953 $8.75
Sahara Sand Ink Pad 147117 $7.50
Soft Suede Ink Pad 147115 $7.50
Whisper White Ink Pad 147227 $9.50
Calypso Coral Stampin' Blends (Light & Dark) 144045 $9.00
Old Olive Stampin' Blend (Light & Dark) 144597 $9.00
Daffodil Delight Stampin' Blends (Light & Dark) 144603 $9.00
Smoky Slate Stampin' Blends (Light) 145054 $4.50
Color Lifter Stampin' Blends 144608 $4.50
Pumpkin Pie Stampin' Blends (Dark) 144577 $4.50
Aqua Painter 103954 $17.00
Shimmery Crystal Effects 150892 $5.00
Simply Shammy 147042 $8.00
Stampin' Pierce Mat 126199 $5.00
Snail Adhesive 104332 $7.00
Dimensionals 104430 $4.00
Multipurpose Liquid Glue 110755 $4.00
Clear Block E 118484 $12.00
Paper Snips 103579 $10.00
1- On the Very Vanilla Cardstock stamp with a light neutral color (I used Sahara Sand) the flower image multiple times. I stamped off my cardstock and then stamped on my cardstock (without reinking) to get an even lighter color of ink.
2- Start with the Dark Calypso Coral Blend Marker and outline all the petals
3- Work on one petal at a time, fill in the petal with the Light Calypso Coral Blend Marker.
4- Use the Dark Calypso Coral to add some depth and shape to your petal. Place this color in the center area of the petal. Stay away from the top or edge of the petal.
5- Use a neutral color like Light Smoky Slate Blend Marker to add a shadow along the bottom. Look for where the petals in front would cast a shadow.
Here is a close up of all the layers before they are blended together.
6- Blend all the layers of color with the Light Calypso Coral Blend Marker. Keep moving the color around until the amount of blend you want is achieved.
Note - Alcohol markers do bleed to the back of your cardstock - make sure to protect your surface.
7- Repeat on all the other petals.
8- Use the Color Lifter Blends Marker to add highlights to the tips of each petal. Just swipe once on each tip. The color will lighten slowly so give it some time before using it over and over, it may take away more color than you want.
9- For the leaf follow the same steps. Start by outlining the leaf with the Dark Old Olive Blends Marker.
10- Add any other colors you may want like a yellow and the shadow.
11- Blend everything together with the Light Old Olive Blends Marker.
12- Use the Color Lifter to add a couple highlights.
13- For the center of the flower use the Light Daffodil Delight Blends Marker all over
14- Use the Dark Pumpkin Pie with the fine tip side and outline the circles in that are in the center of the flower. Don't do too much in the center or the colors can get really muddy.
15- Repeat all these steps to the other flowers.
16- You don't have to do this step if you don't want this look- Splatter Whisper White and Soft Suede over the flowers.
I use an aqua painter and the ink from the lid of the ink pad. Pick up the color and then run it over the lid of the aqua painter to splatter on my cardstock. You can watch how I do this in my video below.
17- Stamp a greeting on the strip of Crumb Cake Cardstock in black ink.
18- Layer the flowers on to the Crumb Cake Cardstock with snail adhesive.
19- Use dimensionals and layer this to the Very Vanilla card base.
20- Add the greeting with dimensionals anywhere you like.
21- Lastly, add Shimmery Crystal Effects on to the flowers. This give a little dew drop look to the flowers. Let dry.
All done!
I have made video walking you through all the steps above. Check it out.
Today's tutorial focuses on using up those extra pieces you have from your October 2019 Paper Pumpkin Kit - Winter Woods! After making some really fun alternative cards with this kit from Stampin Up I had some extra pieces that weren't used. This handmade card was inspired by those pieces. I also show you how to create a heat emboss resist with a watercolor background to create a beautiful snowflake sky. I hope you give it a try.
It is Paper Pumpkin Week here on CreativeChelsey. Check out my other tutorials at these links.
Monday - Turn the original card into a Shaker Card -
Tuesday - Two Beautiful Alternative Cards -
Wednesday - Turn the Snowflake Stamp into Autumn Leaves -
Thursday -
Friday -
Here are the dimensions and pieces you will need to create these cards:
Gray Granite Cardstock card base 5.5" x 8.5" scored at 4.25"
Poppy Parade Cardstock 3" x 3/75"
Fluid 100 Watercolor Paper 3.5" x 5"
20" White Bakers Twine
Here is a list of the supplies I used to make the cards:
Gray Granite Cardstock 146983 $8.75
Poppy Parade Cardstock 119793 $8.75
Poppy Parade Ink Refill 119791 $3.75
Fluid 100 Watercolor Paper 149612 $9.00
White Bakers Twine 124262 $3.50
Night of Navy Ink Pad 147110 $7.50
VersaMark Ink Pad 102283 $9.50
Shimmer White Embossing Powder 149511 $6.00
Heat Tool 129053 $30.00
Embossing Buddy 103083 $6.00
Aqua Painter 103954 $17.00
Shimmery Crystal Effects 150892 $5.00
Stamparatus 146276 $49.00
Simply Shammy 147042 $8.00
Snail Adhesive 104332 $7.00
Multipurpose Liquid Glue 110755 $4.00
Dimensionals 104430 $4.00
Clear Block D 118485 $8.50
Paper Snips 103579 $10.00
Bone Folder 102300 $7.00
Stampin' Pierce Mat 126199 $5.00
Take Your Pick Tool 144107 $10.00
1- Use the Fluid 100 Watercolor paper and cut it in half to be 3.5" x 5". Rub some embossing buddy onto the front of this paper.
2- With the Snowflake stamp and VersaMark ink. Randomly stamp about 5 snowflakes on the watercolor paper.
3- You may want to add the embossing powder after you stamp each snowflake so you can see where they are.
4- Use a heat tool to heat the embossing powder.
5- I love how the shimmery embossing powder looks. So pretty
6- Use an aqua painter and the Night of Navy ink to create a watercolor wash on the watercolor paper. This will make the snowflakes really stand out. Let dry
7- Add a second layer of Night of Navy ink behind each snowflake so really help them pop from the background.
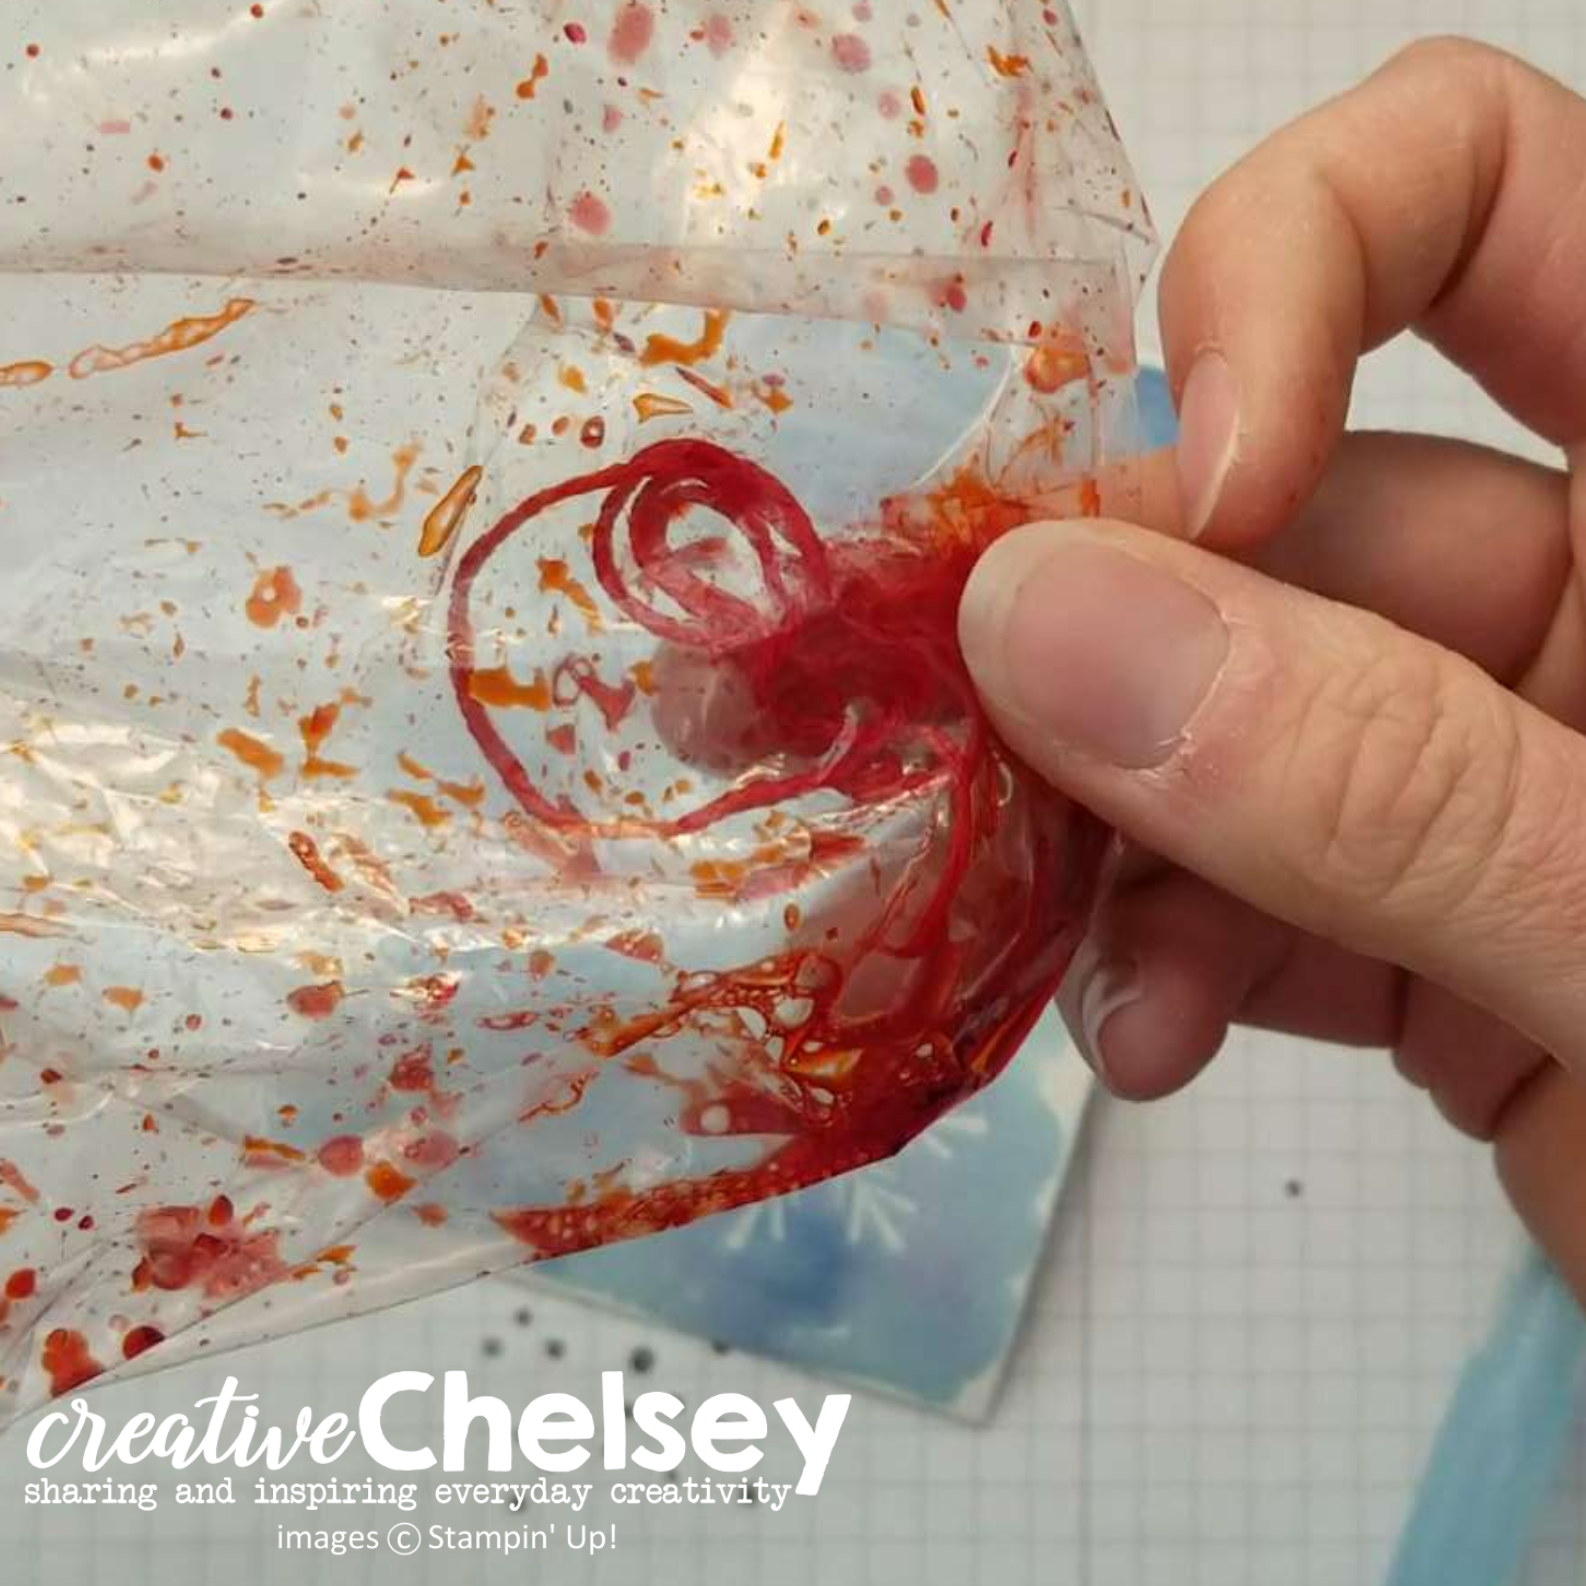
8- Die 20" White Bakers Twine (watch video below for details):
Get it wet
Place inside a ziploc bag.
Add about 5 drops of color - I used Poppy Parade
Rub the twine around in the bag to saturate the twine with the color
Take out of bag with tweezers or a crochet hook.
Place on a scrap paper and either air dry or use your heat tool.
9- If you would like the snowballs stamped in the background. Use Night of Navy and ink your stamp, then stamp off on a scrap paper, then on to the watercolor paper around the larger snowflakes.
10- Add a piece of Poppy Parade cardstock behind the watercolor paper so just about a 1/8" peeks out on the left and right. Place on the bottom half of the paper about 1/2" away from the bottom of the watercolor paper.
11- Wrap the Bakers Twine around and tie a knot a little to the left of center and about an 1" from the bottom of the Poppy Parade cardstock.
12- Add one of the wood grain strips from the kit above the twine.
13- Cut off one set of tree trunks from the cut-outs from the kit and remove all the branches so you have 2 strips. One large and one small.
14- Make sure the shimmery side is up and glue it with some liquid glue. The small one above the twine and the larger bellow the twine.
Add the center of the card base with liquid glue.
15- Stamp your greeting. I used Winter Wishes from the kit. I didn't want it long and skinny. I wanted it to be in a rectangle shape. (watch video below for details)
Start with the inside scrap paper from the tree cut-outs. Place with the shimmery side up in your Stampapratus.
Place your stamp in the center of your paper.
16-Pick up the stamp with the clear plate and ink with Night of Navy. With washi tape cover the words we don't want to stamp "Wishes"
17- Stamp the "Winter" on to the paper. If you need to repeat this step to get a darker image go ahead.
18- Remove the washi tape. Clean Stamp. Remove from the clear plate and line up the next word "Wishes" just under and to the right of the "Winter"
19- Pick up the stamp with the clear plate, ink, cover "Winter" with washi tape, and stamp.
20- Trim the greeting down with a paper trimmer or use a punch/die to get a cute label. I did about 1/4" around the greeting. The final size was about 1 3/4" x 1 1/2"
21- I used a 1/2" circle punch and cut out all the corners.
22- Adhere the greeting to the right of the knot with dimensionals.
23- Add the last little elements -
5 snowflakes with the shimmery crystal effects. Add these around the greeting
1 cardinal with a drop of glue in the right top corner of the greeting, add some shimmery crystal effects all over the cardinal. This will give it some shine and help it pop.
Untwist the ends of the twine
I have made this video walking you through the steps to make this card.