
Welcome to Paper Pumpkin Week here at Creative Chelsey. I love getting my Paper Pumpkin Kit every month and creating fun alternative projects using the supplies in the kit. Today I am sharing my first alternative idea using the November 2022 Paper Pumpkin Kit – From The North Pole.

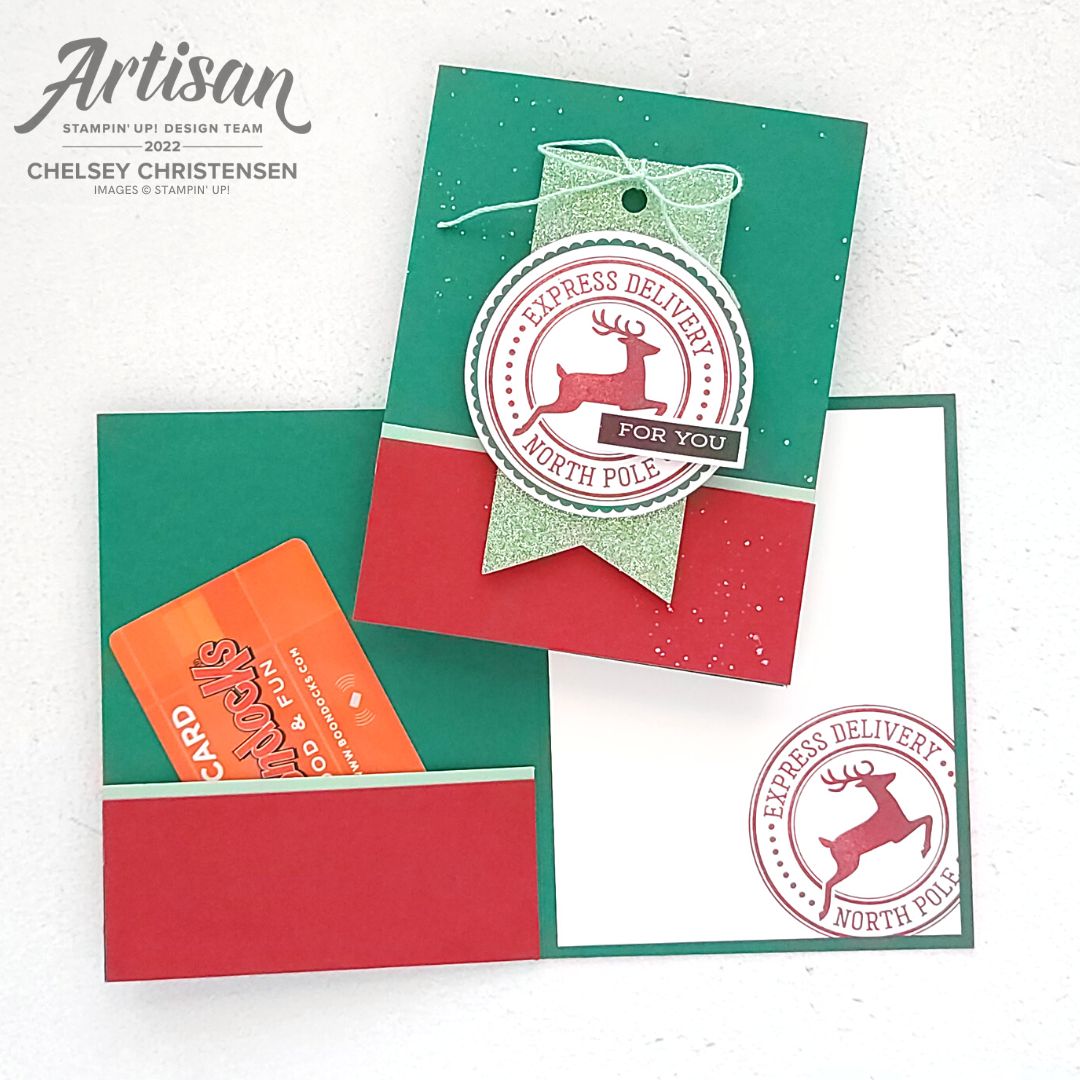
This kit comes with everything you need to make 12 Christmas Gift Tags, 4 in three different designs. This kit is so festive. I love the different tags colors and shapes, the cute die cuts & stamp images. What I like to do is use the supplies in the kit along with some other products and create different or alternative projects. Today I am sharing with you this quick and simple card with an easy gift card or money holder inside. I love how quickly this card comes together and the strong colors giving it a bold look. I love creating alternative projects with Paper Pumpkin Kits so make sure to come back for more as I continue to create with this month’s kit.
If this project inspires you to create something, I would love for you to tag me in any social media post using @creativechelsey | #creativechelsey or email me at chelsey@creativechelsey.com.
It is Paper Pumpkin Week here on Creative Chelsey. This is the first alternative this week. If you would like to see all my alternatives check out the playlist here: https://youtube.com/playlist?list=PL40dV1oxpkNkBBsXud87IGQvUhYHXmfc0
Want to see everything in this month’s kit? Watch me UNBOX this month’s Paper Pumpkin Kit here: https://youtu.be/7XG0POKL3gw

Don't miss out on next month’s Paper Pumpkin Kit -
subscribe today!
SUBSCRIBE to Paper Pumpkin - click here –
https://www.paperpumpkin.com/en-us/sign-up/?demoid=2042902

Make sure to grab one of the Good Things Cards & Envelopes Add-On Kits so you can have coordinating cardbases for December’s Paper Pumpkin Kit. https://www.stampinup.com/products/good-things-cards-envelopes?demoid=2042902

See my Customer Appreciation Products for this month: http://creativechelsey.blogspot.com/p/shop-stampin-up-products.html
Follow me on Instagram https://www.instagram.com/creativechelsey
Or join my Facebook group https://www.facebook.com/groups/2221750878097906

To purchase any of the products you need to create this project visit https://www.stampinup.com?demoid=2042902
———————— What You Need ————————
Shaded Spruce Cardbase 5 ½” x 8 ½” scored at 4 ¼”
Mint Macaron Cardstock (2) ½” x 4 ¼”
Cherry Cobbler (2) 1 ¾” x 4 ¼”
Basic White Cardstock 4” x 5 ¼”
Large Circle Die Cut
Mint Macaron Glimmer Tag
FOR YOU Label
10” Twine


———————— My Favorite Supplies ————————
• Stampin' Seal+ [149699] $12.00 —— https://bit.ly/3Ibz8YK
• Multipurpose Liquid Glue [110755] $4.00 —— https://bit.ly/3IaGF9S
• Tear & Tape Adhesive [138995] $7.00 —— https://bit.ly/3ajQSo5
• Stampin' Dimensionals [104430] $4.25 —— https://bit.ly/3IbzezA
• Mini Glue Dots [103683] $5.25 —— https://bit.ly/3anAcw3
• Stampin' Pierce Mat [126199] $5.00 —— https://bit.ly/3IjEq4d
• Simply Shammy [147042] $8.50 —— https://bit.ly/3bQH7hE
• Paper Snips [103579] $11.00 —— https://bit.ly/3ulT6tV
• Take Your Pick [144107] $10.00 —— https://bit.ly/3IeYxR9
• Bone Folder [102300] $7.00 —— https://bit.ly/3uhErzZ
• Clear Block D [118485] $9.00 —— https://bit.ly/3uuabSs
• Paper Trimmer [152392] $25.00 —— https://bit.ly/3abvykH
• Stampin' Cut & Emboss Machine [149653] $125.00 —— https://bit.ly/3ujz8zU

1- Stamp your large circle image in Cherry Cobbler inside the large circle die cut from the kit. Stamp the same image in the bottom right corner of the Basic White piece. Add the white piece to the right side on the inside of the card.

2- Layer the ½” Mint Macron strip behind the Cherry Cobbler piece with about 1/8” showing. Repeat for the second set.
3- Adhere one to the front of the cardbase at the bottom.
The second is added with tear and tape along the sides and bottom, leave the
top open so you can slide in a gift card. Add it to the inside of the card behind
the front flap. You may need to remove about 1/16” from the side so it doesn’t come
out of the card.
4- Use a drop of Whisper White Craft Ink Refill and mix
with a little water. Add some splatters over the front of the cardbase.

5- Add the stamped circle on the Glimmer Tag with dimensionals. Add the FOR YOU with dimensionals on the right side of the circle. Add tag to the center of the cardbase with dimensionals.
6- Tie 10” of twine into a bow through the hole in the
top.
All Done!
I have also created a video walking you through each step
of making this card:
To purchase any Stampin’ Up! products please visit
https://www.stampinup.com?demoid=2042902
Have a creative day!
Chelsey
chelsey@creativechelsey.com
No comments:
Post a Comment