
Hello my crafting friends,
Today I am excited to share with you my August Artisan Design Team Project. I was asked to use the Fond Of Autumn Bundle. I know I am a little late to the Fall, Autumn, Thanksgiving Cards & Décor, but I was cleaning my craft space and noticed I didn’t share these with you. I especially wanted to share with you a quick and easy way to color these cute Envelope Treat Boxes. I feel like the colors I have chosen for these projects are easy to transition from fall into winter. In case you are see this after Thanksgiving.

See my Customer Appreciation Products for this month: http://creativechelsey.blogspot.com/p/shop-stampin-up-products.html
Follow me on Instagram https://www.instagram.com/creativechelsey
Or join my Facebook group https://www.facebook.com/groups/2221750878097906


Be sure to check out the rest of the team’s wonderful creations on the Stampin’ Up! Corporate Facebook Page at - http://www.facebook.com/stampinup
For more inspiration, tips & tricks from the 2022 Artisan Design Team also check out Stampin’ Up! on Instagram – https://www.instagram.com/stampinupofficial

To purchase any of the products you need to create this project visit
https://www.stampinup.com?demoid=2042902
Here are the dimensions and pieces you will need to create these projects:
Gift Box
Envelope Treat Box
Distressed Gold – 1 ½” x 9”
Basic White Cardstock – scraps for stamping
Gold Satin Edged Ribbon – 9” & 12”
Greeting Card
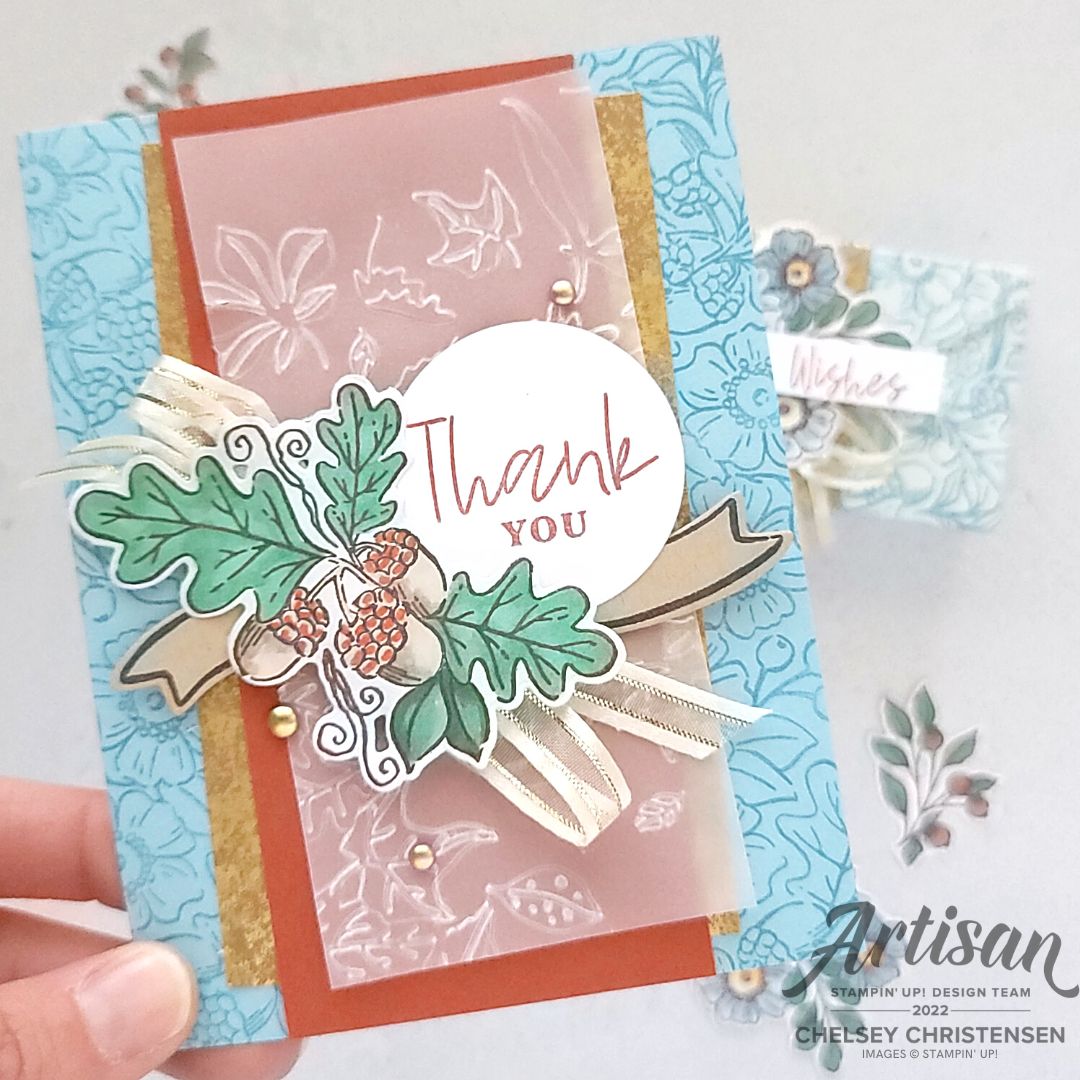
Balmy Blue Cardbase – 5 ½” x 8 ½” scored at 4 ¼”
Cajun Craze Cardstock – 2 ½” x 5 ½”
Distressed Gold – 3” x 5”
Vellum – 2 ½” x 5”
Basic White Cardstock – scraps for stamping
Crumb Cake Cardstock – scraps for stamping
Gold Satin Edged Ribbon – 12”
The products I used are:
Rubbing Alcohol
")

 Specialty Paper")


 Satin Edged Ribbon")


Gift Box
1- Fill a Stampin’ Spritzer with Rubbing Alcohol and add
5-10 drops of Balmy Blue Refill Ink. Shake. Spritz all over the Envelope Treat
Bag. Let dry.
TIP - The Rubbing Alcohol makes it dry faster!
TIP - Spritz inside an old Paper Pumpkin Box. You won't get a mess everywhere.

2- Stamp with the large floral image in Balmy Blue ink over the Envelope Treat Bag.
3- Fold and adhere together (see video for instructions)

4- Wrap 1 ½” x 9” strip of Distressed Gold around and adhere at the bottom of the box. Make sure it can move on and off easily.
5- Warp 9” of ribbon around the paper on the left adhere
on the top. It will be covered by the other elements.

6- Make a faux bow on the top. See video for tips.

7- Stamp the large floral image in Early Espresso ink and color the three flowers with Stampin’ Blend Markers. Cut out with coordinating die that separates the images. Save the other images for the Greeting Card.
Flowers – Balmy Blue, So Saffron, Cajun Craze
Leaves – Shaded Spruce
Berries – Cajun Craze

8- Add the flowers over the faux ribbon with dimensionals.
9- Stamp your greeting in Cajun Craze and trim to fit.
Add over the flowers with dimensionals.

Greeting Card
1- Stamp the large floral image in Balmy Blue along with
left and right sides of the cardbase.

2- Layer the Distressed Gold at and angle in the center of the cardbase. Layer the Cajun Craze over the Gold, then emboss the vellum with Leaf Fall Embossing Folder and add at and angle over the other papers.

3- Stamp an empty banner on Crumb Cake Cardstock with Early Espresso ink and cut with coordinating dies. Add a little lower than center on your card with dimensionals.
4- Stamp your greeting in Cajun Craze and cut out with a
matching Circle Die. Add above the banner with dimensionals.

5- Stamp the large floral image in Early Espresso ink (or use the leftover piece from the box) color in the Acorn section with Stampin’ Blend Markers. I used:
Acorns – Crumb Cake, Cajun Craze
Leaves – Shaded Spruce
Background – Balmy Blue

6- Add 12” of ribbon to the back of the Acorn section into a faux bow. Add this to the left of the greeting with dimensionals.
7- Add Gold Brushed Metallic Dots.
If you would like to watch me create these cards with
step by step tips and directions please watch this video:
If you need any product to make these cards, please visit
my online store: http://www.stampinup.com?demoid=2042902
Have a creative day,
Chelsey
No comments:
Post a Comment