
Hello my crafting friends,
Today I would like to share with you these two beautiful cards created with Stampin’ Up! Waves Of The Ocean Product Collection. These products are early release from the upcoming 2022-2023 Annual Catalog. However, not all products I am sharing today will be available in the catalog – only the Stamp Set & Dies. The other products have limited supply and may sell out before May 2nd. These cards show two different ways you can use ripped pattern paper to create layers to add interest to your cards. As well as, how to create a reversed stamped image using a Stamparatus and Silicone Craft Sheet. I made these cards as part of the Stampin’ Up! Artisan Design Team and they have been shared on their Facebook & Instagram pages along with the other projects made by my teammates.

I love how the first card uses the Blue Foil Sheets to give the waves a fun shiny element and the Vellum Cardstock help it stand apart from the pattern paper in the background.
This second card uses more patterns from the Waves Of The Ocean Designer Series Paper in a fun way to showcase all the beautiful colors. You could easily make this type of card using so many different pattern papers. If you do, I would love to see what you create, please tag me in any social media post using @creativechelsey or #creativechelsey.

See my Customer Appreciation Products for this month: http://creativechelsey.blogspot.com/p/shop-stampin-up-products.html
Follow me on Instagram https://www.instagram.com/creativechelsey
Or join my Facebook group https://www.facebook.com/groups/2221750878097906

Be sure to check out the rest of the team’s wonderful creations on the Stampin’ Up! Corporate Facebook Page at - http://www.facebook.com/stampinup
For more inspiration, tips & tricks from the 2022 Artisan Design Team also check out Stampin’ Up! on Instagram – http://www.instagram.com/stampinup

To purchase any of the products you need to create this project visit https://www.stampinup.com?demoid=2042902
Here are the dimensions and pieces you will need to
create these cards:
Card #1
Thick Basic White Cardbase – 5 ½” x 8 ½” scored at 4 ¼”
Waves Of The Ocean Designer Series Paper – 4” x 5 ¼” | 1”
x 4” | 1 ½” x 4”
Blue Foils – (2) 3” x 6”
Vellum Cardstock – (2) 3” x 6”
Basic White Cardstock – 1 ½” x 3 ½”
Card #2
Thick Basic White Cardbase – 5 ½” x 8 ½” scored at 4 ¼”
Pool Party Cardstock – 3” Circle
Waves Of The Ocean Designer Series Paper – (8) 1 ½” x 4”
Blue Foils – 3” x 6”
Vellum Cardstock – 3” x 6”
Basic White Cardstock – 1” x 3 ½” | 2 ¾” x 2” | 2” x 4”
The products I used are:
Waves of Inspiration Bundle 158841 $51.25
Waves of the Ocean Designer Series Paper 159982 $11.50
Blue Foils Specialty Paper 159983 $10.00 SOLD OUT
Rhinestone Waves Basic Jewels 159396 $6.50 SOLD OUT
Adhesive Sheets 152334 $10.00
Silicone Craft Sheet 127853 $6.00
Pool Party Cardstock 122924 $8.75
Night of Navy Ink Pad 147110 $7.50
Coastal Cabana Ink Pad 147097 $7.50
Memento Black Ink Pad 132708 $6.00
Blending Brushes 153611 $12.00
Layering Circles Dies 151770 $35.00
Thick Basic White Cardstock 159229 $8.25
Basic White Cardstock 159276 $9.75
Vellum Cardstock 101856 $10.00
Clear Block D 118485 $8.50
Simply Shammy 147042 $8.00
Stampin’ Seal Adhesive 152813 $8.00
Dimensionals 104430 $4.00
Multipurpose Liquid Glue 110755 $4.00
Paper Snips 103579 $10.00
Bone Folder 102300 $7.00
Take Your Pick Tool 144107 $10.00
Stamparatus 146276 $49.00
Small Grid Paper 149621 $6.50
Stampin’ Cut & Emboss Machine 149653 $120.00

Card #1
1- Begin by adding Adhesive Sheets to the back of the
Foil Sheet. Run the Waves Dies through your Stampin’ Cut & Emboss Machine.
2- Trace the outline of the same Wave Die on to Vellum.
Fussy Cut out. Erase any pencil lines
3- Add the Foil Wave to the Vellum Wave. Repeat steps 1-3
for more waves.
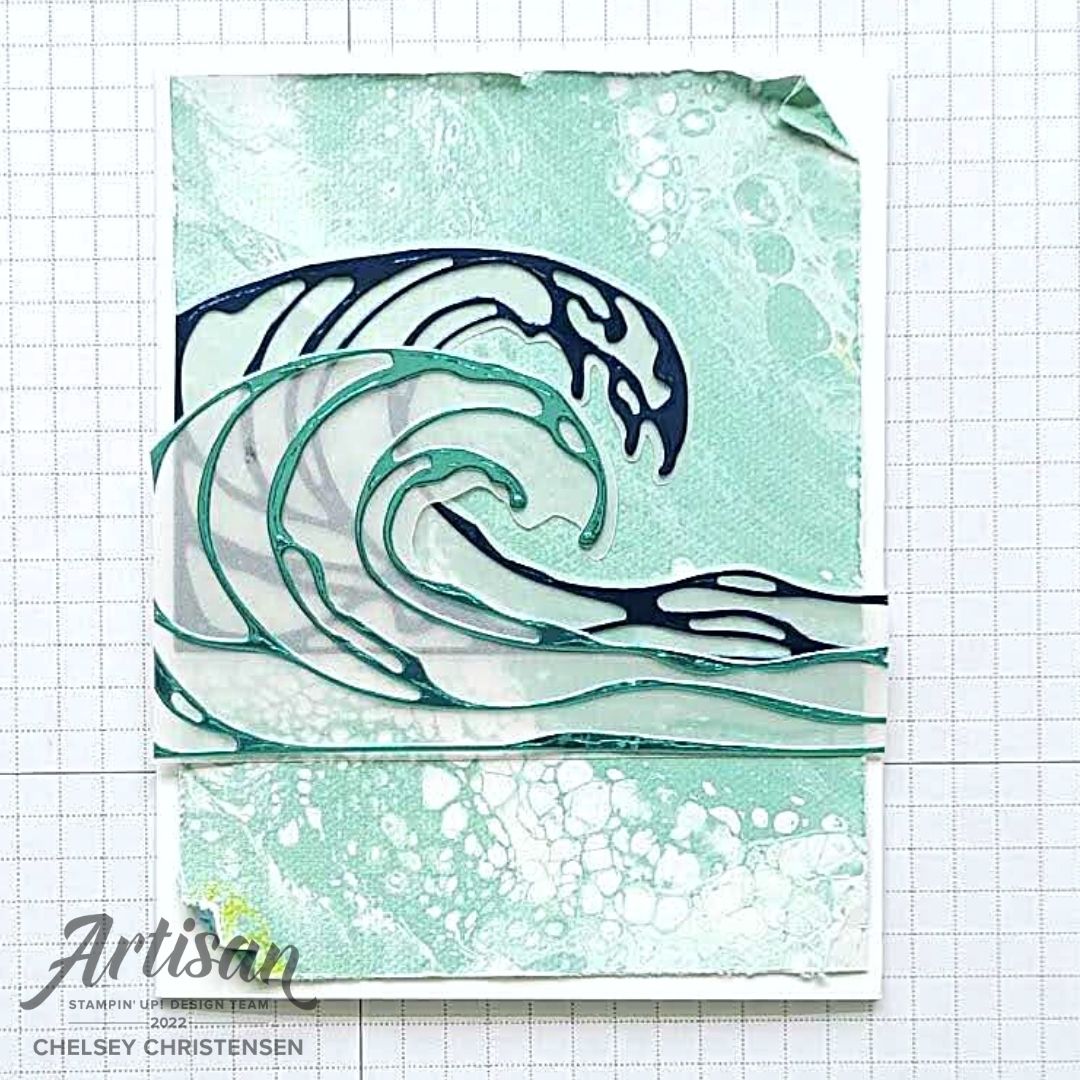
4- Choose a DSP Pattern and cut to 4” x 5 ¼”. Distress the edges with paper snips or bone folder. Adhere at a slight angle to the front of your cardbase.
5- Layer two waves in the middle of the cardbase. I added the adhesive to the bottom edge since that area will be covered with other elements. The second wave should be below the first and to the left a little. Trim off the overhang to the edge of the card. Tack down any foil edges that need it along the edge of the card.

6- Choose two other DSP patterns cut one to 1 ½” x 4” and the other to 1” x 4”. Tear each piece along one edge and distress the other edges. Layer the pieces and adhere below the waves.

7- Stamp your greeting in Night of Navy ink and cut out with one of the labels from the coordinating die set. Add below the waves with dimensionals.
8- You can also stamp some of the birds in Night of Navy
in the top right corner if you would like.
All Done!

Card #2
1- Begin by adding Adhesive Sheets to the back of the
Foil Sheet. Run the Waves Dies through your Stampin’ Cut & Emboss Machine.
2- Trace the outline of the same Wave Die on to Vellum.
Fussy Cut out. Erase any pencil lines
3- Add the Foil Wave to the Vellum Wave.
4- Cut 8 – 1 ½” x 4” pieces of DSP. Tear one long edge of
7 strips. Keep one strip for the bottom without any tearing. Layer together on
the front of the cardbase. Start at the bottom of the cardbase with the one
that has not been torn. Keep an even space around the sides and bottom. Then
layer and keep them even along the sides as they go up the card.

5- Cut out a large circle with the Circle Dies from Pool Party Cardstock. Add a darker ink color to the edges with a blending brush. I used Coastal Cabana.

6- Layer the Wave over the circle and the place the same size circle die over the wave. Line up the cardstock circle and circle die and use washi tape to keep the wave in place. Cut the wave to the same circle. Adhere the wave to the circle but leave the top of the wave unadhered.

7- Cut out both clouds and the detail using adhesive sheets. Add a little blue with the same Blending Brush to the bottom of the clouds. Add the detail over the bottom of the clouds. Place these behind the wave on the right side of the circle.
8- Adhere the circle with dimensionals a little higher
than center of the cardbase.

9- Use a Stamparatus and a silicone craft sheet to create a reverse image of the pelican stamp. Stamp it in Memento black ink onto the silicone craft sheet. Lay a piece of cardstock over the stamped image and stamp again. Cut out with coordinating die. See video for detail instruction.

10- Add a little color to the bird with Stampin’ Blend Markers. I used Light Calypso coral at the tip of the beak, blend with Dark So Saffron. Then add a little shadow with light smoky slate. Cut off the bottom of the post. Add to the card with a dimensional on the left side of the circle.

11- Stamp your greeting in Memento Black ink and cut out with coordinating die from the set. Add it below the wave. Then add some of the Rhinestone Waves Basic Jewels.
If you would like to watch me create these cards with step by step tips and directions please watch this video:
If you need any product to make these cards, please visit my online store: http://www.stampinup.com?demoid=2042902
Have a creative day,
Chelsey
chelsey@creativechelsey.com
No comments:
Post a Comment