
Hello my crafting friends,
Today I would like to share with you my December Artisan Showcase Projects. I was asked to create a couple samples using the Inspired Thoughts Bundle, which includes the Inspired Thoughts Stamp Set and the Inspiring Canopy Dies.


See my Customer Appreciation Products for this month: http://creativechelsey.blogspot.com/p/shop-stampin-up-products.html
Follow me on Instagram https://www.instagram.com/creativechelsey
Or join my Facebook group https://www.facebook.com/groups/2221750878097906


Be sure to check out the rest of the team’s wonderful creative on the Stampin’ Up! Corporate Facebook Page at - http://www.facebook.com/stampinup
For more inspiration, tips & tricks from the 2021 Artisan Design Team also check out Stampin’ Up! on Instagram – http://www.instagram.com/stampinup


To purchase any of the products you need to create this project visit
https://www.stampinup.com?demoid=2042902
Here are the dimensions and pieces you will need to create this card:
Shimmery White Cardbase – (2) 5 ½” x 8 ½” scored at 4 ¼”
Shimmery White Cardstock – 4 ¼” x 5 ½” | greetings – 1 ½”
x 2” or 1” x 3”
Pool Party Cardstock – (2) 2” x 6”
Coastal Cabana Cardstock – (2) 2” x 6”
Bermuda Bay Cardstock – (2) 2” x 6”
Pale Papaya Cardstock – (2) 2” x 6”
Flirty Flamingo Cardstock – (2) 2” x 6”
Petal Pink Cardstock – (2) 2” x 6”
Pear Pizzazz Cardstock – 2” x 6”
Crumb Cake Cardstock – (2) 3 ½” x 4 ½”
Granny Apple Green Cardstock – scraps for leaves
The products I used are:
Inspired Thoughts Bundle 155529 $45.75
Includes: Inspired
Thoughts Stamp Set 155536 $19.00 & Inspiring Canopy Dies 155963 $32.00
Stitched Rectangles Dies 151820 $35.00
Shimmery White Cardstock 101910 $10.00
Pool Party Cardstock 122924 $8.75
Coastal Cabana Cardstock 131297 $8.75
Bermuda Bay Cardstock 131197 $8.75
Petal Pink Cardstock 146985 $8.75
Flirty Flamingo Cardstock 141416 $8.75
Pale Papaya Cardstock 155668 $8.75
Crumb Cake Cardstock 120953 $8.75
Granny Apple Green Cardstock 146990 $8.75
Pear Pizzazz Cardstock 131201 $8.75
Early Espresso Ink Pad 147114 $7.50
Granny Apple Green Stampin’ Blend Markers 154885 $9.00
Mossy Meadow Stampin’ Blend Markers 154890 $9.00
Pale Papaya Stampin’ Blend Markers 155519 $9.00
Flirty Flamingo Stampin’ Blend Markers 154884 $9.00
Petal Pink Stampin’ Blend Markers 154893 $9.00
Crumb Cake Stampin’ Blend Markers 154882 $9.00
Artistry Blooms Adhesive-Backed Sequins 152477 $7.00
Paper Trimmer 152392 $25.00
Clear Block D 118485 $8.50
Simply Shammy 147042 $8.00
Stampin’ Seal Adhesive 152813 $8.00
Dimensionals 104430 $4.00
Adhesive Sheets 152334 $10.00
Paper Snips 103579 $10.00
Bone Folder 102300 $7.00
Take Your Pick Tool 144107 $10.00
Stamparatus 146276 $49.00
Stampin’ Cut & Emboss Machine 149653 $120.00

1- Begin by nesting the 3 ¾” x 5 1/8” & 2 5/8” x 4” Stitched Rectangle Dies together. Make sure the smaller one is evenly placed inside the larger. Cut the 4 ¼” x 5 ½” Shimmery White Cardstock piece. This will give you the “frame” for the blue card and the smaller white piece for the pink card.

2- Cut each 2” x 6” color strip in half with the curvy “ground” die. I used Pool Party, Coastal Cabana, Bermuda Bay, Petal Pink, Pale Papaya, Flirty Flamingo, Pear Pizzazz.

3- For the Blue Card, you will layer the curved strips on the back of the frame. Start at the bottom with one Pear Pizzazz strip. Then layer all four curvy strips from each color going from dark at the bottom to light. Add them so the curves sit in different places. Trim off the edges so they hide behind the frame. Add it to the front of your cardbase.

4- For the Pink Card, Add the layers to a 4 ¼” x 5 ½” piece of copy paper (lightweight). Begin at the top with the lightest color and move to the darkest at the bottom. Cut out the large 3 ¾” x 5 1/8” Stitched Rectangle Die from the layered pieces. It will be tight as you run it through your machine. If it doesn’t cut all the way through that is okay, you can use your Paper Trimmer or a pair of Paper Snips to remove the thick areas. Add it to the front of the other cardbase.

5- For the Trees, Cut the far-right tree from Crumb Cake Cardstock with Adhesive Sheet on the back. Trim around the tree to remove it from the other branches. Trim off the bottom at the base of the trunk. With the Crumb Cake Blend Markers create a shadow going down the trunk with the dark marker and blend out with the light. You can also add some dark areas along the branches if you want. Repeat for a second tree.
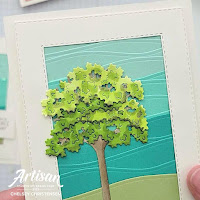
6- To create the leaves, cut out multiples from Shimmery White Cardstock with Adhesive Sheets on the back. To create the green leaves, use Blend Markers. I used light Mossy Meadow and dark Granny Apple Green add areas of color on the die cuts, then blend everything with Light Granny Apple Green. Leave some areas white for highlights and add Dark Mossy Meadow for shadows. You can get darker areas by using different color cardstock like Granny Apple Green.

To create the pink blossoms, use Blend Markers. I used Pale Papaya & Flirty Flamingo and add color to the die cuts, then blend everything with Petal Pink. Use dark or light markers to create shadows or highlights.

7- To finish the Blue Card, add one of the trees so the left branches overlap a little of the frame. Tuck in the trunk to the bottom of the opening, make sure the trunk is straight. Layer the green leaves over the branches. Keep the darker sections near the bottom and lighter areas at the top. Stamp the greeting in Early Espresso ink on Shimmery White Cardstock, cut out with a coordinating Stitched Rectangle Die and add to the right of the tree with dimensionals. Add 5 blue sequins.

8- To finish the Pink Card, add the last Pear Pizzazz curvy strip to the bottom of the 2 5/8” x 4” Shimmery White piece. Run only the Pear Pizzazz area through with the Stitched Rectangle Die using a Partial Die Cutting Technique (see video) to get the stitching on the Pear Pizzazz cardstock. You can add some shadow with the dark Granny Apple Green Marker in the center if you want, blend out with the light marker.

Add the second tree to the middle. Place the pink blossoms over the branches. Keep the darker sections near the bottom and lighter areas at the top. Stamp the greeting in Early Espresso ink on Shimmery White Cardstock, cut out with a coordinating Stitched Rectangle Die and add to the left of the tree with dimensionals. Add 5 pink/orange sequins.
All Done!
If you would like to watch me create these cards with step by step tips and directions please watch this video:
If you need any product to make these cards, please visit my online store: http://www.stampinup.com?demoid=2042902
Have a creative day,
Chelsey
chelsey@creativechelsey.com
No comments:
Post a Comment