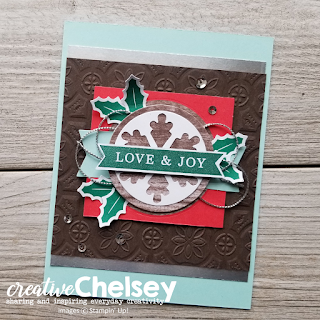
I am so excited to share with you today how I made two beautiful alternative cards with the November 2019 Paper Pumpkin Kit - Winter Gifts! These cards have a trendy farmhouse style to them. By using the elements from the kit paired with some cardstock, embossing folder, and cutting dies you too can create these one-of-a-kind cards.
I love creating alternative cards with Paper Pumpkin Kits so make sure to come back for more as I continue to create with this months kit.
It is Paper Pumpkin Week here on CreativeChelsey. Keep coming back for more!
Don't miss out on next months Paper Pumpkin Kit - subscribe today!
SUBSCRIBE to Paper Pumpkin - click here - https://www.paperpumpkin.com/en-us/sign-up/?demoid=2042902
Here are the dimensions and pieces you will need to create these cards:
Card #1 - Snowflake Circle
Pool Party Cardstock card bases 5.5" x 8.5" scored at 4.25"
Early Espresso Cardstock 4" x 4"
Silver Foil Cardstock 0.5" x 4" (2)
From the Kit:
1 Real Red Tag
Medium Snowfake left over cardstock
6 Holly leaves
1 Pool Party large banner
1 Pool Party small banner
20" Silver Twine
Silver sequins
Card #2 - Deer
Thick Whisper White Cardstock card bases 5.5" x 8.5" scored at 4.25"
Crumb Cake Cardstock 4" x 5.25"
Whisper White Cardstock 0.25" x 3.25"
From the Kit:
1 Real Red Tag
1 Deer
1 Pool Party large banner
6 Sprigs
1 White banner
2 - 6" pieces of Green Ribbon
Silver sequins
Early Espresso Cardstock 119686 $8.75
Pool Party Cardstock 122924 $8.75
Thick Whisper White Cardstock 140272 $8.25
Crumb Cake Cardstock 120953 $8.75
Whisper White Cardstock 100730 $9.75
Silver Foil Sheet 132178 $5.00
Layering Circle Dies 141705 $35.00
Tin Tile Embossing Folder 151801 $10.00
Simply Shammy 147042 $8.00
Snail Adhesive 104332 $7.00
Multipurpose Liquid Glue 110755 $4.00
Dimensionals 104430 $4.00
Clear Block D 118485 $8.50
Paper Snips 103579 $10.00
Bone Folder 102300 $7.00
Stampin' Pierce Mat 126199 $5.00
Take Your Pick Tool 144107 $10.00
STAMPING TIP - If your stamp is not stamping well. Stamp your clean stamp in VersaMark Ink first and then ink it with your regular ink.
Card 1 - Snowflake Circle
1- Remove one of the medium size snowflakes from the cardstock. Save the snowflake for another card. Cut out the remaining cardstock with 1 7/8" circle die centered around the space left from the snowflake.
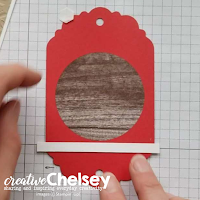
2- Remove the scallop top from the Real Red tag and 1/2" from the bottom with a paper trimmer.
3- Using the next size of circle die 2 1/8" cut out the wood circle from the Real Red tag.
4- Emboss the Early Espresso Cardstock with the Tin Tile Embossing Folder.
5- Stamp "love & joy" in Shaded Spruce on the back (white side) of a Pool Party Banner from the kit.
6- Adhere the strips of silver foil paper to the back of the Early Espresso embossed cardstock. Place it so about a 1/4" of silver is showing on the top and bottom.
7- Add these elements to the center of the Pool Party Card base.
8- Cut the large Pool Party Banner in half
9- Add each half to the sides of the Real Red tag. Place it in the middle so it will look like a long banner is behind the circle.
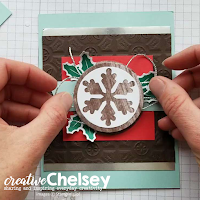
10- Add to the center of the Early Espresso Cardstock
11- Glue the snowflake to the top of the woodgrain circle
12- Cut 20" of silver twine from the kit. Add snail to the back of the snowflake circle. Wrap the the silver twine back and forth to create loops on the right and left.
13- Take 6 holly leaves, group them into two and adhere them around the hole in the Real Red tag. To add some dimension take your finger nail and pinch the leaves so they slightly roll up.
14- With dimensionals add the circle snowflake element to the hole cut in the Real Red tag. I applied mine so the snowflake is pointing up and down.
15- Add the greeting with dimensionals to the center of the snowflake.
16- Add some sequins from the kit.
All done!
Card 2- Deer
1- Add the cut scallops from the 1st card to the bottom of a Real Red tag to create a double ended tag. It should sit about 1/2" in from the bottom.
2- Take a pair of scissors and remove the corners at the bottom so only the scallops show. Don't cut the scallops.
3- Adhere a thin strip of whisper white cardstock 0.25" to hide the cut line at the bottom of the tag.
4- Add the deer with dimensionals to the center of the tag. You want the whole body in the circle and the feet below the white strip. Don't glue the legs down.
5- Add the large blue banner under the legs. Place it so it is lined up with the tag and a little bit of blue is showing below the deer.
6- Stamp "love & joy" in Shaded Spruce on a white banner
7- Add 6 sprigs to the back of the stamped banner.
8- Add the greeting to the base of the tag with dimensionals.
9- Cut 2 pieces of 6" green ribbon from the kit. Loop them through both holes in the tag.
10- Emboss the Crumb Cake cardstock with the Tin Tile folder
11- Add the tag with dimensionals to the center of the Crumb Cake cardstock
12- Flip it over and adhere the ribbon down to the back.
13- Add the Crumb Cake cardstock to the center of the White card base.
14- Add some sequins.
I have also created a video walking you through both these cards.
To purchase any of the products you see in this video visit
https://www.stampinup.com/ECWeb/default.aspx?culture=en-us&dbwsdemoid=2042902
Have a creative day!
Chelsey


2 lovely cards. I especially like the one with the deer. TFS
ReplyDelete