

Today I would like to share with you my cards I made with this month’s SheetLoad of Cards by Call Me Crafty Al. Each month Alicia from Call Me Crafty Al designs a fun template to create multiple handmade cards. Her designs are always fun and easy to use. They include a list of the types of products you need along with measurements to help you cut each piece.

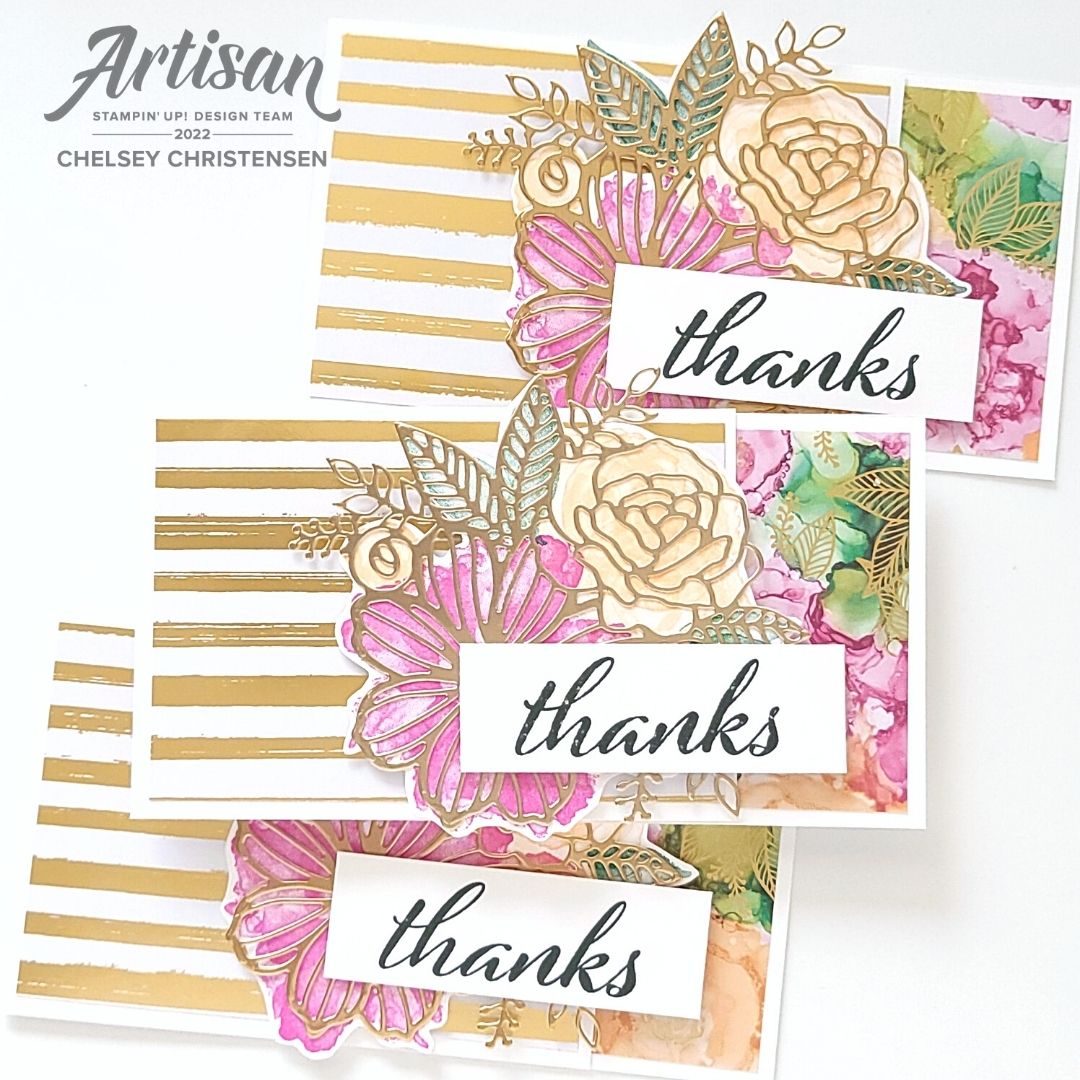
I wanted to use this beautiful Expressions In Ink Specialty Designer Series Paper from Stampin’ Up and the coordinating Artistically Inked Bundle. In this tutorial I share how you can create a customizable grouping of stamped images to coordinated with a detailed die cut. This technique can be used in many different ways.

I also love that this template uses 6” x 6” pattern paper and creates a Fun-Fold Slimline Card. One element I like is that the inside pattern paper can be seen when the card is open and closed. I also like how the die creates layers over the straight edge of the front of the card giving it a unique border. So many fun possibilities with this design.
As a part of her design team, I get a sneak peek at her templates and then get to design and share my cards with you.

See what the YOUTUBE Team created: #SLCTApr2022
See what the INSTAGRAM Team created: https://www.instagram.com/explore/tags/slctapr2022/

If YOU CREATE cards using this month’s SheetLoad, PLEASE USE the following hashtags: #SUYSApr2022 #ShowUsYourSheetLoad #SheetLoadOfCards

Get more details on how to “Show Us Your SheetLoad”, here: https://youtu.be/8r6JbbGfWmo
Find out how to download the April 2022 SheetLoad of Cards, here: https://youtu.be/IhSp1g90soA


To purchase any of the products you need to create this project visit https://www.stampinup.com?demoid=2042902
The products I used are:
Artistically Inked Bundle 155456 $53.00
Includes:
Artistically Inked Stamp Set 154542 $24.00 & Artistic Dies 155371 $35.00
Expressions In Ink Specialty Designer Series Paper 155464
$15.00
Thick Basic White Cardstock 159229 $8.25
Basic White Cardstock 159276 $9.75
Gold Foil Sheets 132622 $5.00
Magenta Madness Ink Pad 153117 $7.50
Pale Papaya Ink Pad 155670 $7.50
Polished Pink Ink Pad 155712 $7.50
Shaded Spruce Ink Pad 147088 $7.50
Evening Evergreen Ink Pad 155576 $7.50
Paper Trimmer 152392 $25.00
Clear Block D 118485 $8.50
Simply Shammy 147042 $8.00
Stampin’ Seal Adhesive 152813 $8.00
Dimensionals 104430 $4.00
Multipurpose Liquid Glue 110755 $4.00
Adhesive Sheets 152334 $10.00
Paper Snips 103579 $10.00
Bone Folder 102300 $7.00
Take Your Pick Tool 144107 $10.00
Stampin’ Cut & Emboss Machine 149653 $120.00
Stamparatus 146276 $49.00

How to create a grouping of Stamped Images to match with a die:
1- Begin with a piece of Basic White Cardstock big enough
for all the stamps. I used a 4 ¼” x 4 ¼” piece. Add it to the Stamparatus and
place the die you want to match the stamps to on top and hold in place with
washi tape.
2- Place the first stamp on top of the die where you want
it to stamp. Pick it up with one of the clear plates attached to the
Stamparatus.

3- Remove the clear plate and flip it over to the other side or use a new one. Add the next stamp(s) over the die and pick up with the clear plate. Repeat with other clear plates and all the stamps you want to use.

4- Remove the die, keep the cardstock in place. Place the first clear plate back into the Stamparatus, ink and stamp. If you are making multiples, remove the cardstock and add another piece to the same place as the first, ink and stamp again – repeat for all cardstock pieces.
5- Remove the first clear plate and add the second. Ink
and stamp all the cardstock pieces. Continue the process for all the stamps
& cardstock pieces.

6- If you want to add smaller images by hand, place the die over the stamped image, hover the stamp over the area you want, remove the die and stamp.

7- Fussy cut out

8- Next cut out the coordinating die from Gold Foil Sheets. I used 4” x 4”. Add Adhesive Sheet to the back of the Gold Foil Sheet in the center. Then cut out with the die. Place it over the stamped image.
All Done!
I have shared and talked about these cards on my YouTube
Channel, so check them out.
To purchase any of the products you see in this video visit https://www.stampinup.com?demoid=2042902
Chelsey
chelsey@creativechelsey.com
No comments:
Post a Comment