
Welcome to Paper Pumpkin Week here at Creative Chelsey. I love getting my Paper Pumpkin Kit every month and creating fun alternative projects using the supplies in the kit. Today I am sharing my third alternative idea using the March 2022 Paper Pumpkin Kit – Beyond The Horizon.

This kit comes with everything you need to make 9 Beautiful Cards, 3 in three different designs. What I like to do is use the supplies in the kit along with some other products and create different or alternative cards. Today I am sharing two simple handmade cards using the double sided patterned envelopes from the kit. You could also make similar cards usingStampin’ Up! Designer Series Paper. I love creating alternative projects with Paper Pumpkin Kits so make sure to come back for more as I continue to create with this month’s kit.

If this project inspires you to create something, I would love for you to tag me in any social media post using @creativechelsey | #creativechelsey or email me at chelsey@creativechelsey.com.
It is Paper Pumpkin Week here on Creative Chelsey. This is the third alternative this week. If you would like to see all my alternatives check out the playlist here: https://youtube.com/playlist?list=PL40dV1oxpkNn0F8KVYMkaaVL_5Yn9MoQe
Want to see everything in this month’s kit? Watch me UNBOX this month’s Paper Pumpkin Kit here: https://youtu.be/Rt8Fd38wHbk

Don't miss out on next month’s Paper Pumpkin Kit - subscribe today!
SUBSCRIBE to Paper Pumpkin - click here –
https://www.paperpumpkin.com/en-us/sign-up/?demoid=2042902
See my Customer Appreciation Products for this month: http://creativechelsey.blogspot.com/p/shop-stampin-up-products.html
Follow me on Instagram https://www.instagram.com/creativechelsey
Or join my Facebook group https://www.facebook.com/groups/2221750878097906

To purchase any of the products you need to create this project visit https://www.stampinup.com?demoid=2042902
Here are the extra pieces of cardstock I used for the
cards:
Thick Basic White Cardbase 5 ½” x 8 ½” scored at 4 ¼”
Basic White Cardstock 5 ½” x 5 ½”
From the Kit:
Envelope
Leftover Die Cuts
Embellishments
Here is a list of the supplies I used to make the
card:
Thick Basic White Cardstock 159229 $8.25
Basic White Cardstock 159276 $9.75
Bumblebee Ink Pad 153116 $7.50
Old Olive Ink Pad 147090 $7.50
Misty Moonlight Ink Pad 153118 $7.50
Pale Papaya Ink Pad 155670 $7.50
Evening Evergreen Ink Pad 155576 $7.50
Calypso Coral Ink Pad $7.50
Paper Trimmer 152392 $25.00
Simply Shammy 147042 $8.00
Stampin’ Seal PLUS Adhesive 149699 $12.00
Multipurpose Liquid Glue 110755 $4.00
Tear & Tape Adhesive 138995 $7.00
Dimensionals 104430 $4.00
Clear Block D 118485 $8.50
Paper Snips 103579 $10.00
Bone Folder 102300 $7.00
Stampin' Pierce Mat 126199 $5.00
Take Your Pick Tool 144107 $10.00
Stampin’ Cut & Emboss Machine 149653 $120.00
 |
| Card #1 |
 |
| Card #2 |

1- Open an envelope from the kit and cut it to these sizes for the card you want to make:
Card #1 – One envelope 4 1/8” x 5 3/8”
Then cut from the bottom a ¾” strip

Card #2 – Choose two coordinating envelopes 4” x 5 ¼”
Then cut each in half at 2 5/8” and then in half again at
2”
You can make two cards

2- Stamp on the watercolor side with any images and coordinating colors you choose.
Card #1 – Pale Papaya flowers going down the left and
bottom sides.

Card #2 – Old Olive dots on the Old Olive section

3- Stamp the flowers and leaves that you want to use.
Tip – stamp the inside detail first then stamp the solid
image on top using a stamp off stamp on technique to get a lighter color. I
used Calypso Coral, Bumblebee, and Misty Moonlight for flowers and Evening
Evergreen for leaves.
Fussy cut out – I did remove the two adjoining flowers
from each other.

4- Add the pattern papers to the cardbase. Use any leftover strips over adjoining areas.


5- Add the flowers to the cards with dimensionals. Layer the larger of the two small flowers over the cut-out area of the largest flower. Tuck in leaves.

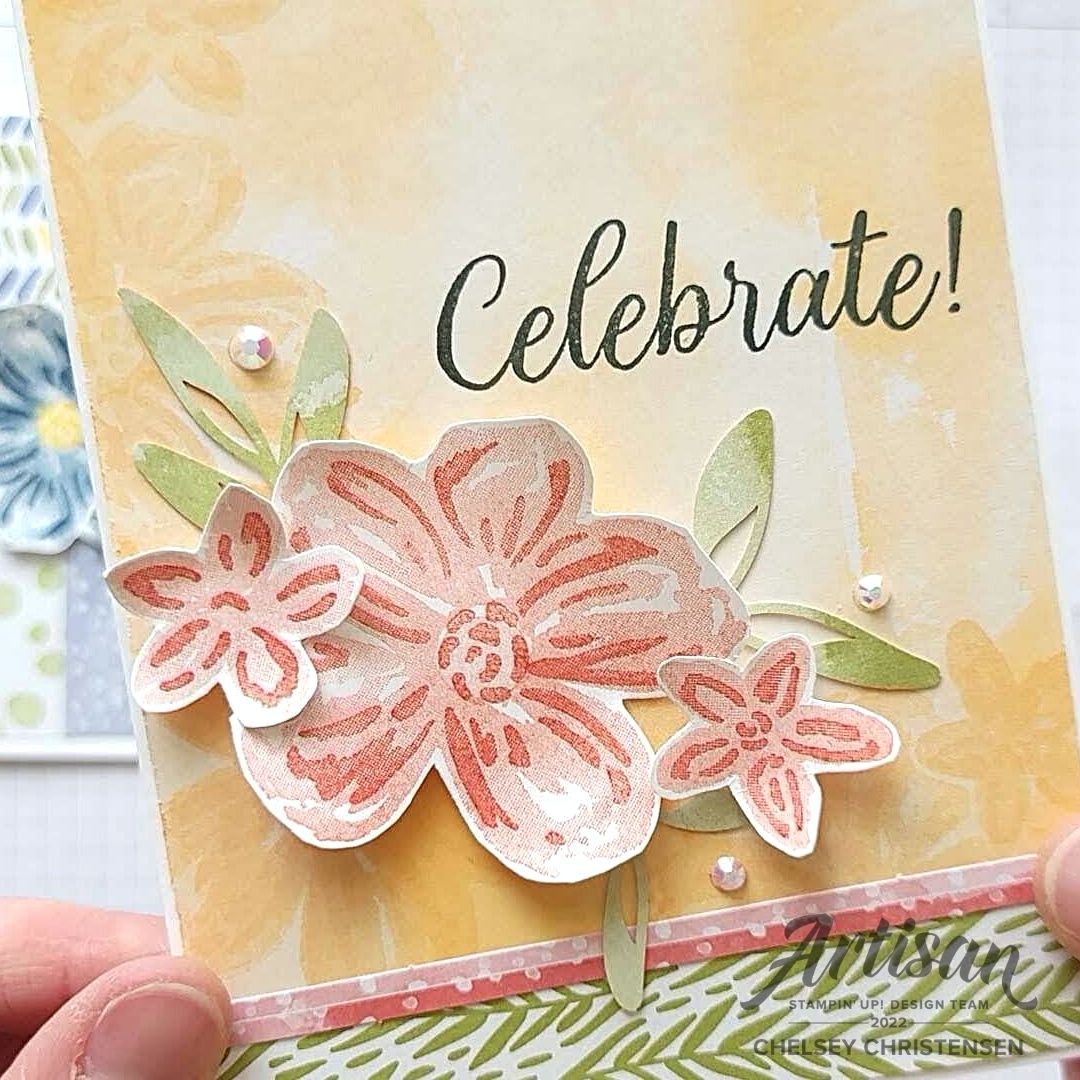
6- Stamp the greeting in Evening Evergreen in an open area.

7- Add three embellishments.
I have also created a video walking you through each step
and some of the details from the other cards:
To purchase any of the products you see in this video visit
https://www.stampinup.com?demoid=2042902
Have a creative day!
Chelsey
chelsey@creativechelsey.com
No comments:
Post a Comment