
Hello my crafting friends,
Today I would like to share with you these two beautiful springtime cards I created for Stampin’ Up!’s Artisan Design Team Showcase in March 2022. I was asked to use the Dahlia Days Bundle in the new January – June 2022 Mini Catalog.

These cards use a lot of tips & tricks and I share them all in the video so make sure to watch. One thing I will be sharing is how to use a detailed die to create an embossed look on cardstock. I used this on the Magenta Madness Cardstock to add a subtle texture. I love how easy it is and how it opens up so many possibilities.

See my Customer Appreciation Products for this month: http://creativechelsey.blogspot.com/p/shop-stampin-up-products.html
Follow me on Instagram https://www.instagram.com/creativechelsey
Or join my Facebook group https://www.facebook.com/groups/2221750878097906

Be sure to check out the rest of the team’s wonderful creative on the Stampin’ Up! Corporate Facebook Page at - http://www.facebook.com/stampinup
For more inspiration, tips & tricks from the 2022 Artisan Design Team also check out Stampin’ Up! on Instagram – http://www.instagram.com/stampinup

To purchase any of the products you need to create this project visit https://www.stampinup.com?demoid=2042902
Here are the dimensions and pieces you will need to create these cards:
Card #1
Blushing Bride Cardbase – 5 ½” x 8 ½” scored at 4 ¼”
Vellum Layering Designs – 4” x 5 ¼”
Mother Of Pearl Specialty Paper – 3 ¼” x 4 ½”
Magenta Madness Cardstock – 3” x 4 ¼”
Basic White Cardstock – (3) 2” x 6”
Card #2
So Saffron Cardbase – 5 ½” x 8 ½” scored at 4 ¼”
Vellum Layering Designs – 4” x 5 ¼”
Basic White Cardstock – (5) 2” x 6”
The products I used are:
Dahlia Days Bundle 157802 $55.75
Vellum Layering Designs 157764 $10.00
Mother Of Pearl Specialty Paper 157666 $6.00
Basic White Cardstock 159276 $9.75
Polished Pink Cardstock 153080 $8.75
So Saffron Cardstock 105118 $8.75
Blushing Bride Cardstock 131198 $8.75
So Saffron Ink Pad 147109 $7.50
Crushed Curry Ink Pad 147087 $7.50
Magenta Madness Ink Pad 153117 $7.50
Blushing Bride Ink Pad 147100 $7.50
Just Jade Ink Pad 153115 $7.50
Evening Evergreen Ink Pad 155576 $7.50
Sponge Daubers 133773 $5.00
Iridescent Rhinestone Basic Jewels 158130 $7.50
White Frayed Ribbon 158138 $7.50
Silicone Craft Sheet 127853 $6.00
Clear Block D 118485 $8.50
Simply Shammy 147042 $8.00
Stampin’ Seal Adhesive 152813 $8.00
Dimensionals 104430 $4.00
Multipurpose Liquid Glue 110755 $4.00
Paper Snips 103579 $10.00
Bone Folder 102300 $7.00
Take Your Pick Tool 144107 $10.00
Stampin’ Cut & Emboss Machine 149653 $120.00

1- Begin stamping the Dahlia image in So Saffron. Then tap Crushed Curry with a sponge dauber randomly onto the stamp. Stamp. Repeat 2 more times for each flower.
2- Next stamp the same image in So Saffron and add
Magenta Madness with a sponge dauber randomly and stamp. Repeat 2 more times
for one flower. You can clean your stamps between stamping so you don’t mix
colors.
3- Now ink the same image in Blushing Bride and add
Magenta Madness with a sponge dauber randomly and stamp. Repeat 2 more times
for the flower. Repeat for a second flower.
4- Now ink the image in Blushing Bride and add Crushed
Curry with a sponge dauber to the image. Stamp. Repeat 2 more times for one
flower. Repeat for a second flower. You can clean your stamps between stamping
so you don’t mix colors.

5- Do the same technique with the three-leaf image. I inked up the image in Just Jade and add Evening Evergreen with a sponge dauber. Repeat 2 more times.
6- Stamp the fern image in Just Jade 5-6 times.

7- Cut out with coordinating dies. From each set of three Dahlia images only cut one image using the die cut. Cut out all the leaves & ferns with coordinating dies.

8- From the other stamped Dahlia, fussy cut one to the middle section of the petals, fussy cut the other to the smallest petals. Use a Bone Folder to curl all three layers. Layer flowers of the same color on top of one another, with the medium size over the full size, then the smallest on the top.


Card #1 – So Saffron
1- Begin by placing the Layering Designs Vellum on the So
Saffron Cardbase. Do not adhere it yet. Adhere the flowers to the vellum. I did
Blushing Bride with Crushed Curry Flower near the top, So Saffron with Crushed
Curry in the middle, So Saffron with Magenta Madness below center, and Blushing
Bride with Magenta Madness at the bottom. Create a backwards “S” curve with the
flowers leaving a space in the center for the greeting.

2- Stamp the greeting in Evening Evergreen on Basic White Cardstock. Use the large label die with the flower from the Detailed Dahlias Dies to cut out. Place the greeting right in the center of the label. Use the partial die cutting technique to change the shape of the label. See video for detailed steps.
.jpg)
3- Add the greeting to the center of the vellum with dimensionals.
4- Add the fern images behind the vellum near the flowers
and greeting.

5- Then add adhesive to the back of the vellum behind the other elements so it doesn’t show. Add to the center of the cardbase.
6- Add a large Iridescent Rhinestone Basic Jewel to the
center of each flower and some smaller ones around the greeting.
All Done


Card #2 – Blushing Bride
1- Create an embossed look with a die by using your
platform 1, one clear plate 3, your silicone craft sheet, then the Polished
Pink cardstock and large detailed die, and last the other clear plate 3. Run through
your Stampin’ Cut & Emboss Machine.

2- Cut about 8” of the White Frayed Ribbon and fold in half. Lay it on the Polished Pink piece so the fold sits at the top of the cardstock on the right side. Use a stapler to hold in place about 1” from the fold. Then take a pair of scrap fabric scissors and cut the ends at an angle.

3- Add another Layering Detailed Designs Vellum piece to the center of the Blushing Bride Cardbase. Layer the Mother of Pearl Paper behind the Polished Pink Cardstock and add both to the center of the card.
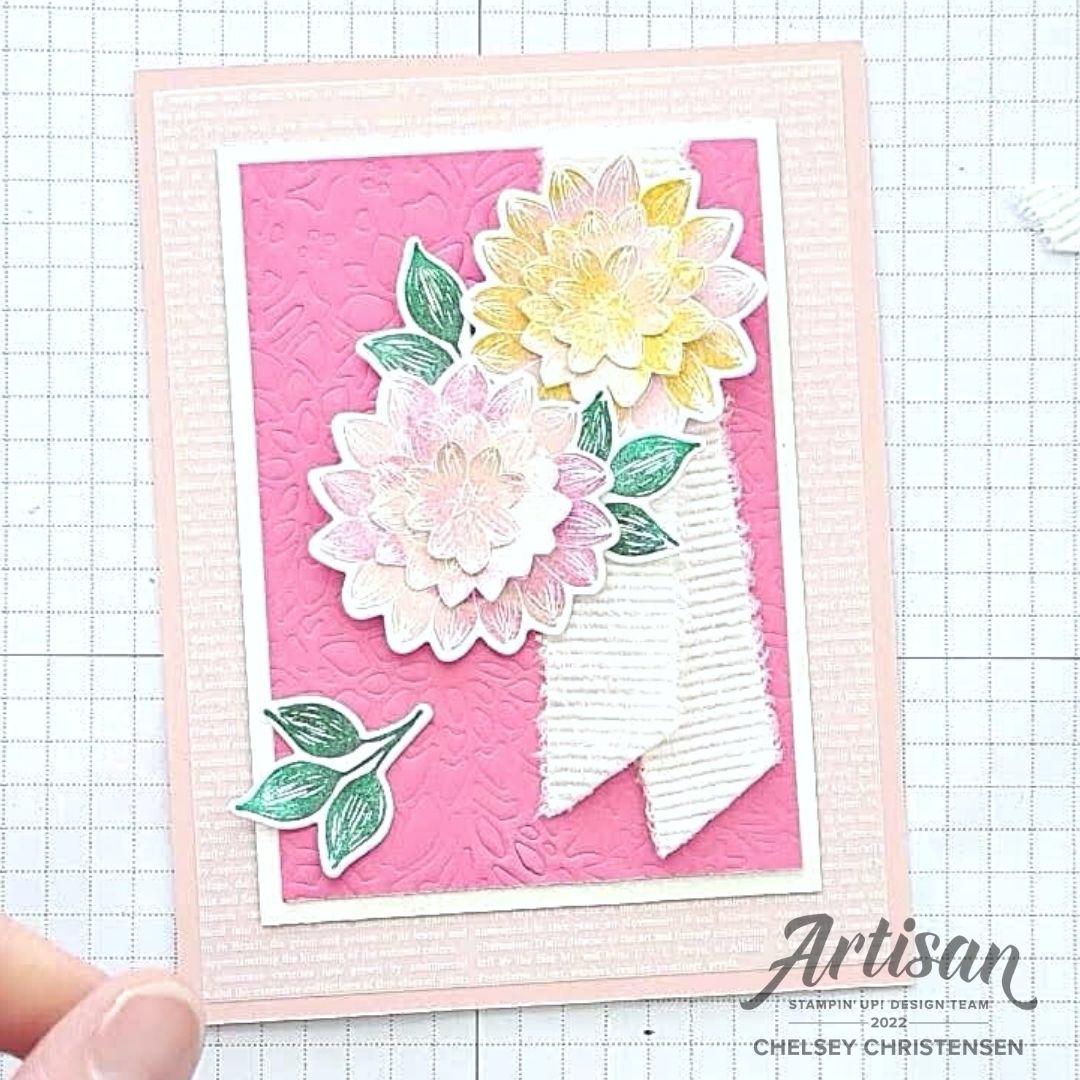
4- Layer the Blushing Bride with Crushed Curry over the staple on the ribbon. I used liquid adhesive to make a strong bond with the ribbon & paper. Then add the Blushing Bride with Magenta Madness with a dimensional to the left of the ribbon and about center on the card.
5- Then tuck the three-leaf images around the flowers and
one near the bottom left corner of the Polished Pink piece.
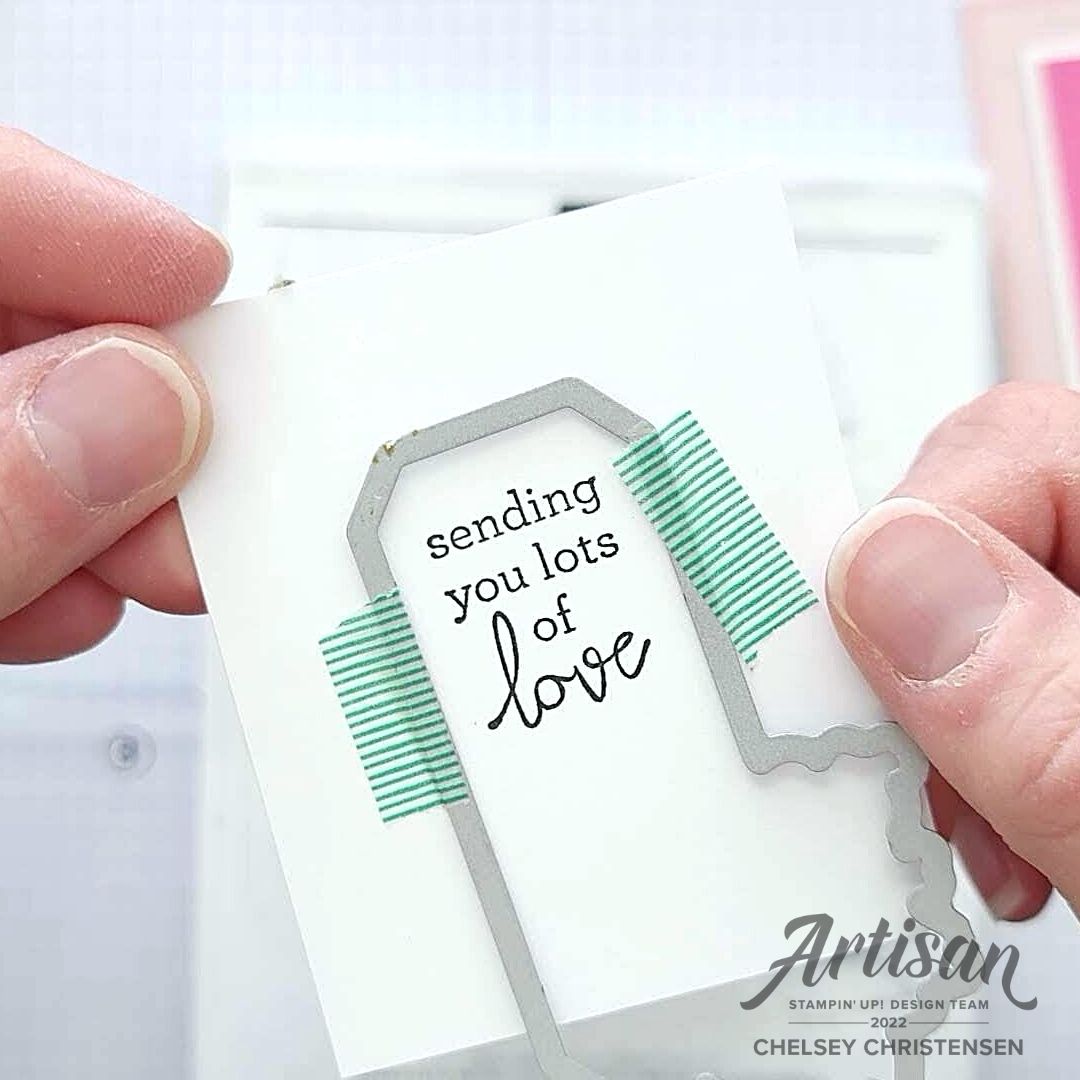
6- Stamp your greeting in Evening Evergreen on Basic White Cardstock. Use the same large label die vertically to cut it out. Use the partial die cutting technique to get a nice size to fit the greeting. See video for detailed instructions. Add it to the bottom left corner with a dimensional.

7- Add a large Iridescent Rhinestone Basic Jewel to the center of each flower and some smaller ones around the greeting.
All Done!
If you would like to watch me create these cards with step by step tips and directions please watch this video:
If you need any product to make these cards, please visit my online store: http://www.stampinup.com?demoid=2042902
Have a creative day,
Chelsey
chelsey@creativechelsey.com
No comments:
Post a Comment