Thursday, June 30, 2022

July 2022 Exclusive Online Card Class - Decorative Masks Techniques

Registration for this class has closed.


Join me for exclusive Online Card Making Tutorials from July 25-30, 2022! 

Class Fee $35

Today I would like to share with you my upcoming Online Class for July 2022. In this class we will be creating 6 Beautiful Handmade Cards using the Artistic Mix Decorative Masks. The stamp set is your choice. I will be using the True Beauty Bundle (158984). I recommend using a floral set with solid flowers and leaves. We will be learning 2 different ways to use the Masks and will start with basic techniques and move to more advance techniques. You can purchase these items from my Stampin’ Up Online Store, https://www.stampinup.com?demoid=2042902.

To sign up for this class, please use the PayPal button below. Please see the list below of the product you will need to have to create these cards.  


DECORATIVE MASKS TECHNIQUE CARD CLASS - $35 (US Only)

You will receive a class kit from me that will include the below supplies:

• Pre-cut cardstock

• Envelopes

• Artistic Mix Decorative Masks

• A Roll of Silver Trim

• 12 Sheets of Lovely Layers Vellum

*Please note that I reserve the right to switch products based on availability. Substituted products will be of similar value and keep the integrity of the design.

CARDSTOCK ONLY KITS - If you would like to make multiple sets of cards, I will be offering a cardstock only kit for $15 that can be purchased along with a full kit. It includes everything except the Silver Trim and Artistic Mix Decorative Masks. You can purchase as many of either kits as you would like. Please note that the Cardstock Only Kit can ONLY be purchased along with one FULL kit. Please make sure to add this option to your PayPal cart before checking out. 


This class will take place in a Private Facebook Group. Not on FACEBOOK? You can still participate - I will email you each video and PDF tutorial after the live class. After you register/pay please email me - chelsey@creativechelsey.com - letting me know you are not on Facebook!

In this Facebook Group I will post:

• Written instructions for each card (PDF) with measurements so you can create more cards.

• Facebook Live Videos for each card where I will walk you through each step to create the cards. Watch live or when you have the time.


What is not included (you will need to have these supplies to complete the cards):

• A Floral Stamp Set & coordinating dies or punch – I recommend something with solid images that don’t need to be colored. I will be using True Beauty Bundle (158984 - $59.25). If you would like help choosing a stamp set you can contact me.

• Fresh Freesia Ink Pad – 147103 $8.00

• Highland Heather Classic Stampin’ Pad – 147103 $8.00

• Tahitian Tide Classic Stampin’ Pad – 159210 $8.00

• Balmy Blue Classic Stampin’ Pad – 147105 $8.00

• Pear Pizzazz Classic Stampin’ Pad – 147104 $8.00

• Soft Sea Foam Classic Stampin’ Pad – 147102 $8.00

• Memento Ink Pad – 132708 $6.00


Here are the tools you will need:

• Blending Brushes – 153611 $12.50

• Stamparatus – 146276 $49.00

• Take Your Pick Tool – 144107 $10.00

• Paper Trimmer – 152392 $25.00

• Stampin’ Cut & Emboss Machine – 149653 $125.00 (If your bundle includes dies)

• Tools: Ribbon/fabric scissors, paper snips, bone folder, adhesive, coordinating clear blocks, and stamp cleaner


If you need any Stampin Up product to take this class you can visit my online store at https://www.stampinup.com?demoid=2042902

Please use host code when ordering: BM39KQ4S

Please contact me if you have any questions chelsey@creativechelsey.com

FINE PRINT:

• Registration for this class closes on Saturday July 16th. Kits will begin shipping the week of July 11th.

• This class is available to both customers and Stampin’ Up demonstrators in the USA. If you live outside of the USA I do offer a TUTORIALS ONLY option for you (not available to those in USA). Please select the correct option when paying. 

• I will ship the class kit to the address listed in PayPal. Please make any changes before you pay. 

• I will contact you and send you class information using the email address you enter in PayPal. Please make sure it is your current email address. 

• I reserve the right to switch products based on availability. Substituted products will be of similar value and keep the integrity of the design.

Please notify me ASAP if there is a problem or the information in PayPal is incorrect – chelsey@creativechelsey.com

Registration for this class has closed

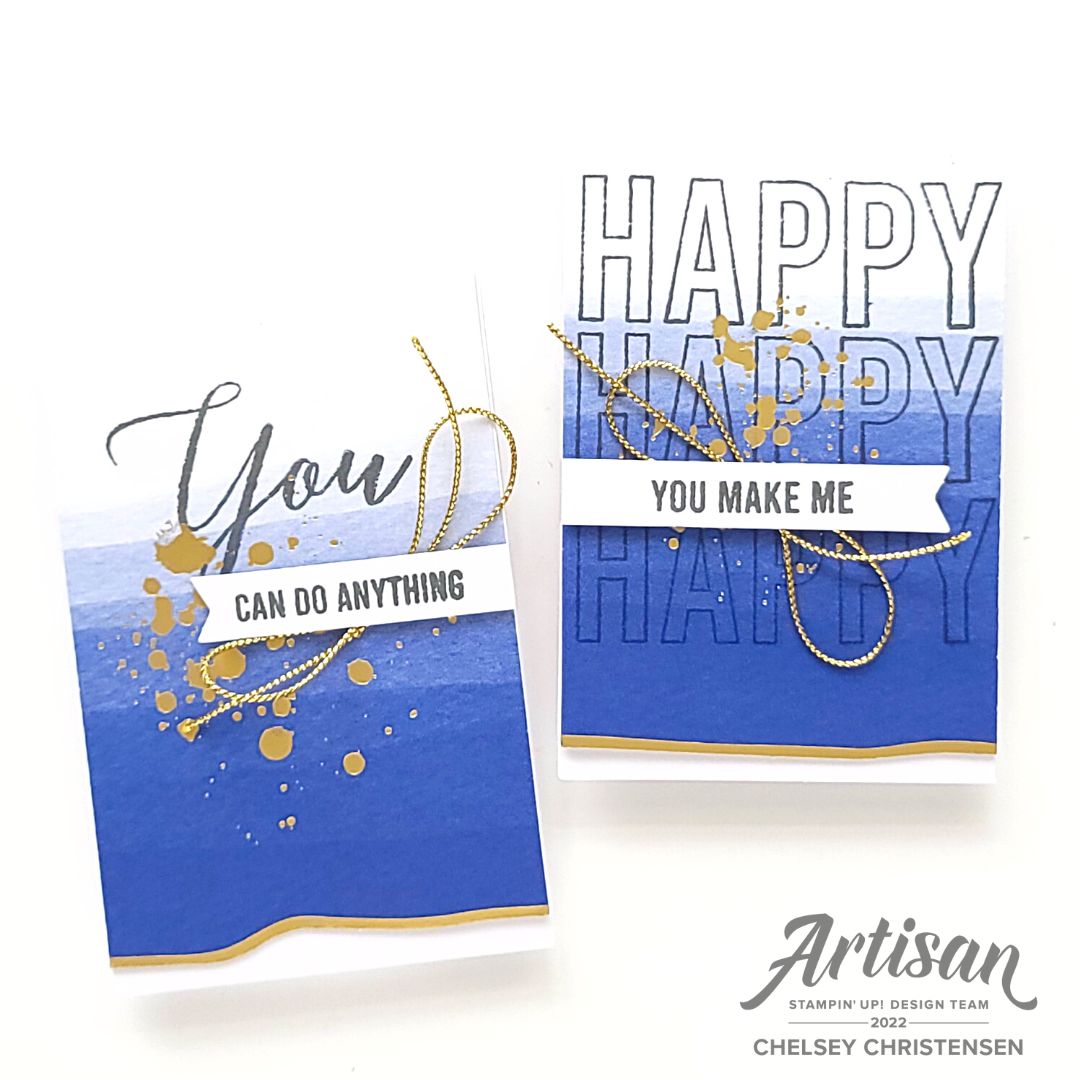
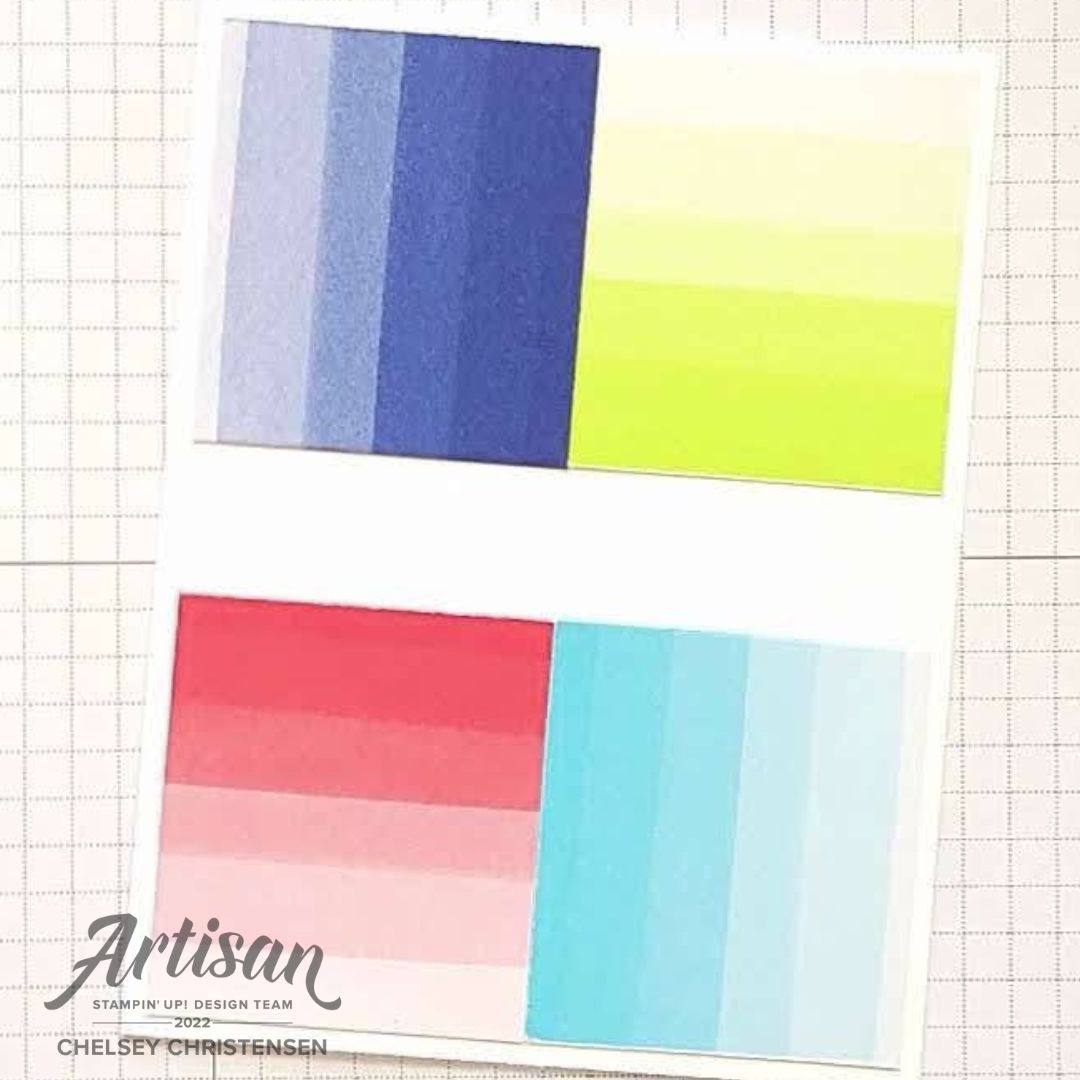
These images are close-ups of the cards we will be making in this Exclusive Online Class! Don't miss it!

Please contact me with any questions

Have a creative day,

Chelsey

chelsey@creativechelsey.com


Friday, June 10, 2022

Make More Handmade BIRTHDAY Cards Using The May 2022 Paper Pumpkin Stamp Set - Stampin' Up!

Welcome to Paper Pumpkin Week here at Creative Chelsey. I love getting my Paper Pumpkin Kit every month and creating fun alternative projects using the supplies in the kit. Today I am sharing my last alternative idea using the May 2022 Paper Pumpkin Kit – Celebrating In Color. This kit comes with everything you need to make 10 Handmade Cards, 2 in five different design that all coordinate with the new 2022-2024 In Colors from Stampin’ Up!.


Every month my Paper Pumpkin subscribers receive an exclusive card kit designed by me using the stamp set from that month’s Paper Pumpkin Kit. These are the cards they will be creating as an extra thank you for being my Paper Pumpkin Customer. If you would like to also receive this special perk, sign up today and select me as your demonstrator (Chelsey Christensen, CO) click here: https://www.paperpumpkin.com/en-us/sign-up/?demoid=2042902.


What I like to do is use the supplies in the kit and create different or alternative cards. Today I am sharing a quick and simple idea using just the stamp set from the kit to create a fun birthday card. I love creating alternative projects with Paper Pumpkin Kits so make sure to check out all the projects I have made with this month’s kit.

If this project inspires you to create something, I would love for you to tag me in any social media post using @creativechelsey | #creativechelsey or email me at chelsey@creativechelsey.com.


It is Paper Pumpkin Week here on Creative Chelsey. This is the last alternative this week. If you would like to see all my alternatives check out the playlist here: https://youtube.com/playlist?list=PL40dV1oxpkNnl8jSDEcmroelkKfL930rJ

Want to see everything in this month’s kit? Watch me UNBOX this month’s Paper Pumpkin Kit here: https://youtu.be/RCg_70nBqq8

Don't miss out on next month’s Paper Pumpkin Kit - subscribe today!
SUBSCRIBE to Paper Pumpkin - click here –


See my Customer Appreciation Products for this month: http://creativechelsey.blogspot.com/p/shop-stampin-up-products.html

Follow me on Instagram https://www.instagram.com/creativechelsey

Or join my Facebook group https://www.facebook.com/groups/2221750878097906


To purchase any of the products you need to create this project visit https://www.stampinup.com?demoid=2042902

Cardstock Pieces:

Smoky Slate Cardbase 5 ½” x 8 ½” scored at 4 ¼”

Basic White Cardstock 3 ¾” x 4 ¼”

Smoky Slate Strip ½” x 2 ¾”

In Color Balloons & Trim 18”


Here is a list of the supplies I used to make the card:

Smoky Slate Cardstock 131202 $9.25

Basic White Cardstock 159276 $10.25

2022-2024 In Color Cardstock Assortment Pack 159204 $9.50

2022-2024 In Color Baker’s Twine Pack 159195 $15.00

Stampin’ Write Markers – choose a coordinating color https://www.stampinup.com/categories/shop-products/featured-products/ink-coloring/markers-more/markers?demoid=2042902

Memento Black Ink Pad 132708 $6.00

Paper Trimmer 152392 $25.00

Simply Shammy 147042 $8.00

Stampin’ Seal PLUS Adhesive 149699 $12.00

Multipurpose Liquid Glue 110755 $4.00

Tear & Tape Adhesive 138995 $7.00

Dimensionals 104430 $4.00

Clear Block D 118485 $8.50

Paper Snips 103579 $10.00

Bone Folder 102300 $7.00

Stampin' Pierce Mat 126199 $5.00

Take Your Pick Tool 144107 $10.00

Stampin’ Cut & Emboss Machine 149653 $120.00


1- Begin by stamping the “Happy” image on the Basic White piece in Memento Black Ink. You can use the image as a reference or create your own pattern. The steps are shown in rainbow pattern, begin with the red, then orange, yellow, light green, dark green, light blue, dark blue, dark purple, light purple, pink, end with white.


2- Color in the center “Happy” with a Stampin’ Write Marker or other coloring tool. Choose a color that coordinates with the In Color Balloons in your kit (sent to my paper pumpkin subscribers).


3- Use a Black Stampin’ Write Marker and add a small border around each balloon. Adhere the balloons. I used a dimensional at the top and a glue dot at the bottom of each balloon.

4- Draw a string from the balloons to the bottom edge of the cardstock.


5- Stamp the greeting on the ½” Smoky Slate strip in Memento Black ink. Add below “Happy” with dimensionals.

6- Wrap 18” of Twine around the cardstock and tie a bow. Place it at the bottom of the greeting.

7- Adhere to the cardbase with dimensionals. See different versions above.


I have also created a video walking you through each step

To purchase any of the products you see in this video visit

https://www.stampinup.com?demoid=2042902

Have a creative day!

Chelsey

chelsey@creativechelsey.com

Thursday, June 9, 2022

Take Your Paper Pumpkin Cards To The Next Level - May 2022 - Celebrating In Color Stampin' Up!

Welcome to Paper Pumpkin Week here at Creative Chelsey. I love getting my Paper Pumpkin Kit every month and creating fun alternative projects using the supplies in the kit. Today I am sharing my third alternative idea using the May 2022 Paper Pumpkin Kit – Celebrating In Color.


This kit comes with everything you need to make 10 Handmade Cards, 2 in five different design that all coordinate with the new 2022-2024 In Colors from Stampin’ Up!. What I like to do is use the supplies in the kit along with some other products and create different or alternative cards. Today I am sharing three cards that show how you can take your paper pumpkin cards to the next level using the stamps from the kit. I love creating alternative projects with Paper Pumpkin Kits so make sure to come back for more as I continue to create with this month’s kit.


If this project inspires you to create something, I would love for you to tag me in any social media post using @creativechelsey | #creativechelsey or email me at chelsey@creativechelsey.com


It is Paper Pumpkin Week here on Creative Chelsey. This is the third alternative this week. If you would like to see all my alternatives check out the playlist here: https://youtube.com/playlist?list=PL40dV1oxpkNnl8jSDEcmroelkKfL930rJ


Want to see everything in this month’s kit? Watch me UNBOX this month’s Paper Pumpkin Kit here:
https://youtu.be/RCg_70nBqq8

Don't miss out on next month’s Paper Pumpkin Kit - subscribe today!
SUBSCRIBE to Paper Pumpkin - click here –


See my Customer Appreciation Products for this month: http://creativechelsey.blogspot.com/p/shop-stampin-up-products.html

Follow me on Instagram https://www.instagram.com/creativechelsey

Or join my Facebook group https://www.facebook.com/groups/2221750878097906


To purchase any of the products you need to create this project visit https://www.stampinup.com?demoid=2042902

Card #1 & 2 (small size)

Starry Sky Die Cut Piece with wavy border

Coordinating White Cardbase

Long Banner - Greetings


Card #3

Orchid Oasis Die Cut with circle

White Cardbase

Circle You Label


Here is a list of the supplies I used to make the card:

2 ¼” Circle Punch or Die

Gold Trim – Simply Elegant Trim 155766 $7.50

Paper Trimmer 152392 $25.00

Simply Shammy 147042 $8.00

Stampin’ Seal PLUS Adhesive 149699 $12.00

Multipurpose Liquid Glue 110755 $4.00

Tear & Tape Adhesive 138995 $7.00

Dimensionals 104430 $4.00

Clear Block D 118485 $8.50

Paper Snips 103579 $10.00

Bone Folder 102300 $7.00

Stampin' Pierce Mat 126199 $5.00

Take Your Pick Tool 144107 $10.00

Stampin’ Cut & Emboss Machine 149653 $120.00


Card #1 & #2

1- Add the Starry Sky Die Cut to the coordinating cardbase. Make sure to add adhesive to the center as well. Then cut down the center at 2 ¾” to create to smaller cards 2 ¾” x 4 ¼” finished size.


2- Card #1 – Stamp Happy down the center of the card three times. Then take a tissue and pat over the gold foil to remove any ink that is sitting on top. This prevents it from smudging.


3- Card #2 – Stamp You once near the top of the card. Remove ink from the gold foiling with a tissue – remember to pat so you don’t smudge it.


4- Cut the Long Banner in half at about 2 ½”. Stamp your choice of greeting to coordinate.

5- Add a faux bow with about 10” of Gold Trim to the back of each greeting. Adhere to the card with dimensionals.

All Done!


Card #3

1- On the Orchid Oasis Die Cut remove the circle. Then stamp Happy down the left side.

2- Cut 1 ¾” from the bottom of the cardbase.

3- Adhere the Orchid Oasis to the front of the cardbase with adhesive only at the top. Then trim off the area that is hanging past the front of the cardbase. I used a Paper Trimmer.


4- Adhere the bottom part to the inside of the cardbase. Make sure it lines up with the top of the card.

5- Remove the white cardstock inside the circle on the front of the cardbase. I used a 2 ¼” circle punch (retired). You could also use the Layering Circle dies or a pair of scissors.


6- Close the cardbase and add the Orchid Oasis circle you removed in step 1 back inside the circle with dimensionals.

7- Stamp Celebrate at the top of the You on the Circle Label. Watch video below for instructions & tips. Add the label to the center of the Orchid Oasis circle.


8- Add three enamel dots.


I have also created a video walking you through each step


To purchase any of the products you see in this video visit

https://www.stampinup.com?demoid=2042902


Have a creative day!

Chelsey

chelsey@creativechelsey.com

Wednesday, June 8, 2022

Two Ways To Use The Pockets From May 2022 Paper Pumpkin Kit - Alternative Handmade Card Ideas

Welcome to Paper Pumpkin Week here at Creative Chelsey. I love getting my Paper Pumpkin Kit every month and creating fun alternative projects using the supplies in the kit. Today I am sharing my second alternative idea using the May 2022 Paper Pumpkin Kit – Celebrating In Color.


This kit comes with everything you need to make 10 Handmade Cards, 2 in five different design that all coordinate with the new 2022-2024 In Colors from Stampin’ Up!. What I like to do is use the supplies in the kit along with some other products and create different or alternative cards. Today I am sharing two cards that use the pocket pieces from the kit. I love creating alternative projects with Paper Pumpkin Kits so make sure to come back for more as I continue to create with this month’s kit.


If this project inspires you to create something, I would love for you to tag me in any social media post using @creativechelsey | #creativechelsey or email me at chelsey@creativechelsey.com.


It is Paper Pumpkin Week here on Creative Chelsey. This is the second alternative this week. If you would like to see all my alternatives check out the playlist here: https://youtube.com/playlist?list=PL40dV1oxpkNnl8jSDEcmroelkKfL930rJ

Want to see everything in this month’s kit? Watch me UNBOX this month’s Paper Pumpkin Kit here: https://youtu.be/RCg_70nBqq8


Don't miss out on next month’s Paper Pumpkin Kit - subscribe today!
SUBSCRIBE to Paper Pumpkin - click here –


See my Customer Appreciation Products for this month: http://creativechelsey.blogspot.com/p/shop-stampin-up-products.html

Follow me on Instagram https://www.instagram.com/creativechelsey

Or join my Facebook group https://www.facebook.com/groups/2221750878097906


To purchase any of the products you need to create this project visit https://www.stampinup.com?demoid=2042902

Card #1

Thick Basic White Cardbase 5 ½” x 8 ½” scored at 4 ¼”

4 Pocket Pieces in different colors

Basic Black Cardstock 1” x 4 ¼”

Best Wishes Die Cut

Enamel Dots


Card #2

Thick Basic White Cardbase 4 ¾” x 8 ½” scored at 4 ¼”

Basic White Cardstock 4 ¼” x 3 ¾”

Parakeet Party Strips

Orchid Oasis Pocket Piece

Happy Die Cut

Enamel Dots


Here is a list of the supplies I used to make the card:

Gold Trim – Simply Elegant Trim 155766 $7.50

Thick Basic White Cardstock 159229 $8.75

Basic White Cardstock 159276 $10.25

Basic Black Cardstock 121045 $9.25

Sweet Sorbet Stampin’ Blend Markers 159224 $9.00

Parakeet Party Stampin’ Blend Markers 159220 $9.00

Tahitian Tide Stampin’ Blend Markers 159221 $9.00

Starry Sky Stampin’ Blend Markers 159222 $9.00

Orchid Oasis Stampin’ Blend Markers 159223 $9.00

Paper Trimmer 152392 $25.00

Simply Shammy 147042 $8.00

Stampin’ Seal PLUS Adhesive 149699 $12.00

Multipurpose Liquid Glue 110755 $4.00

Tear & Tape Adhesive 138995 $7.00

Dimensionals 104430 $4.00

Clear Block D 118485 $8.50

Paper Snips 103579 $10.00

Bone Folder 102300 $7.00

Stampin' Pierce Mat 126199 $5.00

Take Your Pick Tool 144107 $10.00

Stampin’ Cut & Emboss Machine 149653 $120.00


Card #1

1- Cut each Pocket Piece into a 2 ¼” square. Design the layout you want and trim down the width to 2”. Final size will be 2” x 2 ¼” but the direction of each measurement depends on the position of the piece. See video for details.


2- Add the pieces to the corners of the cardbase with a small border around the outside edge. There will be a gap in the center running horizontal.

3- Cover the gap with the Basic Black strip.


4- Color in the letter from the Best Wishes Die Cut with your choice of Stampin’ Blend Markers. I used both the light and dark to give an ombre look to the letters.


5- Add Gold Trim to the back of the greeting in a faux bow. Add the greeting to the center of the card with dimensionals. Add three enamel dots.

All Done!


Card #2 –

1- Add the Parakeet Party strips to the 3 ¾” x 4 ¼” Basic White piece. The strips with the gold, I have placed with the white side on top. The “blank” strips I placed with the white on the bottom. There will be a small gap in between each strip.


2- Fold the pocket on the score lines. Add tear & tape and adhere it over the blank strips, with the bottom lined up with the edge of the Parakeet Party strips.


3- Color in the Happy with a coordinating Stampin’ Blend Markers. Create an ombre look by using the darker marker in the center of the letters. Add to the center of the card with dimensionals.


4- Stamp “You Make Me” in Basic Gray above Happy.


5- Add to your cardbase with dimensionals. Add three enamel dots.

All Done!


I have also created a video walking you through each step:

To purchase any of the products you see in this video visit

https://www.stampinup.com?demoid=2042902


Have a creative day!

Chelsey

chelsey@creativechelsey.com