
Welcome to Paper Pumpkin Week here at Creative Chelsey. I love getting my Paper Pumpkin Kit every month and creating fun alternative projects using the supplies in the kit. Today I am sharing my third alternative idea using the December 2021 Paper Pumpkin Kit – Lots of Pun. This kit comes with everything you need to make 9 Punny Cards, 3 in three different designs.

What I like to do is use the supplies in the kit and create different or alternative cards. Today I am sharing two ways to create more cardbases from the kit. And then we are redesigning the original card twice. I love creating alternative projects with Paper Pumpkin Kits so make sure to come back for more as I continue to create with this month’s kit.

If this project inspires you to create something, I would love for you to tag me in any social media post using @creativechelsey | #creativechelsey or email me at chelsey@creativechelsey.com.

It is Paper Pumpkin Week here on Creative Chelsey. This is the third alternative this week. If you would like to see all my alternatives check out the playlist here: https://youtube.com/playlist?list=PL40dV1oxpkNmsKFbVLmhdr8k5iwqH__IZ

Want to see everything in this month’s kit? Watch me UNBOX this month’s Paper Pumpkin Kit here: https://youtu.be/sN3mYgRHYHE

Don't miss out on next month’s Paper Pumpkin Kit - subscribe today!
SUBSCRIBE to Paper Pumpkin - click here –
https://www.paperpumpkin.com/en-us/sign-up/?demoid=2042902

See my Customer Appreciation Products for this month: http://creativechelsey.blogspot.com/p/shop-stampin-up-products.html

Follow me on Instagram https://www.instagram.com/creativechelsey
Or join my Facebook group https://www.facebook.com/groups/2221750878097906


To purchase any of the products you need to create this project visit https://www.stampinup.com?demoid=2042902
Here are the extra pieces of cardstock I used for the cards:
Granny Apple Green Cardbase 5 ½” x 8 ½” scored at 4 ¼”
Basic White Cardstock 4” x 5 ¼”
From the Kit:
Blue checkered frame and inside piece
Word Bubble – long or short
Pool Party envelope left over pieces
Scallop edge
Die cut pieces
Here is a list of the supplies I used to make the card:
Granny Apple Green Cardstock 146990 $8.75
Basic White Cardstock 159276 $9.75
Granny Apple Green Ink Pad 147095 $7.50
Early Espresso Ink Pad 147114 $7.50
Watercolor Shapes Stamp Set 156968 $21.00
Pool Party Ink Pad 147107 $7.50
Blending Brushes 153611 $12.00
Pool Party Stampin’ Blends 154894 $9.00
Color Lifter Stampin’ Blends 144608 $4.50
Paper Trimmer 152392 $25.00
Simply Shammy 147042 $8.00
Stampin’ Seal PLUS Adhesive 149699 $12.00
Multipurpose Liquid Glue 110755 $4.00
Tear & Tape Adhesive 138995 $7.00
Dimensionals 104430 $4.00
Clear Block D 118485 $8.50
Paper Snips 103579 $10.00
Bone Folder 102300 $7.00
Stampin' Pierce Mat 126199 $5.00
Take Your Pick Tool 144107 $10.00
 |  |
1- Create a cardbase similar to the original one in the kit:
Stampin’ Blends – trace a circular object in the
center of Basic White Cardstock with the light Pool Party Blend. Fill in with
both light & dark. Use the Color Lifter to lighten up areas and create a smoother
outline.
Watercolor Shapes Stamp Set – use a Blending Brush
to add color to the large circle stamp. Stamp in the center of Basic White
Cardstock.
*You can also use Watercolor Paper and Water Painters to
create a circle of color as well, however, I wanted it to be on Basic White
Cardstock, so I decided to try these two other techniques.
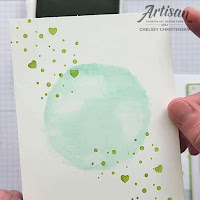
2- Stamp the scatter & heart images in Granny Apple Green in the top left corner to the bottom right corner. Do not stamp through the circle.

3- Cut from Pool Party envelope two strips 1” x 4” & ½” x 4”. Repeat if you are making two cards. Add the smaller strip with the pattern on top to the larger strip with the Pool Party showing. Add these to the center of the Basic White cardstock with the strips going through the middle of the circle.
 |  |
4- Add the Basic White cardstock to the center of the Granny
Apple Green cardbase. Add the blue checkered circle to the center of the
watercolor circle (Stampin’ Blends) with dimensionals. For the other card,
place the blue checkered square over the watercolor circle (stamp) with dimensionals.
 |  |
5- Stamp the coordinating food shape over a die cut in
Early Espresso ink. Add to the circle. Stamp your greeting on either the
small or large word bubble with Early Espresso ink. Add a scallop or solid strip detail to the bottom of the greeting. Add to the circle with
dimensionals. Repeat for other card.
6- Add enamel dots to finish the card.
All Done!
I have also created a video walking you through each step and some of the details from the other cards:
To purchase any of the products you see in this video visit
https://www.stampinup.com?demoid=2042902
Have a creative day!
Chelsey
chelsey@creativechelsey.com
No comments:
Post a Comment