

Today I am excited to share with you my November Artisan Design Team Project. I was asked to use the Lights Aglow Suite of products. This group of products include the Christmas Lights Bundle, Brightest Glow Bundle, Gold & Vanilla Stain-Edged Ribbon, Festive Pearls, Glimmer Specialty Paper, Festive Foils Specialty DSP, and Lights Aglow Designer Series Paper. To purchase any of these products, please visit my online store or use the links below.

I wanted to share a unique look with these products and decided on creative a Negative Space Focal Point. This fun technique creates an opening or hole in the top layer of the card where the focal point is added underneath. I hope you give it a try on your next card.

See my Customer Appreciation Products for this month: http://creativechelsey.blogspot.com/p/shop-stampin-up-products.html
Follow me on Instagram https://www.instagram.com/creativechelsey
Or join my Facebook group https://www.facebook.com/groups/2221750878097906

Be sure to check out the rest of the team’s wonderful creations on the Stampin’ Up! Corporate Facebook Page at - http://www.facebook.com/stampinup
For more inspiration, tips & tricks from the 2022 Artisan Design Team also check out Stampin’ Up! on Instagram – https://www.instagram.com/stampinupofficial

To purchase any of the products you need to create this project visit
https://www.stampinup.com?demoid=2042902
Here are the dimensions and pieces you will need to
create these projects:
Thick Very Vanilla Cardbase – 5 ½” x 8 ½” scored at 4 ¼”
Very Vanilla Cardstock – scraps for stamping
Evening Evergreen Cardstock – scraps for stamping
Lights Aglow DSP – (2) 3 ¾” x 5”
Glimmer Paper – (2) 3 7/8” x 5 1/8”
")
")
 Specialty Designer Series Paper")
 Specialty Paper")


")


 Satin Edged Ribbon")


1- Begin by heat embossing the large tree & snowflake images on Evening Evergreen Cardstock. I like to use an embossing buddy before stamping with VersaMark ink, add gold embossing powder, tap off excess and heat until shiny.
Let cool, then remove the Embossing Buddy with a Microfiber
cloth.
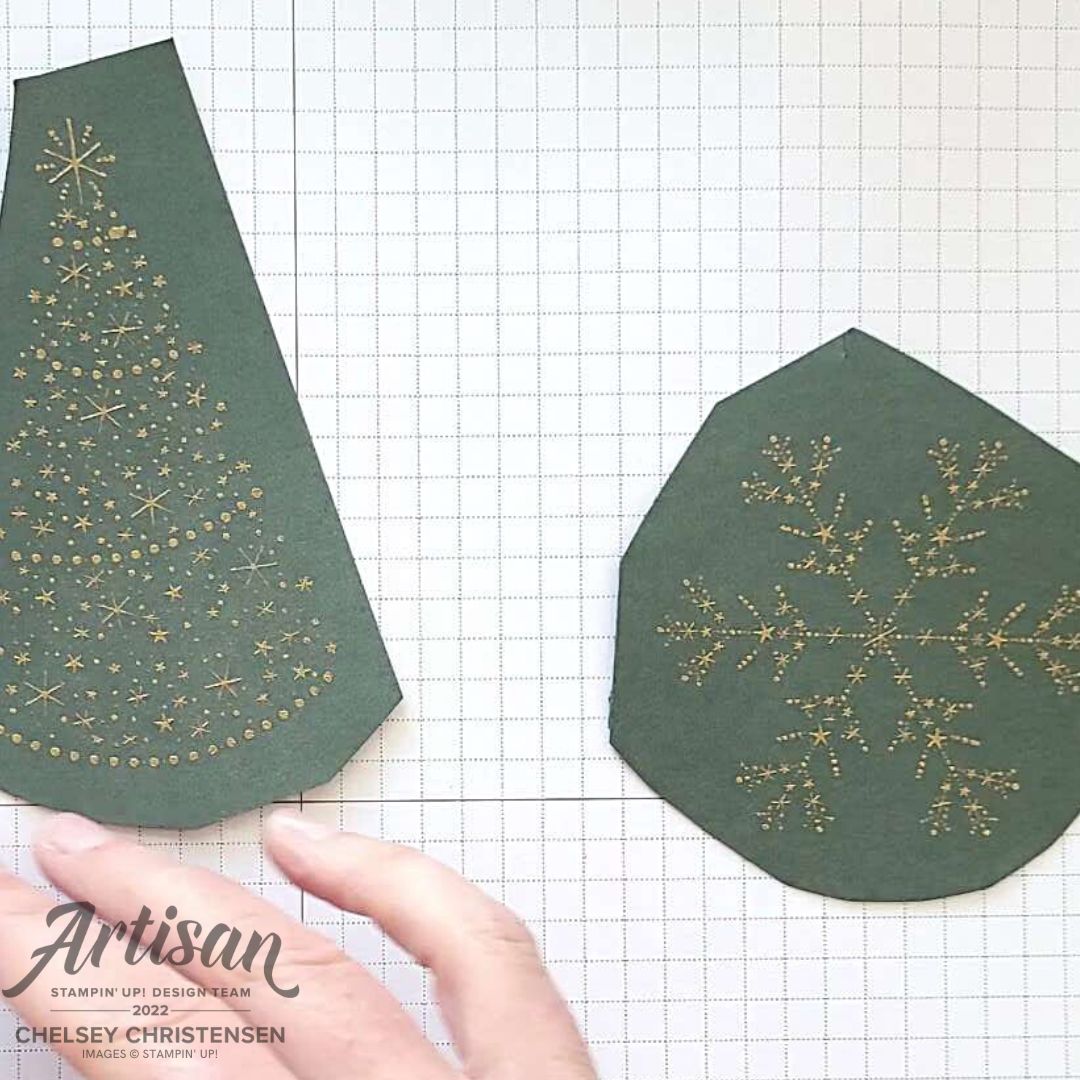
2- Do not cut out with coordinating dies, use paper snips and do a rough cut making sure to give a large border around the images.

3- For the Large Snowflake image you can add the inside detail die inside the snowflake if you want. Run through your Stampin’ Cut & Emboss Machine. Use the Brush Tip for the Take Your Pick Tool and remove the small pieces.

4- Create the negative space (opening) on the front of the card. Start with two pieces of DSP that is 3 ¾” x 5” – One for the Christmas Tree card and the other for the Snowflake card. Add the Large Christmas Tree & Large Snowflake Dies to the center of the DSP and cut out.

5- Add the stamped images underneath with dimensionals. Start by adding dimensionals on the back of the DSP along the negative space opening.
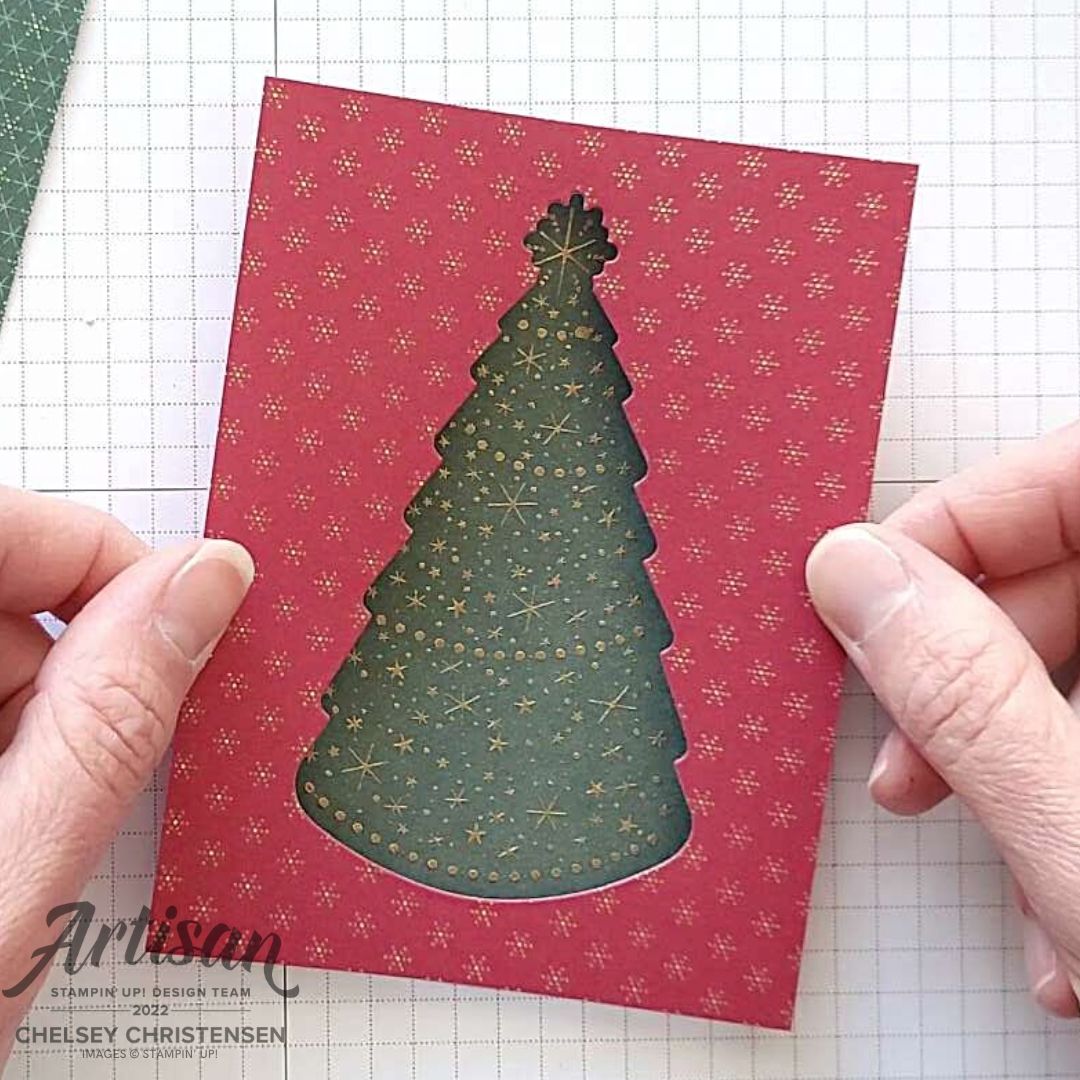
Then hover the DSP over the stamp image until everything lines up and adhere.

6- Adhere coordinating Glimmer Paper 3 7/8” x 5 1/8” to the back to give a fun border and it will peek through the holes in the snowflake. I use Gold for the snowflake and evening evergreen for the tree. Use dimensionals in the corners and liquid glue on the back of the stamped image.

7- Add everything to your cardbase – I used Thick Very Vanilla for my cardbase.
8- Stamp your greeting on Very Vanilla Cardstock in Evening
Evergreen and cut out with coordinating labels from the Labels Aglow Dies. Add Gold
& Vanilla Ribbon if you want in a faux bow behind the greeting and add with
dimensionals.

9- Add any Festive Pearls. I added them to the snowflake, but you could also add them to the Christmas tree.
All Done!
If you would like to watch me create these cards with
step by step tips and directions please watch this video:
If you need any product to make these cards, please visit
my online store: http://www.stampinup.com?demoid=2042902
Have a creative day,
Chelsey
No comments:
Post a Comment