
Welcome to Paper Pumpkin Week here at Creative Chelsey. I love getting my Paper Pumpkin Kit every month and creating fun alternative projects using the supplies in the kit. Today I am sharing my first alternative idea using the August 2022 Paper Pumpkin Kit – Sweet Sunflowers.

This kit comes with everything you need to make 9 Handmade Cards, 3 in three different designs. This kit is beautiful with the watercolor images and delicate honeycomb details. I loved playing with this kit. What I like to do is use the supplies in the kit along with some other products and create different or alternative cards. Today I am sharing how you can make two cards from one cardbase & a fun and easy watercolor technique to create more Sunflowers. I love creating alternative projects with Paper Pumpkin Kits so make sure to come back for more as I continue to create with this month’s kit.
If this project inspires you to create something, I would love for you to tag me in any social media post using @creativechelsey | #creativechelsey or email me at chelsey@creativechelsey.com.

It is Paper Pumpkin Week here on Creative Chelsey. This is the first alternative this week. If you would like to see all my alternatives check out the playlist here: https://youtube.com/playlist?list=PL40dV1oxpkNlJAI7jLwkTDXjfLz1TXXUk
Want to see everything in this month’s kit? Watch me UNBOX this month’s Paper Pumpkin Kit here: https://youtu.be/angLklG9fF0
Don't miss out on next month’s Paper Pumpkin Kit -
subscribe today!
SUBSCRIBE to Paper Pumpkin - click here –
https://www.paperpumpkin.com/en-us/sign-up/?demoid=2042902

See my Customer Appreciation Products for this month: http://creativechelsey.blogspot.com/p/shop-stampin-up-products.html
Follow me on Instagram https://www.instagram.com/creativechelsey
Or join my Facebook group https://www.facebook.com/groups/2221750878097906
To purchase any of the products you need to create this project visit https://www.stampinup.com?demoid=2042902
———————— What You Need ————————
Small Flower Cardbase
Gold Foil Honeycomb Sheet
2 Crumb Cake Cardbases 5 ½” x 8 ½” scored at 4 ¼”
Basic White Cardstock – scraps for stamping & 1 ¼” x
2 ¼” greeting
2 Bee Cut Outs
Yellow & Pink Long Label
Natural Finish Ribbon 6”
———————— Supplies I used to Make These Cards ————————
• Crumb Cake 8-1/2" X 11" Cardstock [120953]
$9.25 —— https://bit.ly/3IAzCaO
• Basic White 8 1/2" X 11" Cardstock [159276]
$10.25 —— https://bit.ly/3OUrF2w
• Natural Finish 7/8" (2.2 Cm) Ribbon [159051] $8.50
—— https://bit.ly/3KhVubT
• Evening Evergreen Classic Stampin' Pad [155576] $8.00
—— https://bit.ly/3Aii3IT
• Mossy Meadow Classic Stampin' Pad [147111] $8.00 —— https://bit.ly/3OvxyT5
• Stampin' Spritzer [126185] $3.25 —— https://bit.ly/3PnUPae
• Neutrals Stampin' Write Markers [147158] $30.00 —— https://bit.ly/3PLnQN1
———————— My Favorite Supplies ————————
• Stampin' Seal+ [149699] $12.00 —— https://bit.ly/3Ibz8YK
• Multipurpose Liquid Glue [110755] $4.00 —— https://bit.ly/3IaGF9S
• Tear & Tape Adhesive [138995] $7.00 —— https://bit.ly/3ajQSo5
• Stampin' Dimensionals [104430] $4.25 —— https://bit.ly/3IbzezA
• Mini Glue Dots [103683] $5.25 —— https://bit.ly/3anAcw3
• Stampin' Pierce Mat [126199] $5.00 —— https://bit.ly/3IjEq4d
• Simply Shammy [147042] $8.50 —— https://bit.ly/3bQH7hE
• Paper Snips [103579] $11.00 —— https://bit.ly/3ulT6tV
• Take Your Pick [144107] $10.00 —— https://bit.ly/3IeYxR9
• Bone Folder [102300] $7.00 —— https://bit.ly/3uhErzZ
• Clear Block D [118485] $9.00 —— https://bit.ly/3uuabSs
• Paper Trimmer [152392] $25.00 —— https://bit.ly/3abvykH
• Stampin' Cut & Emboss Machine [149653] $125.00 —— https://bit.ly/3ujz8zU


Card #1
1- Cut the back watercolor wash of the cardbase to 4” x 5
¼”
2- Cut an organic shape from the center of the Gold Foil
Honeycomb Sheet. Adhere to the center of the watercolor wash piece from the
back of the cardbase.

3- Wrap 6” of ribbon in the center and adhere to the back. Cut a long strip from the edge of the Gold Foil Honeycomb Sheet and add to the center of the ribbon.

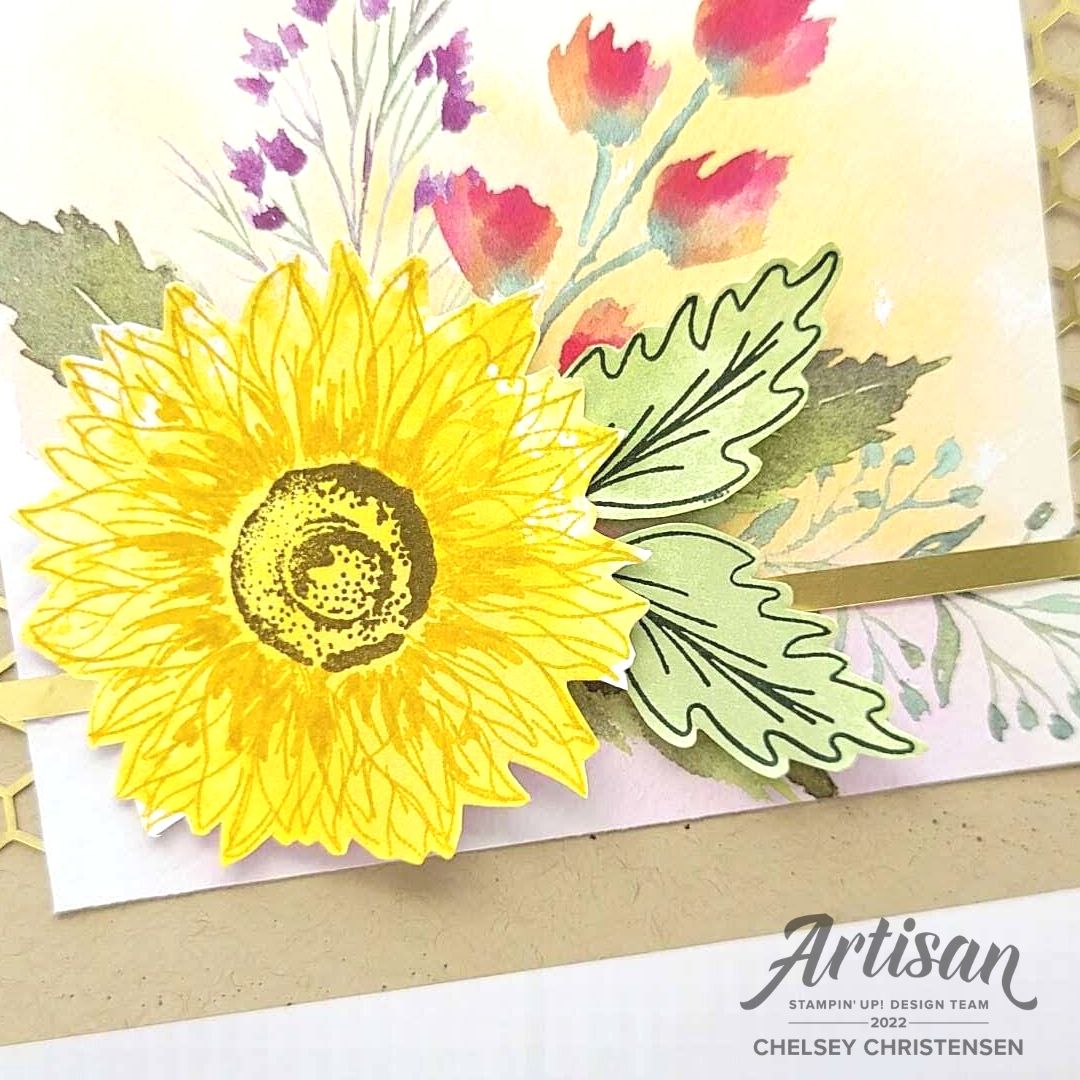
4- Add the Sunflower Stamp backward to a clear block so you will be stamping using the flat side. Ink it up in Crushed Curry ink and spritz with a little water. Gently tap sections of the stamp on Basic White Cardstock to get a variation of color in the shape of the stamp. Add more ink or water as you want. Let dry.
Do the same process with the Leaf Stamp. I used Mossy
Meadow ink. Do this three times.

5- Once it has dried you can stamp your image on top. I used Crushed Curry & Soft Suede for the Sunflower. I also stamped the Sunflower Stamp once and then inked and stamped again over the first image, rotating the stamp. Fussy cut.
Stamp the Leaf Stamp in Evening Evergreen. Fussy cut.

6- Add the Sunflower with dimensionals in the center of the card. Add the Leaves with a dimensionals, one on the upper left of the flower and two on the right in center.
Splatter over the card with a Soft Suede Stampin’ Write
Marker. Use the large brush end, place it inside the cap and flick out over the
area you want a fine splatter. Add everything to the cardbase.

7- Stamp your greeting in Soft Suede on the 1 ¼” strip. Create a banner by cutting up in the center from the bottom edge. Then from the bottom corners to the top of the cut. Add to the left of the Sunflower with dimensionals.
8- Stamp three bees in Soft Suede around the flower.
All Done!


Card #2
1- On the Crumb Cake Cardbase add a little splatter with
the Soft Suede Stampin’ Write Marker – see above step 6
2- Cut the front of the cardbase from the kit to 3 ½” x 4”.
Make sure to keep as much of the flowers as possible. Cut the Gold Foil Honeycomb
Sheet into two strips that are about ¾” x 3”. Add them to the sides of the
flower piece, by attaching them to the back. Add everything to the left of the cardbase
with about ¼” from the top.
3- Trim a long edge of the Gold Foil Honeycomb Sheet and add in the center near the bottom of the flowers.
4- Create a Sunflower by following the above steps 4
& 5 from card #1. You need one Sunflower and two Leaves.
Add the Sunflower to the bottom left corner of the
flowers with dimensionals.
Add the Leaves over the two leaves on the right of the Sunflower
with dimensionals.

5- Stamp your greeting on the yellow & pink label in Soft Suede Ink. Add to the right of the leaves with dimensionals.
6- Add two bees with glue dots.
All Done!
I have also created a video walking you through each step and some of the details from the cards:
To purchase any Stampin’ Up! products please visit
https://www.stampinup.com?demoid=2042902
Have a creative day!
Chelsey
chelsey@creativechelsey.com
No comments:
Post a Comment