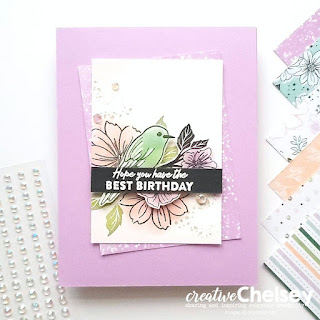
Hello my crafting friends,
Today I am excited to share that I was recently invited to the Stampin’ Fancy Friday Design Team. This group of amazing designers create fun challenges each month. We each then design a project around the challenge. Everyone is invited to participate in the challenge each month. Share your project on IG or FB then tag #stampinfancyfriday when you post it. They will share in their stories to inspire others as well!
The first challenge of 2022! It's all about BIRTHDAYS! 🎂 Make sure to check out all 24 projects from the team all during January to inspire you because everyone deserves a card on their birthday!
I hope you are inspired by this card and create your own Birthday project for the challenge this month.
See my Customer Appreciation Products for this month: http://creativechelsey.blogspot.com/p/shop-stampin-up-products.html
Follow me on Instagram https://www.instagram.com/creativechelsey
Or join my Facebook group https://www.facebook.com/groups/2221750878097906
Be sure to check out the rest of the Stampin’ Fancy Friday team’s wonderful creations on Facebook - https://www.facebook.com/stampinfancyfriday/ or Instagram - https://www.instagram.com/stampinfancyfriday/
To purchase any of the products you need to create this project visit https://www.stampinup.com?demoid=2042902
Here are the dimensions and pieces you will need to
create this card:
Fresh Freesia Cardbase 5 ½” x 8 ½” scored at 4 ¼”
Friendly Hello Designer Series Paper 3” x 4”
Shimmery White Cardstock 2 ¾” x 3 ¾” | 2” x 3” scrap
Basic Black Cardstock ½” x 2 ¾”
The products I used are:
Friendly Hello Stamp Set & Friendly Hello Designer
Series Paper 159990 *FREE with $100 order
Fresh Freesia Cardstock 155613 $8.75
Shimmery White Cardstock 101910 $10.00
Basic Black Cardstock 121045 $8.75
Fresh Freesia Ink Pad 155611 $7.50
Petal Pink Ink Pad 147108 $7.50
Pool Party Ink Pad 147107 $7.50
Granny Apple Green Ink Pad 147095 $7.50
Sahara Sand Ink Pad 147117 $7.50
Sponge Daubers 133773 $5.00
Memento Black Ink Pad 132078 $6.00
Chalk Marker 132133 $3.50
Basic Black Stampin’ Write Marker 100082 $3.00
VersaMark Ink Pad 102283 $9.50
Basics Embossing Powders (white) 155554 $18.00
Heat Tool 129053 $30.00
Iridescent Rhinestones 158130 $7.50
Paper Trimmer 152392 $25.00
Clear Block D 118485 $8.50
Simply Shammy 147042 $8.00
Stampin’ Seal Adhesive 152813 $8.00
Dimensionals 104430 $4.00
Adhesive Sheets 152334 $10.00
Paper Snips 103579 $10.00
Bone Folder 102300 $7.00
Take Your Pick Tool 144107 $10.00
1- Begin by stamping the double flower image in Memento Black Ink in the bottom left area of the 2 ¾” x 3 ¾” Shimmery White piece. Then add four solid leaves in Granny Apple Green around the flowers. Add the splatter image in Sahara Sand ink in the top left area and bottom right.
2- With a Sponge Dauber and Petal Pink ink pad add color inside the flowers.
3- Stamp the bird & flower image on the other piece of Shimmery White Cardstock in Memento Black ink. Add color with Sponge Daubers, Fresh Freesia to the flowers, Pool Party & Granny Apple Green to the bird. Fussy Cut out.
4- Color in some of the branch with a Black Stampin’ Write Marker.
Add highlights to the birds’ tail with a Chalk Marker.
5- Add the Shimmery White Petal Pink flower piece to the DSP at an angle. Add this to the center of the cardbase. You will want the Shimmery White piece to be straight on the card.
6- Add the bird with dimensionals over the Petal Pink flowers. Trim off the tail of the bird at the branch.
7- On the Black ½” strip stamp your greeting in VersaMark ink, add white embossing powder and heat. Then add to the card over the bird with dimensionals. Cover up the branch. Tuck the tail under the greeting with a dimensional. Make sure to place it so the tail of the bird is inline with the body.
8- Add three Iridescent Rhinestones.
All Done!
If you would like to watch me create this card with step
by step tips and directions please watch this video:
If you need any product to make these cards, please visit my online store: http://www.stampinup.com?demoid=2042902
Here are a couple more cards I made with the Friendly Hello Stamp Set & Designer Series Paper
Have a creative day,
Chelsey
chelsey@creativechelsey.com


Love these cards! Great ideas! Thanks for inspiring me.
ReplyDelete