Thursday, December 30, 2021

Create a Multi-Color Background for your Handmade Cards with Inspired Thoughts Bundle - Stampin' Up

Hello my crafting friends,

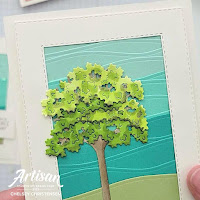
Today I would like to share with you my December Artisan Showcase Projects. I was asked to create a couple samples using the Inspired Thoughts Bundle, which includes the Inspired Thoughts Stamp Set and the Inspiring Canopy Dies. 


The cards I created show a couple fun techniques you can do with the Inspiring Canopy Dies in particular. First, you can create fun backgrounds like these by cutting multiples of the “ground” die from cardstock then layering the pieces over one another. Another simple technique is to separate one tree from the grouping of trees to get a single tree, then cover up the cut area with leaves. My last technique is to use the Stampin’ Blend Markers to create multicolored leaves or blossoms for the trees. I hope you are inspired by these cards.


See my Customer Appreciation Products for this month: http://creativechelsey.blogspot.com/p/shop-stampin-up-products.html

Follow me on Instagram https://www.instagram.com/creativechelsey

Or join my Facebook group https://www.facebook.com/groups/2221750878097906


Be sure to check out the rest of the team’s wonderful creative on the Stampin’ Up! Corporate Facebook Page at -  http://www.facebook.com/stampinup

For more inspiration, tips & tricks from the 2021 Artisan Design Team also check out Stampin’ Up! on Instagram – http://www.instagram.com/stampinup


To purchase any of the products you need to create this project visit

https://www.stampinup.com?demoid=2042902

Here are the dimensions and pieces you will need to create this card:

Shimmery White Cardbase – (2) 5 ½” x 8 ½” scored at 4 ¼”

Shimmery White Cardstock – 4 ¼” x 5 ½” | greetings – 1 ½” x 2” or 1” x 3”

Pool Party Cardstock – (2) 2” x 6”

Coastal Cabana Cardstock – (2) 2” x 6”

Bermuda Bay Cardstock – (2) 2” x 6”

Pale Papaya Cardstock – (2) 2” x 6”

Flirty Flamingo Cardstock – (2) 2” x 6”

Petal Pink Cardstock – (2) 2” x 6”

Pear Pizzazz Cardstock – 2” x 6”

Crumb Cake Cardstock – (2) 3 ½” x 4 ½”

Granny Apple Green Cardstock – scraps for leaves


The products I used are:

Inspired Thoughts Bundle 155529 $45.75

     Includes: Inspired Thoughts Stamp Set 155536 $19.00 & Inspiring Canopy Dies 155963 $32.00

Stitched Rectangles Dies 151820 $35.00

Shimmery White Cardstock 101910 $10.00

Pool Party Cardstock 122924 $8.75

Coastal Cabana Cardstock 131297 $8.75

Bermuda Bay Cardstock 131197 $8.75

Petal Pink Cardstock 146985 $8.75

Flirty Flamingo Cardstock 141416 $8.75

Pale Papaya Cardstock 155668 $8.75

Crumb Cake Cardstock 120953 $8.75

Granny Apple Green Cardstock 146990 $8.75

Pear Pizzazz Cardstock 131201 $8.75

Early Espresso Ink Pad 147114 $7.50

Granny Apple Green Stampin’ Blend Markers 154885 $9.00

Mossy Meadow Stampin’ Blend Markers 154890 $9.00

Pale Papaya Stampin’ Blend Markers 155519 $9.00

Flirty Flamingo Stampin’ Blend Markers 154884 $9.00

Petal Pink Stampin’ Blend Markers 154893 $9.00

Crumb Cake Stampin’ Blend Markers 154882 $9.00

Artistry Blooms Adhesive-Backed Sequins 152477 $7.00

Paper Trimmer 152392 $25.00

Clear Block D 118485 $8.50

Simply Shammy 147042 $8.00

Stampin’ Seal Adhesive 152813 $8.00

Dimensionals 104430 $4.00

Adhesive Sheets 152334 $10.00

Paper Snips 103579 $10.00

Bone Folder 102300 $7.00

Take Your Pick Tool 144107 $10.00

Stamparatus 146276 $49.00

Stampin’ Cut & Emboss Machine 149653 $120.00


1- Begin by nesting the 3 ¾” x 5 1/8” & 2 5/8” x 4” Stitched Rectangle Dies together. Make sure the smaller one is evenly placed inside the larger. Cut the 4 ¼” x 5 ½” Shimmery White Cardstock piece. This will give you the “frame” for the blue card and the smaller white piece for the pink card.


2- Cut each 2” x 6” color strip in half with the curvy “ground” die. I used Pool Party, Coastal Cabana, Bermuda Bay, Petal Pink, Pale Papaya, Flirty Flamingo, Pear Pizzazz.


3- For the Blue Card, you will layer the curved strips on the back of the frame. Start at the bottom with one Pear Pizzazz strip. Then layer all four curvy strips from each color going from dark at the bottom to light. Add them so the curves sit in different places. Trim off the edges so they hide behind the frame. Add it to the front of your cardbase.


4- For the Pink Card, Add the layers to a 4 ¼” x 5 ½” piece of copy paper (lightweight). Begin at the top with the lightest color and move to the darkest at the bottom. Cut out the large 3 ¾” x 5 1/8” Stitched Rectangle Die from the layered pieces. It will be tight as you run it through your machine. If it doesn’t cut all the way through that is okay, you can use your Paper Trimmer or a pair of Paper Snips to remove the thick areas. Add it to the front of the other cardbase.


5- For the Trees, Cut the far-right tree from Crumb Cake Cardstock with Adhesive Sheet on the back. Trim around the tree to remove it from the other branches. Trim off the bottom at the base of the trunk. With the Crumb Cake Blend Markers create a shadow going down the trunk with the dark marker and blend out with the light. You can also add some dark areas along the branches if you want. Repeat for a second tree.


6- To create the leaves, cut out multiples from Shimmery White Cardstock with Adhesive Sheets on the back. To create the green leaves, use Blend Markers. I used light Mossy Meadow and dark Granny Apple Green add areas of color on the die cuts, then blend everything with Light Granny Apple Green. Leave some areas white for highlights and add Dark Mossy Meadow for shadows. You can get darker areas by using different color cardstock like Granny Apple Green.


To create the pink blossoms, use Blend Markers. I used Pale Papaya & Flirty Flamingo and add color to the die cuts, then blend everything with Petal Pink. Use dark or light markers to create shadows or highlights.


7- To finish the Blue Card, add one of the trees so the left branches overlap a little of the frame. Tuck in the trunk to the bottom of the opening, make sure the trunk is straight. Layer the green leaves over the branches. Keep the darker sections near the bottom and lighter areas at the top. Stamp the greeting in Early Espresso ink on Shimmery White Cardstock, cut out with a coordinating Stitched Rectangle Die and add to the right of the tree with dimensionals. Add 5 blue sequins.


8- To finish the Pink Card, add the last Pear Pizzazz curvy strip to the bottom of the 2 5/8” x 4” Shimmery White piece. Run only the Pear Pizzazz area through with the Stitched Rectangle Die using a Partial Die Cutting Technique (see video) to get the stitching on the Pear Pizzazz cardstock. You can add some shadow with the dark Granny Apple Green Marker in the center if you want, blend out with the light marker. 


Add the second tree to the middle. Place the pink blossoms over the branches. Keep the darker sections near the bottom and lighter areas at the top. Stamp the greeting in Early Espresso ink on Shimmery White Cardstock, cut out with a coordinating Stitched Rectangle Die and add to the left of the tree with dimensionals. Add 5 pink/orange sequins.

All Done!


If you would like to watch me create these cards with step by step tips and directions please watch this video:

If you need any product to make these cards, please visit my online store: http://www.stampinup.com?demoid=2042902

Have a creative day,

Chelsey

chelsey@creativechelsey.com

Tuesday, December 28, 2021

Peaceful Place Suite Collection from Stampin' Up - Blending & Coloring Tips & Tricks for Handmade Cards

Hello my crafting friends,

Today I would like to share with you my November Artisan Showcase Projects. I was asked to create two samples using products from the Peaceful Place Suite. The cards I created show how you can create blended backgrounds on both cardstock & designer series paper. Unfortunately, the Peaceful Place products will not be carrying over and will not be available after January 3, 2022. As a result, there may be some products that are no longer available. Even so, I hope you are inspired by these cards.


See my Customer Appreciation Products for this month: http://creativechelsey.blogspot.com/p/shop-stampin-up-products.html

Follow me on Instagram https://www.instagram.com/creativechelsey

Or join my Facebook group https://www.facebook.com/groups/2221750878097906


Be sure to check out the rest of the team’s wonderful creative on the Stampin’ Up! Corporate Facebook Page at -  http://www.facebook.com/stampinup

For more inspiration, tips & tricks from the 2021 Artisan Design Team also check out Stampin’ Up! on Instagram – http://www.instagram.com/stampinup


To purchase any of the products you need to create this project visit https://www.stampinup.com?demoid=2042902

Here are the dimensions and pieces you will need to create this card:

Thick Basic White Cardbase – (2) 5 ½” x 8 ½” scored at 4 ¼”

Basic White Cardstock – (2) 4 1/8” x 5 3/8” | scraps for stamping

Peaceful Place Designer Series Paper – 4” x 5 ¼” (final size 3 3/4" x 5") silver tree pattern | ¾” x 4 ¼” & ½” 4 ¼” strips

Balmy Blue Cardstock – 3” x 5 ½”

Snowy White Velvet Sheets – scraps for die cuts

Evening Evergreen Cardstock – scraps for die cuts


The products I used are:

Peaceful Cabin Stamp Set 156395 $23.00

Cabin Dies 156404 $37.00

Peaceful Place Specialty Designer Series Paper 156394 $15.00

Snowy White Velvet Paper 156405 $5.00

Timber 3D Embossing Folder 156406 $10.00

Subtle Shimmer Sequins 156407 $6.50

Misty Moonlight Ink Pad 153118 $7.50

Balmy Blue Ink Pad 147105 $7.50

Soft Suede Ink Pad 147115 $7.50

VersaMark Ink Pad 102283 $9.50

Memento Black Ink Pad 132708 $6.00

Evening Evergreen Ink Pad 155576 $7.50

Balmy Blue Cardstock 146982 $8.75

Evening Evergreen Cardstock 155574 $8.75

Silver Embossing Powder 155555 $18.00

White Embossing Powder 155554 $18.00

Embossing Buddy

Heat Tool 129053 $30.00

Water Painters 151298 $12.00

Blending Brushes 153611 $12.00

Chalk Markers 132133 $3.50

Die Brush Attachment 149655 $9.00

Wink of Stella 141897 $8.00

Tasteful Label Dies 152886 $31.00

Seasonal Label Dies 156299 $38.00

Paper Trimmer 152392 $25.00

Clear Block D 118485 $8.50

Simply Shammy 147042 $8.00

Stampin’ Seal Adhesive 152813 $8.00

Dimensionals 104430 $4.00

Paper Snips 103579 $10.00

Bone Folder 102300 $7.00

Take Your Pick Tool 144107 $10.00

Stamparatus 146276 $49.00

Stampin’ Cut & Emboss Machine 149653 $120.00


1- Begin by creating your blended background, either on Cardstock or Designer Series Paper. Tip: When using the Blending Brushes start off the paper and then move to the paper & build up color slowly to get a smoother gradient.

Create your blend on the Silver Tree pattern paper with Misty Moonlight ink. Create a top down blend. Wipe off any excess ink that may be sitting on top of the foil with a paper tissue. Cut the DSP down to 3 3/4" x 5".


Create a circular blend on the Balmy Blue Cardstock with Misty Moonlight ink leaving the center untouched.


2- Stamp & die cut the images.

Stamp the tree image in Evening Evergreen ink on Basic White Cardstock make sure you have about 1” of space at the bottom to create a snowy landscape, cut out with coordinating die. To add a little more color to the trees you can blend some of the ink with a Water Painter and a little water. I just tapped it around the trees to randomly add another level of color while leaving some areas untouched.


Stamp the cabin in Memento Black ink of Basic White Cardstock. Keep the image to the top left of the cardstock. Then cut out with coordinating die. Add a little color to the snow with Balmy Blue ink mixed with lots of water to keep the color light, however, keep the water on the cardstock to a minimum to prevent warping. Then use Soft Suede ink to add a little color to the cabin.


To stamp the background begin by adding a lot of Embossing Buddy. Then stamp the tree image in VersaMark across the middle of the cardstock, add silver embossing powder and heat. Next stamp the snowflakes in the sky with VersaMark ink, add white embossing powder and heat. If there are any areas you want more snowflakes you can use the Chalk Marker to add some small dots.


3- Cut out coordinating Die Cuts.

On the Evening Evergreen Cardstock cut out the larger tree die cuts with the inserts. From Snowy White Velvet Paper cut out the skinny whimsical trees. Add a little sparkle with the Wink of Stella.


4- Put it all together.

Emboss the 4 1/8” x 5 3/8” Basic White Cardstock with the Timer Embossing Folder and add it to the front of the cardbase. 


Add the blended background on top in the center.


Next layer the die cut trees over the silver foil trees on the DSP.

Then add the stamped trees layered on top of the die cut trees with the bottom of the snowy landscape touching the bottom of the DSP. Make sure to trim the sides to fit the width of the DSP. You can pop the tops of the trees with dimensionals.


Stamp your greeting in Evening Evergreen on a label from the Tasteful Label Dies. Add it to the middle of the card below the trees with dimensionals. Add the smallest Snowy White Velvet trees around the greeting. Then use the Wink of Stella of add a little sparkle.


Emboss the 4 1/8” x 5 3/8” Basic White Cardstock with the Timer Embossing Folder and add it to the front of the cardbase. Add the blended background on top in the center.


Next add the cabin layer at the bottom of the trees. You can add dimensionals at the top to pop it off of the card. Trim at the sides of the cardbase.


Then add some different size strips from the DSP patterns to cover the bottom area. I used one ¾” and another ½”. 


Add more of the Snowy White Velvet Trees to the sides with Wink of Stella if you want. 


Stamp your greeting in Soft Suede and cut out with a label from the Seasonal Label Dies and add it with dimensionals under the cabin.


Last add some Subtle Sequins with liquid glue on both cards.

All Done!


If you would like to watch me create these cards with step by step tips and directions please watch this video:

If you need any product to make these cards, please visit my online store: http://www.stampinup.com?demoid=2042902

Have a creative day,

Chelsey

chelsey@creativechelsey.com

Friday, December 24, 2021

Sneak Peek at Upcoming Sale-a-bration Products – Amazing Otters - Global Stampin' Video Hop December 2021 - Stampin' Up!

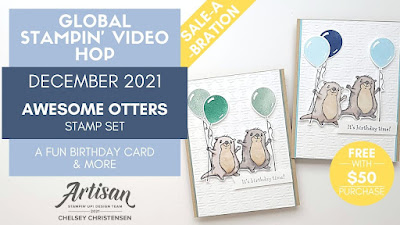
Today is another tutorial for the Global Stampin’ Video Hop on YouTube. Each month on the fourth Friday other Stampin’ Up Demonstrators from around the world come together and share their projects based on a monthly theme. December’s Theme is SALE-A-BRATION. Make sure to check out all the other team members to get a sneak peek at the upcoming Sale-a-bration Products available January 4th 2022. Today I am sharing the a Fun Birthday Card using the Amazing Otters, which is one of the Free products you can get during Sale-a-bration (Jan 4 - Feb. 28th). I hope this card inspires you to create something for someone special today.


Make sure to check out what everyone makes for this monthly Video Hop. You can start with my video, I have linked it below. You can find the next video at the top of the video’s description on YouTube. Have fun!


See my Customer Appreciation Products for this month: http://creativechelsey.blogspot.com/p/shop-stampin-up-products.html

Follow me on Instagram https://www.instagram.com/creativechelsey

Or join my Facebook group https://www.facebook.com/groups/2221750878097906


To purchase any of the products you need to create this project visit https://www.stampinup.com?demoid=2042902

Here are the dimensions and pieces you will need to create this card:

Crumb Cake Cardstock – cardbase 5 ½” x 8 ½” scored at 4 ¼”

Basic White Cardstock – 3 7/8” x 5 ½” | ½” x 2 ½” |scrap paper for stamping

Balmy Blue/Soft Succulent Cardstock – 4” x 5 ½”


The products I used are:

Awesome Otters Stamp Set 158087 FREE with $50 purchase

Penguin Place Stamp Set 156410 $17.00

Crumb Cake Cardstock 120953 $8.75

Soft Succulent Cardstock 155776 $8.75

Balmy Blue Cardstock 146982 $8.75

Basic White Cardstock 159276 $9.75

Memento Black Ink Pad 132708 $6.00

Balmy Blue Ink Pad 147105 $7.50

Night of Navy Ink Pad 147110 $7.50

Soft Succulent Ink Pad 155778 $7.50

Shaded Spruce Ink Pad 147088 $7.50

Crumb Cake Stampin’ Blend Markers 154882 $9.00

Gray Granite Stampin’ Blend Markers 154886 $9.00

Smoky Slate Stampin’ Blend Markers 154904 $9.00

Balloon Bouquet Punch – retired

Banners Pick A Punch 153608 $23.00

Gingham Embossing Folder 157627 $7.50

Paper Trimmer 152392 $25.00

Clear Block D 118485 $8.50

Simply Shammy 147042 $8.00

Stampin’ Seal Adhesive 152813 $8.00

Dimensionals 104430 $4.00

Paper Snips 103579 $10.00

Bone Folder 102300 $7.00

Take Your Pick Tool 144107 $10.00

Stampin’ Cut & Emboss Machine 149653 $120.00


1- Emboss the 3 7/8” x 5 ½” Basic White Cardstock with the Gingham Embossing Folder. Add it to the center of the coordinating cardstock piece. I used Balmy Blue & Soft Succulent. Then place everything in the center of the Crumb Cake cardbase.


2- Stamp two standing otters near the bottom of a large scrap piece of Basic White Cardstock. If you want, you can use the masking technique so they layer one over the other. Do this by stamping the left otter first, layer a mask made from a post-in note over the first image. Then stamp the second one so it slightly overlaps the first. Then remove the mask.


3- Stamp a couple balloon strings from the Penguin Place Set in the otter’s hands.


4- Color the Otters with neutral Stampin’ Blend Markers. I used Crumb Cake in the center, then both Gray Granite shades for the otter on the left, and light Smoky Slate & Dark Gray Granite for the otter on the right. Use the darker colors to add shading.


5- Fussy cut out all the images together and place below middle on the cardbase with dimensionals.


6- Stamp balloons from the Penguin Place Set in coordinating colors. I used Balmy Blue & Night of Navy or Soft Succulent & Shaded Spruce ink. Then punch or fussy cut out. Add them to the top of the balloon strings. Use dimensionals on some.


7- Stamp your greeting on the ½” strip in coordinating ink, Night of Navy/Shaded Spruce. Flag the left side with the Banners Pick A Punch and adhere with dimensionals under the otters.

All Done.


Here is the link to my Global Stampin’ Video - Make sure to check out everyone’s projects by clicking on the next video link at the top of the description on YouTube.


To purchase any of the products you see in this video visit https://www.stampinup.com?demoid=2042902

Have a creative day!

Chelsey

chelsey@creativechelsey.com